.png "Powered by vBulletin")
I've seen several threads lately that mention, and pictorially exemplify, polished engine covers and other bare metal. Cafekid did a good job, along with several others, but is anyone planning on making a tutorial on it? Seems like there would be a use for details as to chemicals, papers, Abralon pads, buffers, pastes, etc. used to bring out the shine. How bout it guys?
-
-
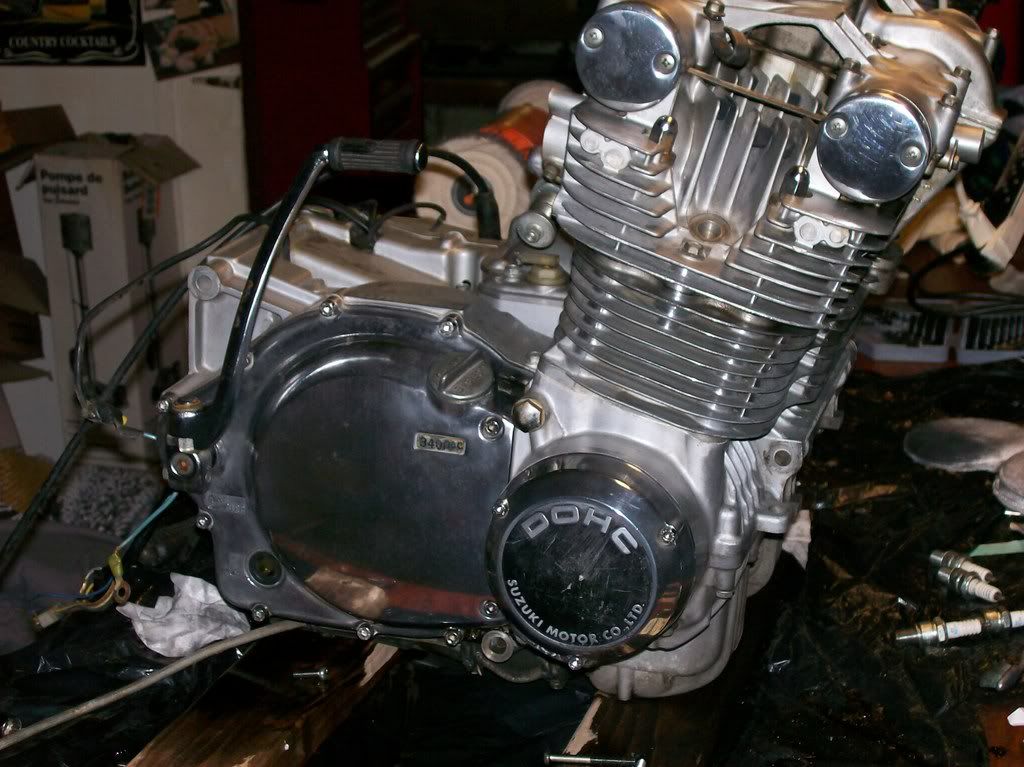
I used a cotton wheel on the bench grinder, along with polishing compound I found at Lowe's.
First, you have to be sure that any old clear coat is removed. I have heard of several methods to do that, but it was already gone off of my parts. The polishing compounds at Lowe's come in several levels of abrasion/polish. There is a tube of white stuff that is Mibro brand, labeled #5, light polishing. There is also a green tube, #6 for high-gloss polishing, but I did not get very good results with that, so I just use the #5. Hold the polish against the wheel to smear some on the edge, then hold the part against the wheel with moderate pressure and always keep the part moving. Go back over the polished area, using a different direction, if possible. When it is polished to your satisfaction, touch up the details with Mother's Aluminum Polish and a clean rag. The results are worth it.
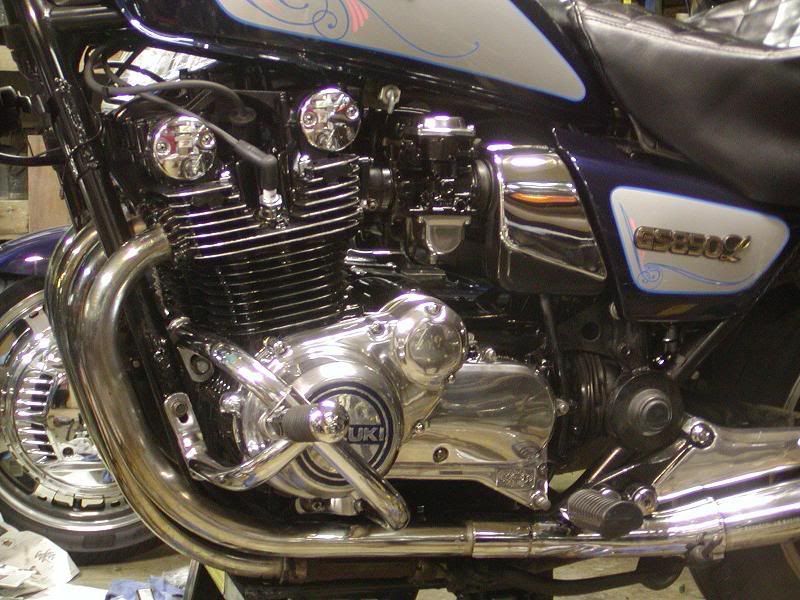
Polished parts on her 850L include fork tubes, stator cover, shifter cover, "points" cover, clutch cover, carb diaphragm covers and float bowls, and rear footpeg mounts.

.sigpic
mine: 2000 Honda GoldWing GL1500SE and 1980 GS850G'K' "Junior"
hers: 1982 GS850GL - "Angel" and 1969 Suzuki T250 Scrambler
#1 son: 1986 Yamaha Venture Royale 1300 and 1982 GS650GL "Rat Bagger"
#2 son: 1980 GS1000G
Family Portrait
Siblings and Spouses
Mom's first ride
Want a copy of my valve adjust spreadsheet for your 2-valve per cylinder engine? Send me an e-mail request (not a PM)
(Click on my username in the upper-left corner for e-mail info.) -
Steve...tell the wife she's got a GREAT looking bike there. I'll be heading in that direction this spring when time permits and am looking forward to the results as well. My first practice piece was the valve cover/head on 200x three wheeler and also had great results. The Mother's polish does wonders to shine things up when done with the wheel. Also, though I've yet to apply it, there is another product that's supposed to have a 10 year warranty on the polished finish...I remember buying it, looking forward to using it, but can't find it!
Comment
-
I saw a pro do it at one of the bike shows and bought a starter kit which had several cotton wheels on arbors and some shaped bobs(cotton pads in different shapes also on arbors) along with 3 compound sticks, course (black) , medium (brown) , fine (red) and ultrafine (white).
After the fact I found that our Princess Auto stores carry these supplies so I now get them there. I think Harbour Freight would have the same stuff.
The pros recommend using a benchmount system as mentioned as it offers a bit more power than the drill or die grinder. I started using a 3/8 drill and Dremel tool for tight spots with the parts still on the bike. They work well enough but the power of say a bench mount grinder would speed up the process. For some fiddly bits like the inside of a fork leg, taking off the part will make things easier.
From my experience, start by removing any clear coat use paint remover or progressive wet and dry paper from 600 grit upward. It is important to sand out any scratches with the finer paper before going to compounds or you'll see them in the finish.
Using a seperate wheel for each colour compound start with course and work on through to fine. The shine will get clearer and deeper with each step. Finish up with a good paste wax or metal polish like Autosol or Meguiars.
I don't re clearcoat my metals and just polish up a time or two during the season. If they get any blemishes pull out the buffer and go over them again. Once they are done I find them easy to keep shiny.
While I like shiny on old bikes I don't think it suits newer sportbikes so with the GS I'm going with the blacked out look. I painted the cases and am thinking about doing the rear peg struts as well.
Hope this helps a bit. If I had the time I'd do some pics but way busy right now sorry.
Cheers all.
Spyug.Last edited by Guest; 01-15-2008, 04:47 PM.Comment
-
On her behalf...THANKS. 8-[Originally posted by Dave8338 View Post
After we bought the bike from a friend and worked out the mechanical and electrical gremlins, she got a bonus at work and wanted (rightfully so) to spend it on herself. She chose to get the bike painted. It was the black and gray scheme, which would not have been so bad, but it looked like a blind person had been filling the tank. I have never seen so many chips in the paint, within about 2 inches of the filler neck. :shock: Both side covers had the gray portion repainted by hand in battleship gray. One of them also had broken tabs, but I was able to find a replacement on eBay. The trunk is a vintage Wixom trunk from late '70s/early '80s and complements the lines nicely. We will be getting some different saddlebags that are a bit larger and easier to open, but other than that, it's sitting the way she wants it.
Besides the obvious Saddlemen seat and Plexifairing windshield for comfort, she has a J&M CB radio for keeping in touch with the group. For other entertainment, there is also a choice of XM satellite radio or iPod that will connect to the AUX input on the CB, and she can hear that in her helmet, as well. A Vista-Cruise throttle lock relieves the right hand for now, but an electronic cruise control is in the works.
Over the last 3 riding seasons, she has put on about 14,000 miles in 20 states. \\ /
/
.sigpic
mine: 2000 Honda GoldWing GL1500SE and 1980 GS850G'K' "Junior"
hers: 1982 GS850GL - "Angel" and 1969 Suzuki T250 Scrambler
#1 son: 1986 Yamaha Venture Royale 1300 and 1982 GS650GL "Rat Bagger"
#2 son: 1980 GS1000G
Family Portrait
Siblings and Spouses
Mom's first ride
Want a copy of my valve adjust spreadsheet for your 2-valve per cylinder engine? Send me an e-mail request (not a PM)
(Click on my username in the upper-left corner for e-mail info.)Comment
-
I've had some excellent results with steelwool coarse grade for removing clearcoat. Then followed that with medium, and then extra fine, both with any cheap metal/ chrome polish. Mothers gold aluminum polish to finish the piece off is a must. Most everything is hand rubbed. Although my arm gets dead tired, the results are very nice.
I have a dremel which I mainly use to remove rust, or any crud build up. For polishing anything other than an occasional hard to reach spot, it stinks. I actually went to Home Depot after polishing some parts on Saturday (with my dead tired arm), to get a bench grinder OF WHICH THEY HAD NONE :shock:. Think I'll get one though, one of these days!
By the way, I like these forums. It's Good to know there are places on-line to go and get it out of my system! Wish I thought to look for one earlier.Comment
-
Cool! I was wondering about the diaphragm covers and float bowls on my own bike. I guess the carb bodies would be crazy to polish - looks like you painted them?Originally posted by Steve View Post
So it looks like you can polish anything aluminum and with enough flat surface for a buffing wheel? Come on - someone come back with a pic of your hand-polished carb bodies. :-D
Nice Job, Steve!Comment
-
Heh. I wouldnt attempt polishing those for all the tea in China. Im just not that patient. My sordid attempt at the case covers and whatnot involved a high speed benchmount buffer, and a can of Mothers alu polish. I couldnt find the rouges that Steve obviously found at Lowes. And my Harbor Freight didnt carry them. So i tried that. Works OK...not perfect by any means, but they look a damn sight better than they did.
Comment
-
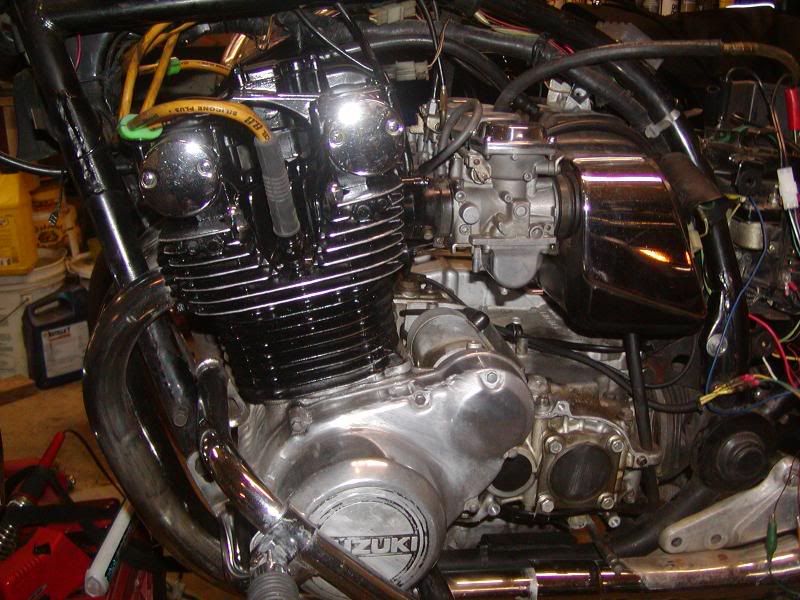
Al and I (well, mostly Al) polished the covers on my GS850 last spring using cotton wheels on a repurposed bench grinder. It took him about two hours of off and on experimentation to do the clutch, stator, ignition, and final drive covers. They started out as nasty as you can possibly imagine, and ended up with a mirror finish.
He started with the red compound, which we found quickly got rid of the horrible corrosion and any remaining clear coat. We didn't bother to strip the clear coat or using sandpaper -- the clear and corrosion came off very quickly with the red compound, although there were fragments of the clear coat down in the bolt holes where it didn't matter much.
He then went to the white compound on another wheel (sewn cotton) for the polishing. We experimented with a loose cotton wheel after that, but couldn't tell any difference.
The compound was part of a kit from Harbor freight -- you got a couple of large bars of compound along with some useless small buffs for $5. HF also had a nice selection of cotton buffs, although I had to drill out bushings to the correct diameter for my oddball grinder.
The compound was pretty much rock-hard (I don't know if it's supposed to be that way) so we ended up heating one end of the compound bar with a heat gun to get it soft enough for the cotton wheel to pick up. The compound worked well, though.
Since then, I've only waxed them a couple of times, but they still look great! I need to find new badges or re-paint the old ones (the black paint in the badges gets removed along with everything else).
When I replaced the seals in the forks last fall, I used paint stripper and water to remove the old clearcoat, then gave the fork legs the same treatment. I stopped short of a mirror finish, though -- I just wanted a satin finish that mimicked OEM.
Looks a bit nicer than it did a couple of years ago, methinks...
 1983 GS850G, Cosmos Blue.
2005 KLR685, Aztec Pink - Turd II.3, the ReReReTurdening
2015 Yamaha FJ-09, Magma Red Power Corrupts...
Eat more venison.
Please provide details. The GSR Hive Mind is nearly omniscient, but not yet clairvoyant.
Celeriter equita, converteque saepe.
SUPPORT THIS SITE! DONATE TODAY!
Co-host of "The Riding Obsession" sport-touring motorcycling podcast at tro.bike!Comment
-
Looks like this is turning into a "show us your shiny stuff" thread! \\/
Anyway, wouldn't polishing the (mostly) zinc carb bodies be a bad idea?
That stuff's so porous and soft, I wouldn't know how to begin. I'm sure someone has done it, though.
Some '83 bikes had black painted carbs -- I'm pretty sure the 1100E and 750E did. However, I've never seen a speck of paint on my '83 850G carbs.
Did the wife's bike above come with black carbs, or did you paint them?1983 GS850G, Cosmos Blue.
2005 KLR685, Aztec Pink - Turd II.3, the ReReReTurdening
2015 Yamaha FJ-09, Magma Red Power Corrupts...
Eat more venison.
Please provide details. The GSR Hive Mind is nearly omniscient, but not yet clairvoyant.
Celeriter equita, converteque saepe.
SUPPORT THIS SITE! DONATE TODAY!
Co-host of "The Riding Obsession" sport-touring motorcycling podcast at tro.bike!Comment
-
Yeah, I thought about polishing the carb bodies for...oh...about half a second or so. I even got the gazillion-piece polishing kit for my Dremel, but then reality grabbed me and shook me to my senses. Yes, I painted the carbs with the same engine black paint that went on the engine. Because the carbs don't leak, it has held up rather well, too.Originally posted by Roostabunny View Post
Just to show that the right side is not a fluke, here are before and after pictures of the left side.
In the before shot, I was playing with the black paint on the engine to see how it would look.
It's a little hard to get a good picture of SHINE, but here are before and after pics of the fork leg:
.sigpic
mine: 2000 Honda GoldWing GL1500SE and 1980 GS850G'K' "Junior"
hers: 1982 GS850GL - "Angel" and 1969 Suzuki T250 Scrambler
#1 son: 1986 Yamaha Venture Royale 1300 and 1982 GS650GL "Rat Bagger"
#2 son: 1980 GS1000G
Family Portrait
Siblings and Spouses
Mom's first ride
Want a copy of my valve adjust spreadsheet for your 2-valve per cylinder engine? Send me an e-mail request (not a PM)
(Click on my username in the upper-left corner for e-mail info.)Comment
-
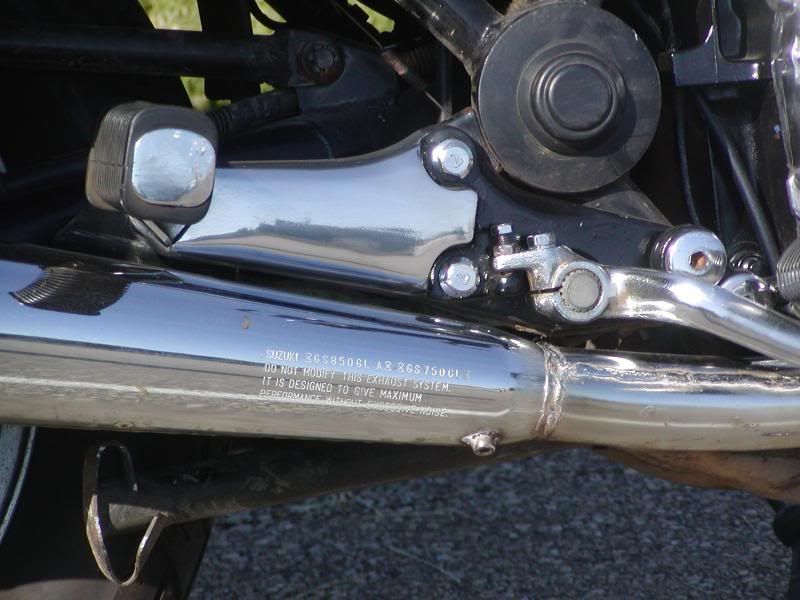
And here is a detail shot of the rear footpeg/muffler mount. I only polished the easy part and painted the rest black.
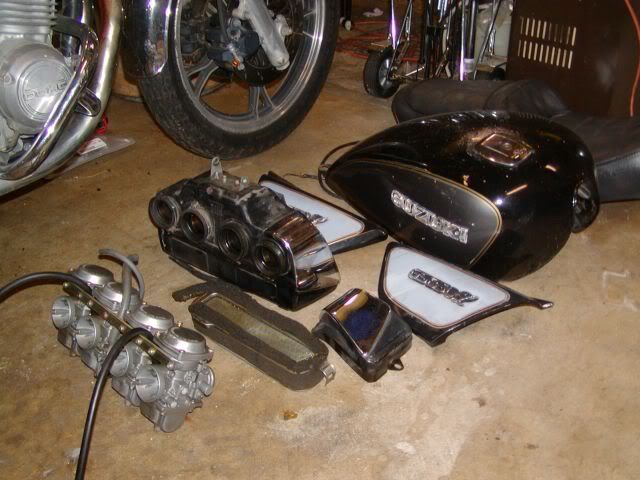
Here is a shot before paint and polish, showing the hand-painted side panels.
Oh, Brian, you don't have to get new badges after polishing your covers. Just paint them in the color of your choice.
.Last edited by Steve; 01-15-2008, 08:46 PM.sigpic
mine: 2000 Honda GoldWing GL1500SE and 1980 GS850G'K' "Junior"
hers: 1982 GS850GL - "Angel" and 1969 Suzuki T250 Scrambler
#1 son: 1986 Yamaha Venture Royale 1300 and 1982 GS650GL "Rat Bagger"
#2 son: 1980 GS1000G
Family Portrait
Siblings and Spouses
Mom's first ride
Want a copy of my valve adjust spreadsheet for your 2-valve per cylinder engine? Send me an e-mail request (not a PM)
(Click on my username in the upper-left corner for e-mail info.)Comment
-
A bit off subject, but i totally spaced grabbing that tail lamp this morning, so's it made no sense to call ya. We'll try it again tomorrow. Secondly I think i recal you saying you painted that motor IN FRAME. Let me say still how impressed i am by that, and ask you how you went about masking that off, as im considering doing the same to my top end.
Comment
-
Hey, while grabbing the light, don't forget the other parts you want polished.
Maybe we can take some pictures and get Paulyboy his tutorial. 8-[sigpic
mine: 2000 Honda GoldWing GL1500SE and 1980 GS850G'K' "Junior"
hers: 1982 GS850GL - "Angel" and 1969 Suzuki T250 Scrambler
#1 son: 1986 Yamaha Venture Royale 1300 and 1982 GS650GL "Rat Bagger"
#2 son: 1980 GS1000G
Family Portrait
Siblings and Spouses
Mom's first ride
Want a copy of my valve adjust spreadsheet for your 2-valve per cylinder engine? Send me an e-mail request (not a PM)
(Click on my username in the upper-left corner for e-mail info.)Comment
-
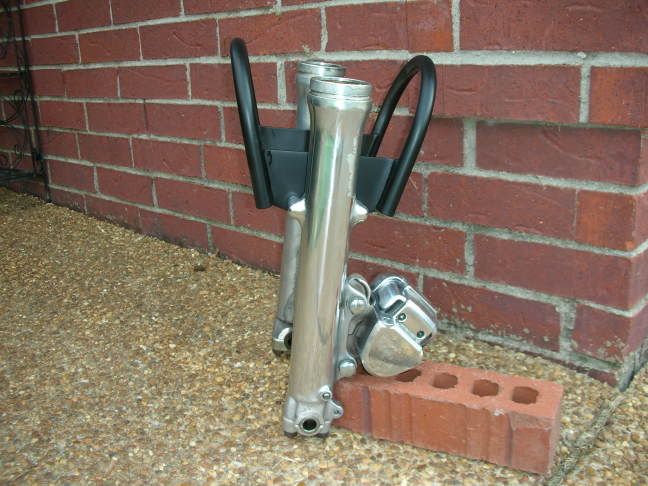
A brief warning: Polishing is addictive.
Once you start, EVERYTHING will end up polished.
I usually start with a grey 3m scotchbrite pad to cut the clear and work up from there. Usually 800, 1200 grit. (wet sanding is way faster) Then hit it with the buffing wheel/polishing rouge. I use the sewn wheels for larger parts. The loose wheels work well for getting in the corners.
The surface on cast parts is never completely level. So the 800/1200 will keep the end result from looking "wavy"
You can get away use the buffing wheel and rouge only, but in the long run, it takes longer.
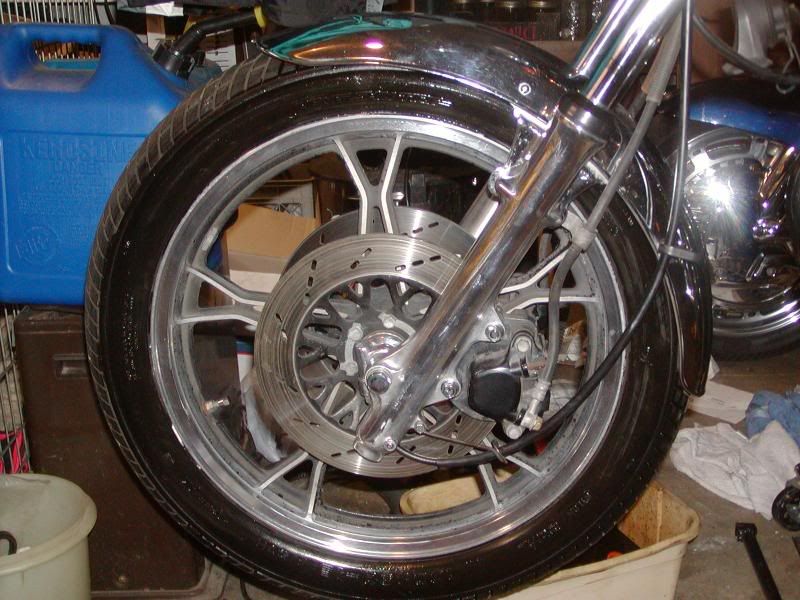
This set of forks came off a bike that sat outside since 1987
 Last edited by Guest; 01-16-2008, 12:04 AM.
Comment
Comment