Announcement

Collapse
No announcement yet.

Removing Left Side Case Cover

Collapse
X
 
  • Filter
  • Time
  • Show
Clear All
new posts

    Removing Left Side Case Cover

    What's the trick to getting the LH case cover off? Any hidden bolts I missed?

    It's slowly coming off after banging on it a hundred times with a rubber mallet but one side still feels tight and I really don't want to break it.

    Tips n Tricks appreciated.
    Last edited by Guest; 11-20-2006, 11:25 PM.

    #2
    bigger hammer!

    Comment


      #3
      Originally posted by focus frenzy View Post
      bigger hammer!
      Yeah, you knew where I was going with that alright.

      Seriously, I want to take that case off for polishing but there's wires connected. What's the best way? Is there a connector somewhere inline that will allow me to remove that cover?

      Thanks.

      Comment


        #4
        the wires from the stator (stock) pass through a opening into and under the starter and route up to close to the R&R.
        stock it has bullet connectors, but most people eliminate the connectors to insure a reliable charging system as the bullet connectors suck.

        Comment


          #5
          Originally posted by Pearson View Post
          Yeah, you knew where I was going with that alright.

          Seriously, I want to take that case off for polishing but there's wires connected. What's the best way? Is there a connector somewhere inline that will allow me to remove that cover?

          Thanks.
          Part of your situation is the stator is a giant magnet helping to hold that cover in place, there is also 1 or 2 alignment tubes that sometimes get tough to remove case as it corrodes and ages, so keep at it it will come off and resist using a screw driver to pry it off, and the wires, they snake under the starter cover (remove cover) and end at connectors at the back of the motor under the left side cover, and last of all put a new gasket on when your done,good luck

          Comment


            #6
            Originally posted by Jackrp View Post
            Part of your situation is the stator is a giant magnet helping to hold that cover in place, there is also 1 or 2 alignment tubes that sometimes get tough to remove case as it corrodes and ages, so keep at it it will come off and resist using a screw driver to pry it off, and the wires, they snake under the starter cover (remove cover) and end at connectors at the back of the motor under the left side cover, and last of all put a new gasket on when your done,good luck
            I did get the case off, noting the corrosion on those tubes like you mentioned. Then after a half hour of mostly getting frustrated and stripping the heads off phillips screws inside the cover, I'm going to have to trace the wire back under the starter motor. I can't get a good shot at them with my impact driver and neither yelling nor cussing like a sailor at those screws seemed to help loosen them one bit.

            Comment


              #7
              Originally posted by focus frenzy View Post
              the wires from the stator (stock) pass through a opening into and under the starter and route up to close to the R&R.
              stock it has bullet connectors, but most people eliminate the connectors to insure a reliable charging system as the bullet connectors suck.
              Hey, you're an old timer...help a newbie out here. Those wires do end in bullet connectors just like you say. I can't pull them thru and behind that clutch adjustment case. They won't budge. How do I get that case off?

              This simple project of buffing out the alternator cover is turning into a bit of a nightmare. I feel like I'm going 4 steps backwards. Arrgh. #-o

              Comment


                #8
                will have to look at a 750 as it is differant from it's bigger brothers (and sisters) but one at a time helps and removing the other covers in the way.

                Comment


                  #9
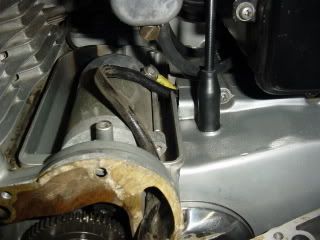
                  Here's a pic of the stator area showing the wires leading out and into the starter motor, then exiting at the yellow lug and behind the LH case. The shiny cover at the bottom of the pic is shown removed next.


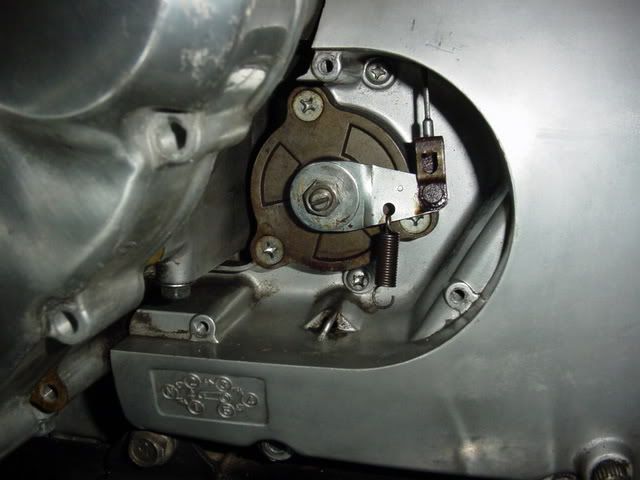
                  Here the shiny cover is removed revealing the clutch adjustment hardware. In order to get to my stator wires, all this must come off, but is there anything I need to watch for or is pulling this all apart straight forward? I'm not going to throw my clutch out of adjustment or anything, right?

                  Comment


                    #10
                    Originally posted by Pearson View Post
                    What's the trick to getting the LH case cover off? Any hidden bolts I missed?

                    It's slowly coming off after banging on it a hundred times with a rubber mallet but one side still feels tight and I really don't want to break it.

                    Tips n Tricks appreciated.

                    If I remember right there is two alignment dowels. These dowels can get a burr, or corrosion on them making they a BITC# to remove. I tape up 2 wide screwdriver blades with electrical tape, and gently pry te cover off evenly.

                    Comment


                      #11
                      Originally posted by Road_Clam View Post
                      If I remember right there is two alignment dowels. These dowels can get a burr, or corrosion on them making they a BITC# to remove. I tape up 2 wide screwdriver blades with electrical tape, and gently pry te cover off evenly.
                      Earlier I did get the stator cover off and I'm past that. Now I have to get to the stator wires that run behind the clutch adjuster case. I'll be tackling this in the next day or two and just wanted to see if there's anything I need to be aware of such as pulling a shaft out or misaligning anything. This is my first time playing mechanic and just need a little help with the gray areas my manuals don't cover very well.

                      Well thanks to everyone looking and helping, I'm just gonna dive in and pray.

                      Comment


                        #12
                        Good pics...

                        No advice to add, I'm still trying to get the side cover off. Finally got my Clymer manual so I know more now than I did. Planning to replace the stator, reg/rect...but the ultimate goal is to get into the starter to see why she won't crank. Suspision is the starter brushes but haven't gotten the starter cover off yet either (need to borrow metric box wrench from the neighbors to reach the screw near holding the right side of it on).

                        I've wacked and pulled that cover now and again for weeks, but not diligently. Mine's a 650 but looks very similar to yours...infact I think my gas tank is off a 750 'cause its got the same paint scheme as your bike.

                        Good luck! And do keep posting updates as you progress..the color pics are nicer than the b/w in the manual!

                        Comment


                          #13
                          one more thing...

                          in taking out the bolts for my side cover I noted (after the fact) that there seems to be 3 different length bolts. I believe the longest one goes in the front most hole, anyone know where the others go??

                          Comment


                            #14
                            Originally posted by jbs80106 View Post
                            I've wacked and pulled that cover now and again for weeks, but not diligently. Mine's a 650 but looks very similar to yours...infact I think my gas tank is off a 750 'cause its got the same paint scheme as your bike.
                            I'm almost positive my LH cover hasn't been off the bike in almost 30 yrs. My advice is to get a rubber or leather mallet and/or regular hammer with a wood block. Keep tapping it around in circles, apply a little heat from say a heat gun, plenty of penetrating oil too. I first noticed it giving way towards the rear of the case and carefully worked a 5in1 tool in there and gently worked my way towards the front of the bike, knowing I was sacrificing yet another gasket. That final screw at the 10o'clock position seemed to have alot of magnetic force (or corrosion) behind it. Get a good grip and gently keep rocking it back and forth, up and down, pulling the whole time. Once you've got the mating surfaces apart, pull it firmly straight off to break that magnet free. It's a strong one.

                            The case screws should become obvious as you put it back together. You are ordering new stainless from ebay with a tube of antisieze...right?:-D

                            Comment


                              #15
                              After-fact advice


                              A rough drawing of the cover on a cereal box or a piece of cardboard can avoid bolt problems. Punch holes along the diagram and insert the bolt in the respective hole as it is removed.

                              This works on many other repairs, as you do not know what is coming out until it is removed.


                              I have tapped, slapped, and even pried these covers at different times.

                              Prying is NOT recommended, as any slip will cause damage.

                              It is possible that a previous owner used a glue of some sort, and that can make things difficult. After all else failed on one bike, I had to use a knife to cut through the stuff .

                              Be patient....it will come off.
                              Bertrand Russell: 'Men are born ignorant, not stupid. They are made stupid by education.'

                              Comment

                              Working...
                              X