Announcement
Collapse
No announcement yet.
Got my Dynojet kit in the mail today, W/ no instructions! Help!
Collapse
X
-
 Mpenner
Got my Dynojet kit in the mail today, W/ no instructions! Help!
Hey guys and gals, I have a 81 GS650E that i ordered a Dynojet stage 3 kit for from Z1. I open up the package and it has no instructions or recomendations. I am hoping someone with a gs650 can give me a lil help!! What notch on the needle is your clip? how many turns out on the mixture screw? or even if you have the instructions and can scan them and email them to me it would be awesome!Tags: None
-
 TheCafeKid
What sort of set up are you running?? Tell me that and I can tell you what you need to do..
Pods or stock airbox?
Stock pipes or header??
-
 gixerbike1
Gs650e
Okay,
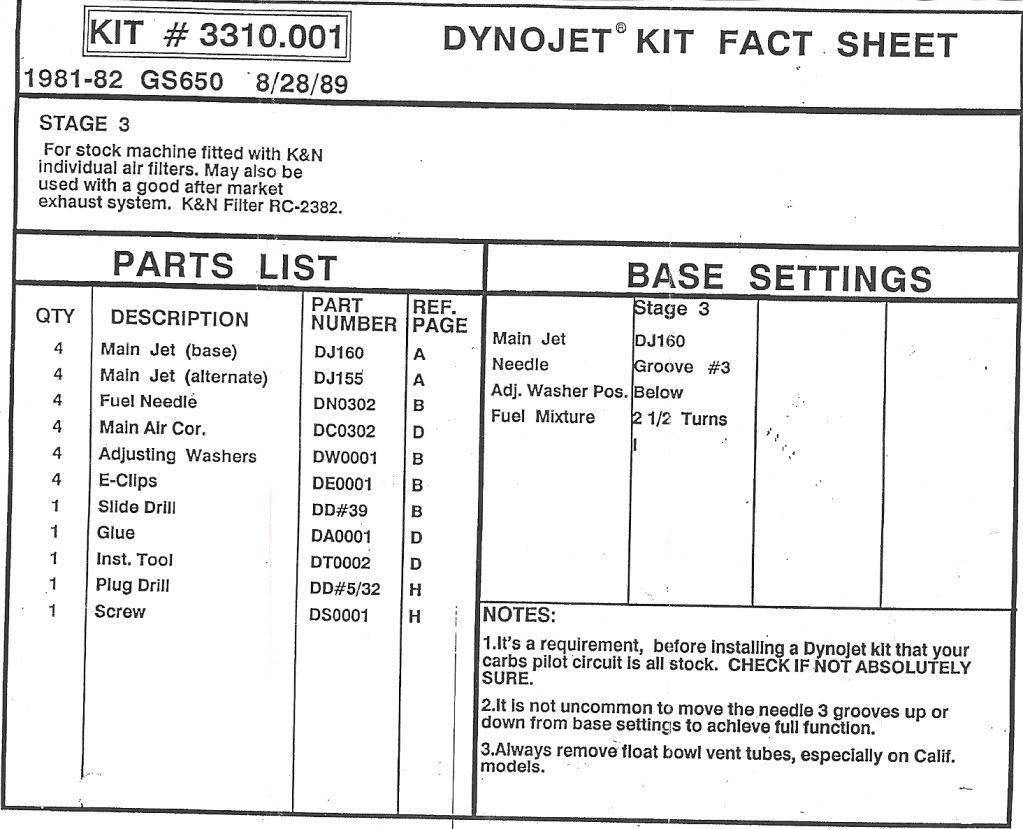
You should have 2 drill bits, one small one and one big one, 4 needles with (4) "E" clips, 4 shim washers, (4) 155 main jets (4) 160 main jets, (4) air adjuster plugs with the tool to insert them and a small bottle of super Glue to keep them in place.
You will need to remove the tops of the carbs to get to the slide so you can drill the slide. This is where the small drill bit comes in.
You will also need to remove the float bowls so you can get to the main jet for replacement.
While you have them pulled down make sure EVERYTHING inside is CLEAN and the float height is absolutely correct!!
My instructions were sparse and i still have them and can post a pic of them once i get home,
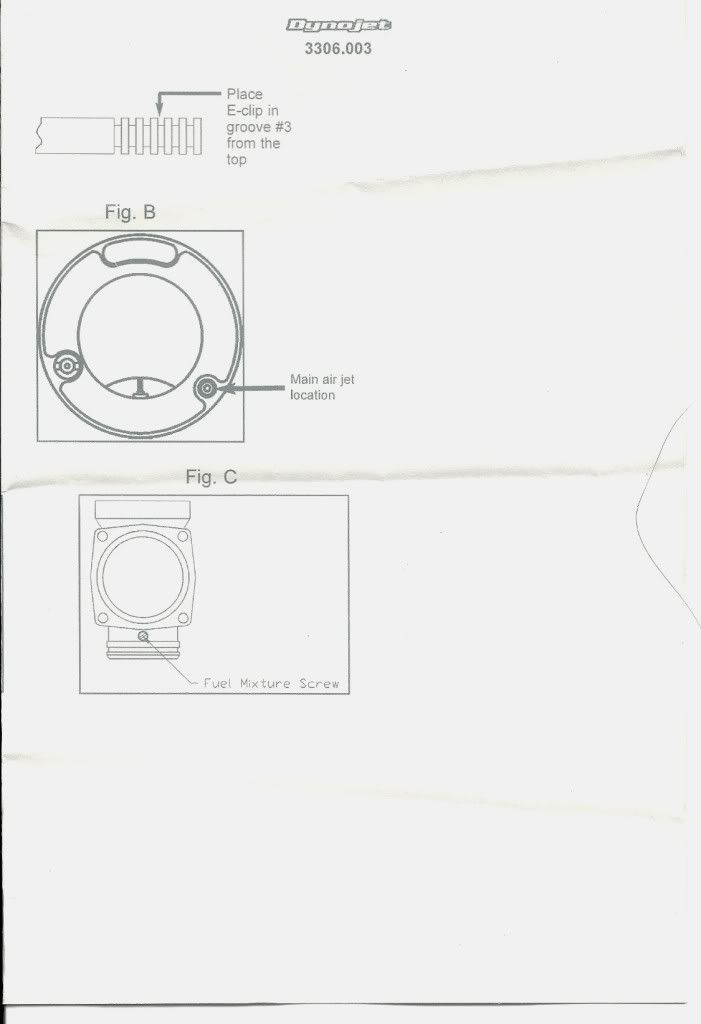
however mine instructed me to set the needle clips on pos. #3, replace the main jets with the 160's (since i had a full system and pod filters)
You may need to go with the 155's. Depends on your setup like CafeKid asked.
Use the larger drill bit to carefully drill out the cap that covers the idle air screws, they do mean CAREFULLY because if you go too far you can ruin the air screw.
Once the cap is removed from all 4, you want to turn the air screws all the way in until they are LIGHTLY seated and then back them out 2.5 turns from the lightly seated position.
Then you will need to insert the air correcting plugs into the front side of each carb, as you are looking at the large opening side (filter side) it's the hole on the right side of each carb.
One you've done all of that you have a good starting point. I'll still take a pic of what i have and post it just in case.
Let us know what you have as far as filters/airbox and exhaust.
Tommy
Comment
-
 Mpenner
Hey Guys sorry for not giving enough info. The bike has the full stock exhaust system and Pod filters. The P.O. removed and discarded the stock air box and stuff and put on pods but never rejetted or anything. The Dynojet website didn't even have a copy of the instructions!
Also Where did you put the shim washers and what of the stock slide parts did you reuse?Last edited by Guest; 04-07-2010, 07:39 PM.
Comment
-
Originally posted by Mpenner View PostI open up the package and it has no instructions or recomendations. !
Thread drift, kinda..
This is the second time I've heard of this in the past couple of mos.
Dosn't anyone else find this odd?sigpic
82 GS850
78 GS1000
04 HD Fatboy
...............................____
.................________-|___\____
..;.;;.:;:;.,;.|__(O)___|____/_(O)|
Comment
-
 Mpenner
looking at the instructions for a gs700 it says to reuse all the stock jet needle spacers, Am I to reuse the plastic washer/spacer thing? Also where am I to put the washer included in Dynojet kit? It says to put it on top of the e-clip but in the picture it is below the e-clip..... This sucks and would really really appreciate some help!
Comment
-
 gixerbike1
 -
 Mpenner
 -
 gixerbike1
 -
 Demonthrall
****Thread Hijack****
The same thing happened to me as my Dynajet stage III kit arrived today with no instructions as well. Its a 1982 GS550MZ kit for my "L" bike.
The instruction Gixxer loaded look like they would work on mine. Would I want to start on the 3rd or 4th needle gap though?
thanks in advanced, sorry to hijack. dissapointed that there was no instructions from Z1!!
Comment
.png)


Comment