• Required reading for all forum users!!!

    Welcome!
    Register to access the full functionality of the GSResources forum. Until you register and activate your account you will not have full forum access, nor will you be able to post or reply to messages.

    A note to new registrants...
    All new forum registrations must be activated via email before you have full access to the forum.

    A Special Note about Email accounts!
    DO NOT SIGN UP USING hotmail, outlook, gmx, sbcglobal, att, bellsouth or email.com. They delete our forum signup emails.

    A note to old forum members...
    I receive numerous requests from people who can no longer log in because their accounts were deleted. As mentioned in the forum FAQ, user accounts are deleted if you haven't logged in for the past 6 months. If you can't log in, then create a new forum account. If you don't get an error message, then check your email account for an activation message. If you get a message stating that the email address is already in use, then your account still exists so follow the instructions in the forum FAQ for resetting your password.

    Have you forgotten your password or have a new email address? Then read the forum FAQ for details on how to reset it.

    Any email requests for "can't log in anymore" problems or "lost my password" problems will be deleted. Read the forum FAQ and follow the instructions there - that's what we have one for...

  • Returning Visitors

    If you are a returning visitor who never received your confirmation email, then odds are your email provider is blockinig emails from our server. The only thing that can be done to get around this is you will have to try creating another forum account using an email address from another domain.

    If you are a returning visitor to the forum and can't log in using your old forum name and password but used to be able to then chances are your account is deleted. Purges of the databases are done regularly. You will have to create a new forum account and you should be all set.

Piston Ring Spacing

  • Thread starter Thread starter Havoc1231
  • Start date Start date
I separate them 80 degrees apart.
I do not put any oil on the pistons or rings. You want them dry to get the rings to seat. I do use oil in the wrist pins.
Make sure you have a good cylinder hone, pistons are facing the right direction and you set the ring gap.
 
Ive got the piston's facing the right way, cylinders have been honed and the ring gaps are all set as I have them in the picture. I have the two rings above and below the oil ring with the gaps together facing forward, then I have the two rings above that about 45 degrees either right and left of the bottom two rings (about 90 degrees from each other. I'll be using zip ties to compress the rings. Do they just slide off after insertion so I can cut them off?
 
Huh?

Huh?

I ALWAYS lightly oil the cylinder and rings at installation. Unless you like grinding off a few thousand miles worth of ring seal area at start up.:eek:
 
Bill is right Maddevil. The rings will seat almost instantly if they go in dry. Just oil the pins & put it together. Oiling the rings can lead to glazing the cylindes on fire up if done wrong. Ray.
 
How did I do on the piston ring spacing?
According to the factory manual for my 850 (and I would imagine that all GSes would be similar), you messed up. :eek:

RingGaps_zpsd22a0415.jpg


.
 
This is exactly why I asked before I installed the cylinders. I've looked at that diagram so many times, but it doesn't clearly mark where the gaps go. I can see that is has the gaps on the two top rings set about 90 degrees apart with the two oil rings in between them...right? Or is it the two oil rings facing forward and then the top two rings at 135 degrees on either side of it (making a Y shape)? Or are the two oil rings supposed to be 180 degrees apart from one another? That diagram sucks, I'm sorry but it just does. Each piston has four rings, not three and each one has a gap.
 
Maybe I've finally stared long enough, tell me if this is right...
Oil ring gap (which I didn't really see when looking at the piston) at 1200 (exhaust side), oil ring side rails at 1000 and 0200 (45 degrees from 1200), top ring at 0700 and 2nd ring at 0500 (45 degrees from 0600)...right?
 
This is exactly why I asked before I installed the cylinders. I've looked at that diagram so many times, but it doesn't clearly mark where the gaps go. I can see that is has the gaps on the two top rings set about 90 degrees apart with the two oil rings in between them...right? Or is it the two oil rings facing forward and then the top two rings at 135 degrees on either side of it (making a Y shape)? Or are the two oil rings supposed to be 180 degrees apart from one another? That diagram sucks, I'm sorry but it just does. Each piston has four rings, not three and each one has a gap.
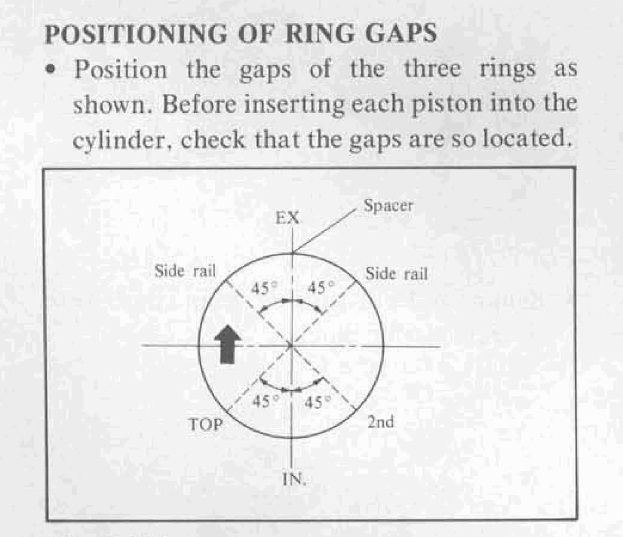
Well, apparetnly you have "seen the light", based on your next post, but the picture really is rather clear.

The "top" ring (in the lower left corner) is the ring that is closest to the top of the piston.
The "2nd" ring (in the lower right corner) is the next ring down.
The "side rails" are the two skinny rings on the sides of the oil spreader. Together those three pieces comprise the "oil ring". The gaps for those rings are shown in the two upper corners.


Maybe I've finally stared long enough, tell me if this is right...
Oil ring gap (which I didn't really see when looking at the piston) at 1200 (exhaust side), oil ring side rails at 1000 and 0200 (45 degrees from 1200), top ring at 0700 and 2nd ring at 0500 (45 degrees from 0600)...right?
The "oil ring gap" is not visible in the picture you posted. If you look carefully at the wavy spreader in the center, you will find one spot that has a difference in the wave. Look at it real close, you will be able to see where the two ends come together. That is the "oil ring gap".

.
 
I just kept staring at it and I heard bells and harps and revving engines...after checking with my co-worker to confirm I wasn't having a stroke I realized I had cracked the code.

Once again thanks for holding my hand through the process. Just have to buy some hose clamps, install the cylinders, install the head, check the valve clearances....and I'll have the engine almost mostly reassembled.
 
Why do you need hose clamps? Is your radiator leaking?

The bottoms of the cylinders are tapered. If you block the center cylinders so they can't go down, then start with them, you can finesse the cylinders over the rings, just using your fingertips. After #2&3 are in place, remove the blocks and do 1&4. Once they are all in place, put the head (and gasket) on and bolt it all down.

.
 
The "wavy" oil ring is referred to as the "spacer" in the diagram. One other thing that I don't think was mentioned - make sure that the ends of the oil ring / spacer don't overlap. Sometimes when you are moving all the ring end gaps into their proper position the oil ring / spacer can inadvertently become overlapped instead of butted up end to end. If you accidentally put it in that way the oil ring / spacer won't have any tension on the cylinder wall to control the oil. Once you get all the gaps properly lined up give the oil ring / spacer one last check before you put the ring clamp on it.
 
The rings rotate with use, so their exact position during assembly isn't overly important. The position of the rings in the photo look fine to me, other than the oil control ring rail gaps, top to bottom, should be spaced out some.
 
Why do you need hose clamps? Is your radiator leaking?

The bottoms of the cylinders are tapered. If you block the center cylinders so they can't go down, then start with them, you can finesse the cylinders over the rings, just using your fingertips. After #2&3 are in place, remove the blocks and do 1&4. Once they are all in place, put the head (and gasket) on and bolt it all down.

Thanks Steve, I'll give that a shot. Most of what I've read on here suggests using a hose clamp/zip tie/$20 tool to compress the rings for cylinder insertion. And I might not be the most mechanically inclined, but I'm pretty sure I don't have a radiator.
 
Rings made of the right ID PVC with a slot cut down the side walls.

Put a sleeve over each piston and use a dryer clamp to compress the PVC piping. The slot down the side will allow it to close up and you have some pretty simple and easy to make ring compressors.

Four 1 inch slices should do it. You just remove the clamps and remove then from around the connecting rod. Scrape the edges where you make the slices so they are chip free so nothing falls off and into the crankcase.

In case a chip does get in...full the engine to the top with water and the chips will float for easy removal..:eek::eek::eek:
 
hUH...

hUH...

Bill is right Maddevil. The rings will seat almost instantly if they go in dry. Just oil the pins & put it together. Oiling the rings can lead to glazing the cylindes on fire up if done wrong. Ray.

Well, I'm not talking about pouring a quart of 30 wt in the cylinder, I just rub a little on the cylinder walls and around the rings with my finger. haven't had a low compression motor yet. But, to each his own.:D
 
Make absolutely certain that all of the honing grit is removed from the cylinder block. Wipe the bores with a paper towel lightly dampened with oil or ATF and it should not have any dark residue on it. The pistons do need a little oil on them so they don't get scuffed up.
 
Back
Top