Announcement

Collapse
No announcement yet.

Replacing cam chain without motor tear down?

Collapse
X
 
  • Filter
  • Time
  • Show
Clear All
new posts

    Replacing cam chain without motor tear down?

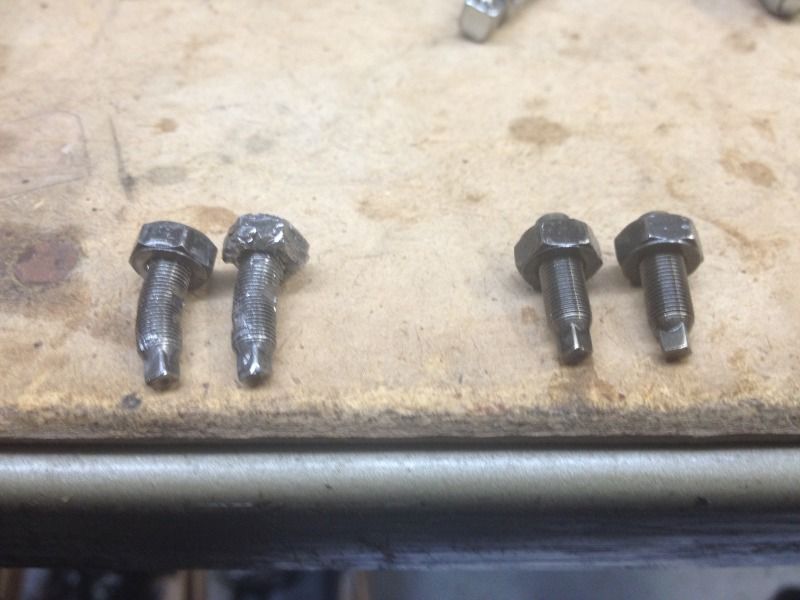
    I started a thread previously about my bike just continuously cranking without starting and now i know why. BOTH exhaust valve adjusters came loose on the right cylinder, found their way into the path of the chain and into the bottom end.

    The adjusters also got stuck and prevented the cam chain from moving as if it was a dead battery, but in reality was overworking the starter and so on and so forth.

    Luckily it didn't cause any damage to the head or cylinder just the chain guide and the chain itself which is what's worrying me. Are there any tricks to getting a new chain on without taking apart the whole bottom end?


    #2
    IF you can find a replacement link and have the riveting tool, you can cut the chain, link the new chain on the old one with some wire and basically thread it back around by pulling the old chain and feeding in the new. Then rivet the cam chain back together.
    MY BIKES..1977 GS 750 B, 1978 GS 1000 C (X2)
    1978 GS 1000 E, 1979 GS 1000 S, 1973 Yamaha TX 750, 1977 Kawasaki KZ 650B1, 1975 Honda GL1000 Goldwing, 1983 CB 650SC Nighthawk, 1972 Honda CB 350K4, 74 Honda CB550

    NEVER SNEAK UP ON A SLEEPING DOG..NOT EVEN YOUR OWN.


    I would rather trust my bike to a "QUACK" that KNOWS how to fix it rather than a book worm that THINKS HE KNOWS how to fix it.

    Comment


      #3
      This is a tricky bit of bodging, even if you already know how long a cam chain you need (number of links?). one thing I suggest you do first is find a way to lock the position of the cams and the crank. If a new chain is not put back in the correct position, you will be in big trouble. The side that matters is the front of the engine. The number of links there is what determines the times, so when you replace the chain, make sure there arn't any extra links up front.

      The second problem is getting the cam chain to hook up at all on the bottom end. the engine wasn't exactly designed with this chain changing proceedure in mind, and there are no guides at the bottom end. The housing around the cam chain gives it lots of room, and it has at least a chain width on either side. Snagging aside you have to get the new chain to hook up AND have no doubling back in the chain (folding of the links causing a jam).

      be sure to take OFF the chain tensioner, before you start.

      one other tip, you can take thin stainless steel wire, and lightly thread the links of the new chain to keep it from catching on the crank sprocket while you are feeding it through. When you have it in position, yank the wire out gently. you will need 3 or 4 wires to do this properly, but I'm sure you can figure it out.

      Have fun!

      Comment


        #4
        this can be done

        The biggest concern is whether the lower sprocket is damaged.
        A bent or chipped tooth, MIGHT work but also MIGHT jump with disastrous results. (same goes for the damaged chain)

        Do it the way Chuck suggested by making a wire link joing the new chain on and turning the engine by hand to feed it though.

        But you need to to ensure the cam sprockets stay engaged and turn the correct amount or the pistons will hit the valves. It might be safer to remove all the adjusters so valves stay closed.

        Rivitable joiner, then you can reset the timing from stratch using the timing marks and info in you service manual.

        Comment


          #5
          Originally posted by john82q View Post

          But you need to to ensure the cam sprockets stay engaged and turn the correct amount or the pistons will hit the valves. It might be safer to remove all the adjusters so valves stay closed.

          .
          Take the cams out. No big deal. You need to remove to reset the cam timing anyway.
          http://img.photobucket.com/albums/v5...tatesMap-1.jpg

          Life is too short to ride an L.

          Comment


            #6
            1 as TK says , take cams out
            2 as BR says , take the tensioner out.
            3 try to order a new chain and the dealer will tell you the length in links.

            Probably 120 links or 118 (120 for all the 400's and up)

            Too loose by two links and your tensioner will not work and just slip in, too tight by two links and you will not get the tensioner in.

            4 as Chuck says You can break that chain and buy a chain break tool to do it just about anywhere. Join the new and old chain best you can and rotate the new one in. As long as the cam's are out your good. Oh and take the plugs out.

            5 YAMAHA, makes a timing chain for the xs 400 that has a master link that you rivet like the main bike chain. There is a tool to do it properly and measurements, Any Yamaha dealer could help you there. I can't remember what It was.


            6 Don't break and remake a new 1 piece chain, Find one that is purposed built for a master link.

            There are tools made for go-karting chains that happen to be the 35 pitch chain and they do break the chain and push the pins out and back in however they DO NOT rivet the end of the solid pin chain, so don't buy one or use one. Just doesn't work and makes the links too tight.

            There are a few types of 219 or 35 pitch chain. I believe the one you want is the FTH219, Might have to check when you source the chain at the dealer.

            I know the stock chain is FTS219 and is a one piece chain.


            I bought one of these 219 chains way back before I knew better and found it was a master link chain. The shop i got it from said it was just fine and I did put 15000km on it and only replaced it because I needed a longer one for my mod.

            But the point I was getting to is: I thought I needed it to be assembled so the guys at that shop simply assembled the chain and used a center punch and a hammer to rivet the chain and measured the outer diameter of the pin a few times. It worked fine and when I took the chain out the last time I was curious how hard it would be to break it. And so I tried. It ended up being just as hard to remove that link as any link in the chain!

            Oh and Yamaha does sell just the master link for a few dollars it you want to buy one and rivet it just to see how hard it is to pull it apart and to see what happens if you over rivet it. (they crack)


            Take the front guide out and it will help in getting the chain around the bottom.


            Hope that helps,


            PS, add your bike to your signature.

            (gs300L)


            One more thing that just came to mind.

            When that chain went super tight and did that damage there are only a few things that give.

            1 the tensioner
            2 the rear guide

            Its worth taking the tensioner apart to see if there is any damage or scoring on the ball or plunger. Also when you have the cams out push the guide forward and look at the contact pad on the back of it to see if there is any damage.
            Last edited by Mekanix; 11-08-2012, 09:55 PM.
            Stephen.
            1981 GSX540L "Frankintwin"
            1989 GS500E Resto-mod .

            400 mod thread
            Photo's 1

            Photos 2

            Gs500 build thread
            GS twin wiki

            Comment

            Working...
            X