Announcement

Collapse
No announcement yet.

Replaced the rear tire but hit a re-assembly snag.

Collapse
X
 
  • Filter
  • Time
  • Show
Clear All
new posts

    Replaced the rear tire but hit a re-assembly snag.

    Here I go again, guys...

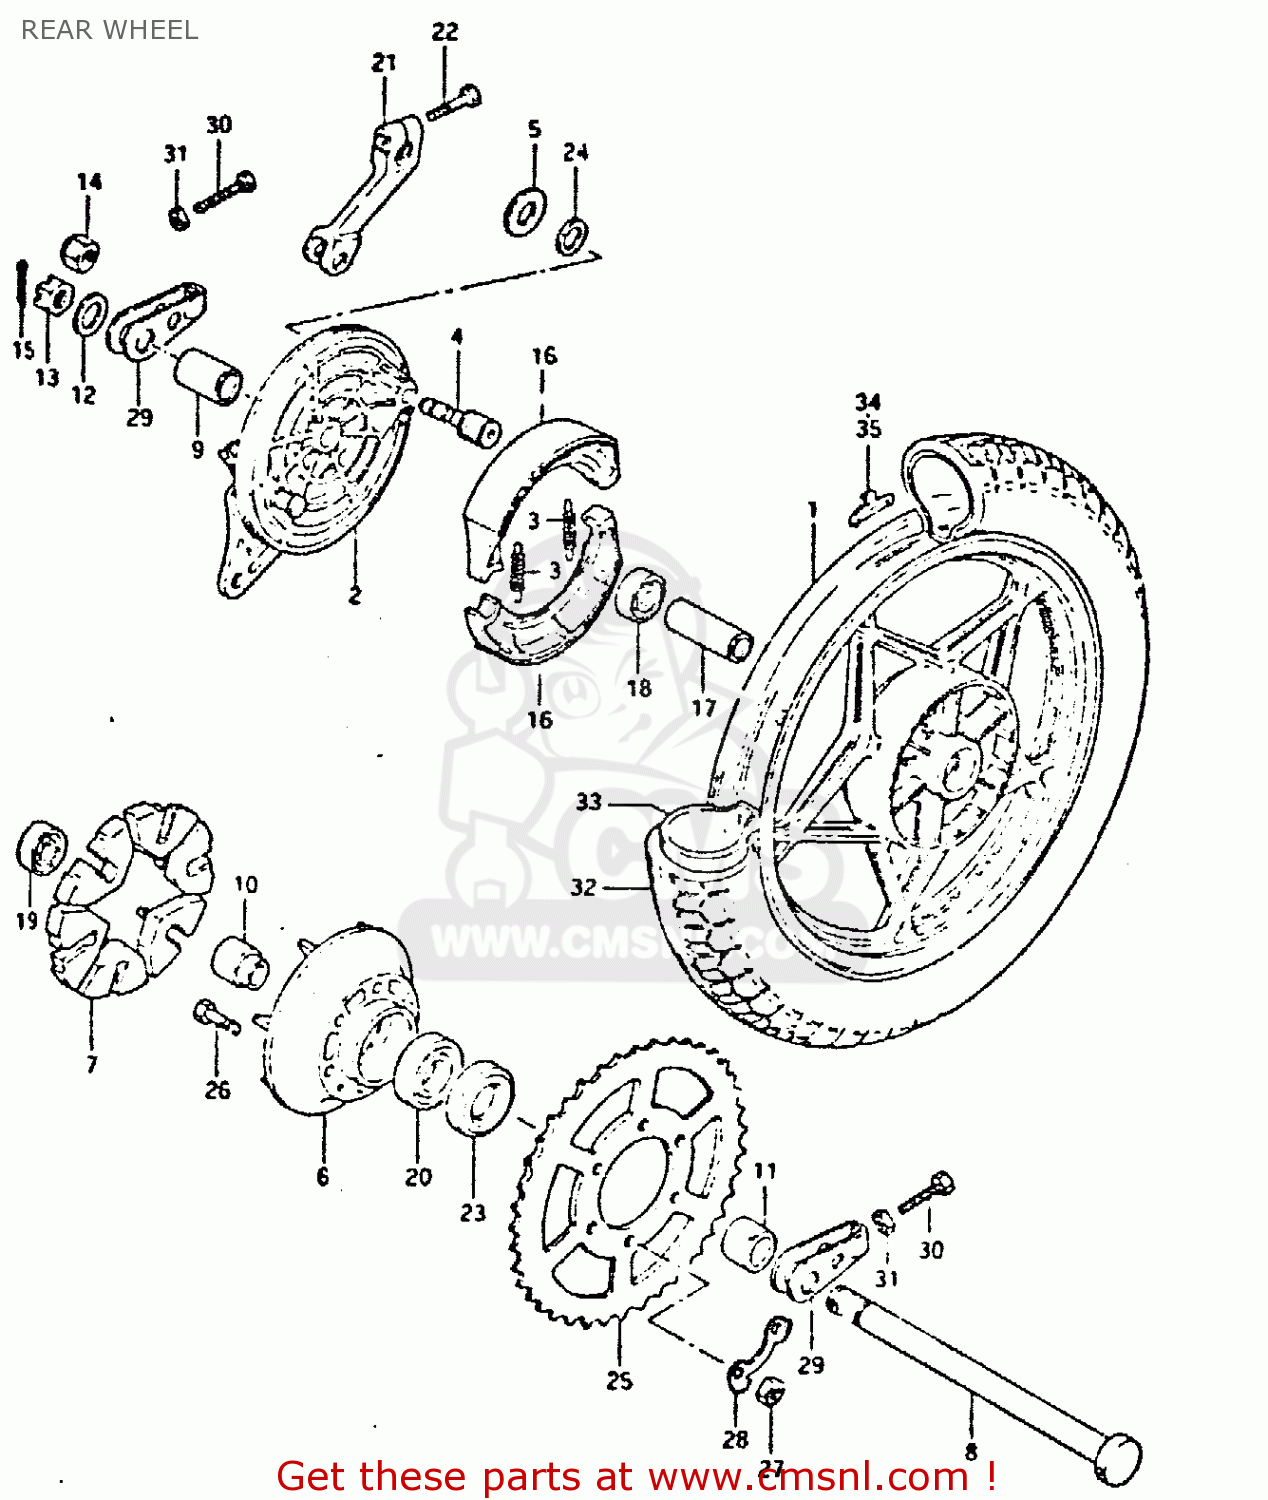
    Like the title says, I replaced my twelve year old oversized tire that the PO had on the bike and now I am having two problems putting the wheel back on. The first problem is that, when I took the wheel off, I did not pay attention to where all the washers and spacers went because I took pictures. Now that I am puting the wheel back on after changing the tire I find that I can't remember the proper placement of the washers and spacers. No problem. I whip out the manual and BAM! I took the castle nut off the sprocket side of the bike but the diagrm clearly shows it is supposed to be on the drum break side. Not only that but the diagram also shows that there only one washer is used on the outside of the wheel, but I have three washers.... OK... Not a problem. I took pictures. Well, damn, the pictures do not show where the third washer was used. The part that concerns me most about this little problem is why the previous owner had the extra parts and why the axle was inserted the wrong way.

    PDF page 35 (printed page 32) of the manual on BikeCliff's site shows the part layout.

    Here is a picture of where there are two washers where there is only supposed to be one:

    I think the slightly larger one is the original. As for the third I have no idea where it was originally. It is very thin compared to the other two and the picture does not show where it was hiding so I took a guess and put it between the spacer in the picture and the chain adjuster.

    The second problem is that when I tighten the axle nut to the proper torque specs the wheel no longer spins free. I have to loosen the nut below 10 ft-lbs for it to spin freely, where before I took the wheel off everything was find in that regard.

    Any ideas or advice?

    #2
    Looks like last po assembled it incorrectly check the link and compare it with the manual, looks the same to me and assemble as per drawing. In the link there are only 2 washers on that side no 5 and 12

    Last edited by fastbysuzuki; 06-10-2018, 03:27 AM.
    The big guy up there rides a Suzuki (this I know)
    1981 gs850gx

    1999 RF900
    past bikes. RF900
    TL1000s
    Hayabusa
    gsx 750f x2
    197cc Francis Barnett
    various British nails

    Comment


      #3
      How big was the old tire? I wonder it the PO was trying to gain clearance by adding washers to tweak the swingarm apart a bit.
      sigpic
      When consulting the magic 8 ball for advice, one must first ask it "will your answers be accurate?"

      Glen
      -85 1150 es - Plus size supermodel.
      -Rusty old scooter.
      Other things I like to photograph.....instagram.com/gs_junkie
      https://www.instagram.com/glen_brenner/
      https://www.flickr.com/photos/152267...7713345317771/

      Comment


        #4
        1st, I'd say it's time to check your wheel bearings. best to replace them anyways.
        I'd say again, Be sure to download the correct shop manual. I recall you have a 400 with a GSX engine . The correct manual is the 250-300 from Bass cliff's. The addendum that cover the differences of the 400s from the 250s is also there. go through it carefully per rear wheel.wheelbearingPlay.jpg

        The Haynes does not seem so good on this subject, but I'd have one. Canadian tire can get it for you, I think.

        per the rest of it, I like dorkburger's idea but I'd incline to the PO was trying to make up for play with that washer.

        Comment


          #5
          Originally posted by dorkburger View Post
          How big was the old tire? I wonder it the PO was trying to gain clearance by adding washers to tweak the swingarm apart a bit.
          The old tire was a 110/90 on the original 18 inch rim, so when I say oversized I mean not the proper size of 3.50x18 (or 100/90) so I don't see a need for any additional clearance mounting it as 10mm is minor.

          Originally posted by Gorminrider View Post
          1st, I'd say it's time to check your wheel bearings. best to replace them anyways.
          I'd say again, Be sure to download the correct shop manual. I recall you have a 400 with a GSX engine . The correct manual is the 250-300 from Bass cliff's. The addendum that cover the differences of the 400s from the 250s is also there. go through it carefully per rear wheel.[ATTACH=CONFIG]55236[/ATTACH]

          The Haynes does not seem so good on this subject, but I'd have one. Canadian tire can get it for you, I think.

          per the rest of it, I like dorkburger's idea but I'd incline to the PO was trying to make up for play with that washer.

          I did an offhand check of the bearing when I had the wheel off and I'm sure the PO had them replaced recently because they felt good with no play in them. I'll take a closer look when I take the wheel off again to swap the axle bolt the right way around. Maybe one of the spacers in binding in some way I can't see.

          Comment


            #6
            Originally posted by Polish-Jack View Post
            The old tire was a 110/90 on the original 18 inch rim, so when I say oversized I mean not the proper size of 3.50x18 (or 100/90) so I don't see a need for any additional clearance mounting it as 10mm is minor.


            I did an offhand check of the bearing when I had the wheel off and I'm sure the PO had them replaced recently because they felt good with no play in them. I'll take a closer look when I take the wheel off again to swap the axle bolt the right way around. Maybe one of the spacers in binding in some way I can't see.
            There is [supposed to be] a spacer inside, between the bearings. If a bearing isn't fully seated in the hub, the inner race will not contact the spacer and when the axle is tightened it will be end loaded and bind. When you have it off, pressing both inner races inward should make the spacer tight between them. If not, either the spacer is wrong/worn or the bearings aren't fully home in the hub. Tapping them in with a socket the size of the outer race should fix that. Never tap on the inner race as the balls will indent the races, unless the bearing is headed trashwards anyway.

            There are plenty of cheap ball bearings available. Don't expect too much from a $4 wheel bearing; there's a global race to see who can still make a ball bearing for 1972 prices. There's a big difference between 40 hp and 100mph and your wheelbarrow. I've found the pricier bearings to be multiples of the budget ones, but you [should] get real metal, real seals, real grease, round balls, and peace of mind.

            It is possible - I've seen it - that the brake side bearing has seized and worn the center hub of the brake backing plate enough that it is arguing with the wheel hub in some way, but usually the axle will have a wear section as well. If so, I think I have spares.
            '82 GS450T

            Comment


              #7
              So I found the problem and the PO is a POS.

              The first thing I found was that I was completely missing the sprocket side spacer(#11) and in it's place the PO used the sprocket hub bearing spacer (#10) instead. This has caused the sprocket hub bearing (#20) to eat itself and explains the reason why there were so many extra washers, it was to take up the room that the slightly larger missing spacer left behind.

              I've ordered the parts that were missing and damaged and now I get to find out how much fun replacing a bearing is going to be.

              Comment


                #8
                Originally posted by Polish-Jack View Post
                So I found the problem and the PO is a POS.

                The first thing I found was that I was completely missing the sprocket side spacer(#11) and in it's place the PO used the sprocket hub bearing spacer (#10) instead. This has caused the sprocket hub bearing (#20) to eat itself and explains the reason why there were so many extra washers, it was to take up the room that the slightly larger missing spacer left behind.

                I've ordered the parts that were missing and damaged and now I get to find out how much fun replacing a bearing is going to be.
                Putting in a new bearing isn't that difficult. All you need is a socket that is just slightly smaller than the diameter of the bearing and tap it in with a hammer. Make sure it's big enough to ride the outer diameter of the bearing, but not so big it could get stuck in the hub. Also pay attention to driving it in straight, you don't want it binding up if it goes in crooked. You will know when it's seated as the sound will change when you hit it. If you can put the new bearing in without tapping it in, then your hub has been damaged by the old bearing and you may need a new wheel.
                :cool:GSRick
                No God, no peace. Know God, know peace.

                Eric Bang RIP 9/5/2018
                Have some bikes ready for us when we meet up.

                Comment


                  #9
                  you will see this trick elsewhere, but put the new bearing in the freezer, and *maybe* warm up the wheel a bit with a torch/oven, the bearing should drop right in, no pounding required.
                  1983 GS 1100 ESD :D

                  Comment


                    #10
                    I finally got all the parts in to replace the bearing and the missing pieces to get everything up and running so I went and removed the old broken bearing. When I cleaned all of the old grease out I found that there is damage to the hub.


                    I looks like the surface where the bearing is pushed up against, about half way up from the hole has been eaten away by the damaged bearing. I'm hoping it's still usable, at least for a season as I search for a deal on one in better condition.

                    There is also damage to the spacer/bushing that I did not notice until I cleaned all of the old grease off and it matches the damage to the hub.


                    I am planning on just using this one too as I am tired of waiting on parts. I want to get riding and half the season here is gone.

                    I also noticed the sprocket shifts back and forth on this hub right now as the PO did not have the sprocket bolts torqued down at all. I can move the nuts by hand and the only thing keeping them on right now are the bent over tab washers... bastard PO.

                    Comment


                      #11
                      If you can't find a wheel, PM me. I have one with the bushing and all .I'll never use it and I haven't looked closely at it but I think it's better than that!! it's from an 82 so is tubeless type. Pretty sure it'll fit though.

                      Comment


                        #12
                        Thanks for the offer but the problem has been solved. Member John Park is local to me and he hooked me up with a replacement hub and bushing.

                        Thanks again, John!

                        Comment


                          #13
                          And here we go! Installed and spinning free!


                          Thanks again, John.

                          Comment

                          Working...
                          X