Announcement

Collapse
No announcement yet.

Valve job advice please

Collapse
X
 
  • Filter
  • Time
  • Show
Clear All
new posts

    Valve job advice please

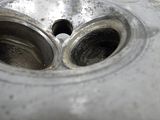
    I pulled my valves with the PVC spring compressor (aweaome tool!). It looks like the PO was not into shimming.

    .

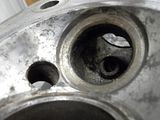
    After this pic was taken, I used some brake cleaner and a green nylon scrubbie to clean it up. It worked on the "bowl", but I cant get to the aluminum on on the exhaust seats. Any suggestions for getting this clean? Also, I am thinking about my next step. Is there anything I can do myself as far as a valve job is concerned? I have a pic of the valves, but it appears that one file upload a day is my limit. I will post a pic of the valves asap.

    thanks!

    #2
    That head needs some serious cleaning before you can tell what you have. To be honest, it's not looking good from what that first photo shows.

    When faced with similar issues on a few different bike rebuilds I was able to find decent used parts off ebay for cheaper than it would have cost to have them rebuilt. In fact, it was WAY cheaper.

    Good luck
    Ed

    To measure is to know.

    Mikuni O-ring Kits For Sale...https://www.thegsresources.com/_foru...ts#post1703182

    Top Newbie Mistakes thread...http://www.thegsresources.com/_forum...d.php?t=171846

    Carb rebuild tutorial...https://gsarchive.bwringer.com/mtsac...d_Tutorial.pdf

    KZ750E Rebuild Thread...http://www.thegsresources.com/_forum...0-Resurrection

    Comment


      #3
      Thanks, although that's not what I was hoping to hear! I wish I had a pic of it after I cleaned it up, it really desn't look bad. there is still carbon in the exhaust valve seats and down by the valve guides, but the rest looks good. It looks like all the aluminun is there, if I could get the carbon off. Is there a good way to remove that carbon?

      Comment


        #4
        Originally posted by snyderman View Post
        Thanks, although that's not what I was hoping to hear! I wish I had a pic of it after I cleaned it up, it really desn't look bad. there is still carbon in the exhaust valve seats and down by the valve guides, but the rest looks good. It looks like all the aluminun is there, if I could get the carbon off. Is there a good way to remove that carbon?
        Soak the parts in Seafoam. Works very well. Also you can chuck them up in a drill motor and use an abrasive on faces and stems. Stay away from seats with this method. Ray
        "Nobody goes there anymore, it's too crowded" -Yogi Berra
        GS Valve Shim Club http://www.thegsresources.com/_forum...d.php?t=122394
        1978 GS1000EC Back home with DJ
        1979 GS1000SN The new hope
        1986 VFR700F2 Recycled

        Comment


          #5
          Snyderman;

          Where in rural MN do you live?

          Comment


            #6
            I've been there, done that on worse. Bead blasting was how I did it. Followed by sandpaper drum rolls in a Dremel, followed by conventional valve lapping.

            This particular head is off a Honda SL125 and the motor is back in service today.

            Kirk


            Comment


              #7
              The important part is the valve seat, which is of a hardened material. If it needs to be replaced you would be better served just finding another one.
              If you can clean them up, as well as the valves, then you can most likely lap them in and be good to go. The lapping material and the lapping tool are fairly inexpensive.

              Comment


                #8
                As koolaid kid says, the seat is the critical thing, and the valve guide but lets leave that out for now. In particular, the seat where the valve contacts. There should not be any pitting in the seat, or the valve, where the two parts contact each other. If there is, you need to have the valve seats and valves machined - commonly denoted as performing a "valve job". Minor pitting can be removed by lapping, but not deep pits. The problem comes in regarding cost. A proper "valve job" will cost you a pretty goodly bit of money, way more than buying a clean used head.

                As for how to clean that mess, I suggest soaking in carb dip. If you set the head in a large tub and keep it wet with carb dip for a day or so most of that grudge will hose off.
                Ed

                To measure is to know.

                Mikuni O-ring Kits For Sale...https://www.thegsresources.com/_foru...ts#post1703182

                Top Newbie Mistakes thread...http://www.thegsresources.com/_forum...d.php?t=171846

                Carb rebuild tutorial...https://gsarchive.bwringer.com/mtsac...d_Tutorial.pdf

                KZ750E Rebuild Thread...http://www.thegsresources.com/_forum...0-Resurrection

                Comment


                  #9
                  As an example, I had the head on my GPz redone by a professional race motor shop. They did a great job, check the valve guides, shimmed it, checked out valve heights and verified they would not hit my Wiseco pistons, etc. etc. They also replaced all my valves. But it set me back ~$500 to get it done.
                  Unless you are building a race motor, your better choice would be to find a replacement if the seats or valves are damaged.

                  Comment


                    #10
                    Originally posted by snyderman View Post
                    I have a pic of the valves, but it appears that one file upload a day is my limit. I will post a pic of the valves asap.
                    The trick is to not "upload it". Not sure where you are uploading it to, but put all the photes you want on PhotoBucket, then post the IMG links for the pictures in your message, like kirkn did. You can post up to 10 pictures per message that way. If you have more than 10, just start another message in the same thread.

                    .
                    sigpic
                    mine: 2000 Honda GoldWing GL1500SE and 1980 GS850G'K' "Junior"
                    hers: 1982 GS850GL - "Angel" and 1969 Suzuki T250 Scrambler
                    #1 son: 1986 Yamaha Venture Royale 1300 and 1982 GS650GL "Rat Bagger"
                    #2 son: 1980 GS1000G
                    Family Portrait
                    Siblings and Spouses
                    Mom's first ride
                    Want a copy of my valve adjust spreadsheet for your 2-valve per cylinder engine? Send me an e-mail request (not a PM)
                    (Click on my username in the upper-left corner for e-mail info.)

                    Comment


                      #11
                      Thanks for all the advice. I will clean things up the best I can and post pics. Is bead blasting something that I can have done (bring my head somewhere)?

                      Ryonker - I live in Stacy, about 15 miles north of Forest Lake.

                      Comment


                        #12
                        I cleaned up my valve seats with a Dremel and a brass wire brush. seemed to remove the black and leave the silver. There is some pitting. #1 cylinder is the worst, and they get better from 2-4. 4 looks great. Any idea why that would be?


                        Can these be lapped? The #1 exhaust valve itself looks great.

                        Comment


                          #13
                          You can try lapping and then see how it looks. Many people tend to ignore some random pitting but personally, I like to see clean metal.
                          Ed

                          To measure is to know.

                          Mikuni O-ring Kits For Sale...https://www.thegsresources.com/_foru...ts#post1703182

                          Top Newbie Mistakes thread...http://www.thegsresources.com/_forum...d.php?t=171846

                          Carb rebuild tutorial...https://gsarchive.bwringer.com/mtsac...d_Tutorial.pdf

                          KZ750E Rebuild Thread...http://www.thegsresources.com/_forum...0-Resurrection

                          Comment


                            #14
                            I picked up a suction cup lapping tool and a package of VersaChem metal grinding compound. It has a coarse and a fine grit. I thought I would start on the worst seat with the fine just to see what I get, then use the coarse only if I need to. This is my first time lapping. Any advice?

                            Comment


                              #15
                              Don't know if the fine will remove enough to get you there, but you won't get into any trouble that way either. Go for it and see what you have. Should clean up enough to run again I'll bet. Good luck with it. Ray
                              "Nobody goes there anymore, it's too crowded" -Yogi Berra
                              GS Valve Shim Club http://www.thegsresources.com/_forum...d.php?t=122394
                              1978 GS1000EC Back home with DJ
                              1979 GS1000SN The new hope
                              1986 VFR700F2 Recycled

                              Comment

                              Working...
                              X