Announcement

Collapse
No announcement yet.

1981 GS 750 cam chain broke in 1989

Collapse
X
 
  • Filter
  • Time
  • Show
Clear All
new posts

    #31
    Hi Ed

    yeah, I used plastiguage on all the rod bearings, and also on the main crank bearings, everything was OK except two of the crank main bearings, which I replaced with proper size. Oddly, the pairs of center main bearings were fine, it was each end of the crank that was having bearing wear issues, the alternator end particularly

    the engine gasket kit is aftermarket, made by Athena, I can't say I much like the look of the valve guide seals or the head gasket, I haven't decided if I am going to use either, I might just order a Suzuki head gasket, but the rest of the stuff looks pretty much OK.

    Paul

    Comment


      #32
      Originally posted by laverda1200 View Post
      Hi Ed

      yeah, I used plastiguage on all the rod bearings, and also on the main crank bearings, everything was OK except two of the crank main bearings, which I replaced with proper size. Oddly, the pairs of center main bearings were fine, it was each end of the crank that was having bearing wear issues, the alternator end particularly

      the engine gasket kit is aftermarket, made by Athena, I can't say I much like the look of the valve guide seals or the head gasket, I haven't decided if I am going to use either, I might just order a Suzuki head gasket, but the rest of the stuff looks pretty much OK.

      Paul
      Paul,

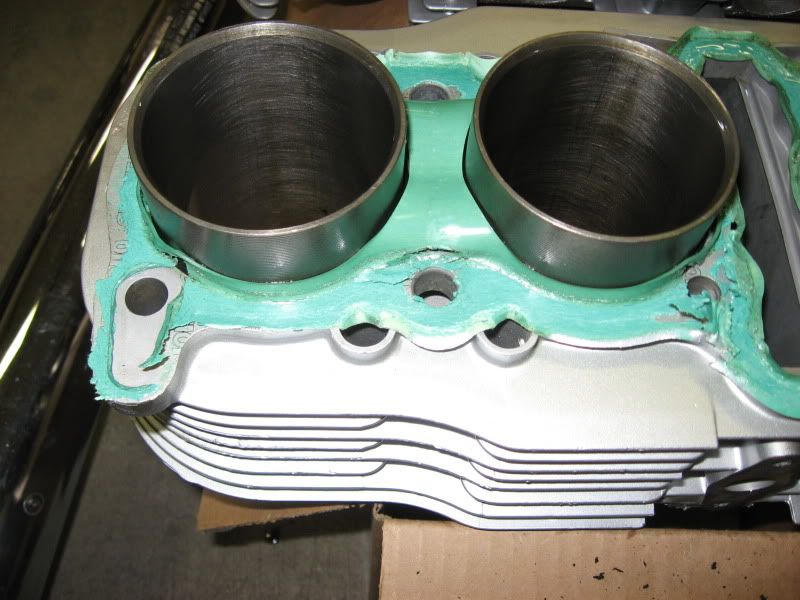
      The Athena base gaskets are horrible. These photos were taken after mine failed after only about 150 miles. I torqued the head after the first few heat cycles and all the nuts were loose. Check again after a few more heat cycles and once again, loose nuts. The base gasket was extruding out of place and the head wouldn't stay tight. The head gasket was fine though.


      Ed

      To measure is to know.

      Mikuni O-ring Kits For Sale...https://www.thegsresources.com/_foru...ts#post1703182

      Top Newbie Mistakes thread...http://www.thegsresources.com/_forum...d.php?t=171846

      Carb rebuild tutorial...https://gsarchive.bwringer.com/mtsac...d_Tutorial.pdf

      KZ750E Rebuild Thread...http://www.thegsresources.com/_forum...0-Resurrection

      Comment


        #33
        I would highly recommend using OEM Suzuki gaskets, unless you like oil leaks that is. Many of the aftermarket gaskets are inferior to the OEM pieces, and as I understand it the difference in gasket thickness between AM and OEM can lead to problems.

        edit: Looks like Ed beat me to it

        Comment


          #34
          Athena gaskets

          those Athena base gasket photos are horrifying, as well as the thought of having to pull the head and barrels only 150 miles after a full rebuild....

          I went to the local big box Suzuki store and ordered a full gasket set, it was about $110. When it arrived (after a two week wait) I saw it was an aftermarket gasket set, the parts guy assured me it was as good or better than stock Suzuki and that is what they provide for "those really old bikes".

          it is a holiday Monday here today, I was going to finish the motor build today, but looks like I won't be using the Athena cylinder base gasket, guess I'll have to sit in the sun and drink beer all day instead.......

          thanks very much guys.

          Paul

          Comment


            #35
            so, since I am waiting to order an OEM Suzuki cylinder base gasket, I am thinking "while I am at it" that I "might as well" replace the piston rings and run a hone down the cylinder liners.

            what is a good source for reasonably priced and reasonable quality replacement stock size piston rings for an 81 GS 750 16 valve motor?

            Paul

            Comment


              #36
              I'm unaware of anything other than OEM.

              I'd talk to Z1 Enterprises. Good folks to deal with and they ship international, or so I've been told.

              BTW, don't forget new valve stem seals. I think Athena includes them so you should be good there.
              Ed

              To measure is to know.

              Mikuni O-ring Kits For Sale...https://www.thegsresources.com/_foru...ts#post1703182

              Top Newbie Mistakes thread...http://www.thegsresources.com/_forum...d.php?t=171846

              Carb rebuild tutorial...https://gsarchive.bwringer.com/mtsac...d_Tutorial.pdf

              KZ750E Rebuild Thread...http://www.thegsresources.com/_forum...0-Resurrection

              Comment


                #37
                yes, new valve stem seals came with the Athena full engine gasket kit, and yes, I am lapping in all 16 of the tiny little valves and replacing the valve guide seals...

                I put the clutch back together earlier today, odd setup for the clutch actuator, I am much more familiar with a push type assembly, that weird square geared pull assembly caused some head scratching working out how to get the outer clutch cover on and the gears engaged with each other.

                I do not understand why Suzuki painted all the engine externals, I am really fighting the urge to just spray everything with paint stripper and have at it with a polishing rig...but I will resist, looks like a lot of unnecessary work for now, I'll get the engine back in the frame and running for the first time since 1989, then decide.

                Paul

                Comment


                  #38
                  If I'm not mistaken, 81 should have an unpainted engine. At least my 81 750E did.

                  Comment


                    #39
                    Just got caught up reading the thread Paul..the real trick to assembling these motors is to put the pistons and rods into the bores then put the top case onto the barrels. Place the crank in position and assemble the rods onto it.Working with the thing inverted of course.
                    The box can then go into the top case and the lower case gets offered on.Only a couple of selector forks to guide into place.
                    Much easier than those roller bearing cranks....LOL

                    Comment


                      #40
                      Hi Greg

                      sounds like something I should do while standing on my head>>>>

                      Paul

                      Comment


                        #41
                        Only in the Nortern Hemisphere Paul.....works fine down here.

                        Seriously, the hardest part of assembling a multi cylinder bike motor is fitting the barrel over the pistons and rings. Doing this first, one cylinder at a time, then attatching rods to crank while it sits in the top case bearings is so easy you'll see one reason why everything now is plain bearing cranks....

                        Comment


                          #42
                          Hi Greg

                          too late for me, maybe next time. I have already buttoned up the bottom end. Roller bearing crank engine habits.

                          I typically bend up wire piston supports to keep the pistons from moving around, attach stainless steel hose clamps around the rings, then lower the barrel and tap gently. Worked fine on the KZ 650 engine I just rebuilt, anyways.

                          this evening I am doing my craft project of making a new cylinder base gasket for the Suzuki motor out of high temp gasket sheet (the stuff they replaced asbestos sheet with) as I am not going to use the Athena kit base gasket, then I'll put the barrels on and stick the partially completed motor back in the frame before finishing the head. The carbs are completely rebuilt, all I need to do then is find an inexpensive used exhaust system to be able to try and fire the engine for the first time since 1989....

                          Paul

                          Comment


                            #43
                            cylinder base gasket made, pistons all cleaned in my ultrasonic tank, barrels fresh out of my parts washer tank, local Suzuki stealer wants over $200 for a set of piston rings, so measured existing ring end gaps, all fine, and will re-use the rings, ready to slip the barrels on......see attached photo

                            Paul

                            Comment


                              #44
                              Wow that came out beautifully cleaned! Jealous that you have an ultrasonic cleaner at home shop! Used on to clean out a float bowl on a Yammy XS 400 that I bought. Worked great after only 10 minutes in the tank!

                              Comment


                                #45
                                Hi Dueller

                                yeah, the photo clearly shows how well the pistons cleaned up, what the photos don't show is that the underside/insides/ring lands of the pistons are all as clean as the outside.

                                a couple of the most used tools in my home garage are the recirculating parts washer tank (about $200 plus solvents) and the small but heavy duty stainless steel ultrasonic tank (about $400 but Chinese knockoffs can be had for $75 or less). Also useful is Gunk Hydroseal http://www.gunk.com/products/cat_PC_PW.asp to soak carb bodies, pistons, pretty much anything. Those pistons in the photo all spent 24 hours soaking in Hydroseal before they did several cycles in the ultrasonic tank.

                                I also soaked the cylinder barrels for 24 hours in Hydroseal, then thorughly washed them off in the parts washer tank, I did both crankcase halves in the parts washer tank, etc.

                                In the ultrasonic, I use hot water and a bit of Dawn dish soap for most parts cleaning, works really really well on carb bodies. Often I soak parts overnight in Hydroseal (I have a couple of gallons in a covered bucket that I use over and over and over) before finishing them off in the ultrasonic tank, then for carb bodies, use a fine tip blow nozzle at 100 psi to be absolutely sure the carb passages are all clear.

                                the carbs from this Suzuki 750 project sat from 1989 to present with fuel in them, the slides were gummed solid, as were most of the passages, after my cleaning process they look like new inside and out, even the insides of the float bowls.

                                for all the rusty fasteners and bits on the Suzuki 750, including the heavily rusted rear shock springs, Evapo Rust is amazing stuff, just toss all the rusty bits in overnight, all the rust will have disapeared overnight, well worth hunting up a supply for yourself. http://www.evaporust.ca/ I have salvaged all the original rusty fasteners on the Suzuki 750, they all look like new now. Originality, plus saves on buying all new fasteners or replating.

                                Paul
                                Last edited by Guest; 09-07-2011, 10:31 PM.

                                Comment

                                Working...
                                X