Announcement

Collapse
No announcement yet.

Engine Removal Shaft Drive GS1100

Collapse
X
 
  • Filter
  • Time
  • Show
Clear All
new posts

    Engine Removal Shaft Drive GS1100

    The problem is; do I need to remove the swing arm to undo the shaft drive from the engine?

    I have pushed back the rubber boot around the engine shaft drive connection and can barely get a spanner in to undo the 12mm nuts.

    Any ideas?

    Greetings
    Richard
    sigpic
    GS1150 EF bought Jun 2015
    GS1150 ES bought Mar 2014: ES Makeover Thread AND blog: Go to the Blog
    GS1100 G (2) bought Aug 2013: Road Runner Project Thread AND blog: Go to the Blog
    GS1100 G (1) Dad bought new 1985 (in rebuild) see: Dad's GS1100 G Rebuild AND blog: Go to the Blog
    Previously owned: Suzuki GS750 EF (Canada), Suzuki GS750 (UK)(Avatar circa 1977), Yamaha XT500, Suzuki T500, Honda XL125, Garelli 50
    Join the United Kingdom (UK) Suzuki GS Facebook Group here

    #2
    You do indeed use a 12mm ring spanner on those bolts.

    It's a bit tedious, but it's the only way.

    You might need to try a different spanner -- some are too thick to fit the space available.

    Once the bolts are broken loose, it gets a little easier.

    Make sure you use Loctite when you reinstall -- those bolts are highly stressed and (obviously) pretty important. If you decide to replace them, order new ones from Suzuki -- they're an oddball length and specially hardened.
    1983 GS850G, Cosmos Blue.
    2005 KLR685, Aztec Pink - Turd II.3, the ReReReTurdening
    2015 Yamaha FJ-09, Magma Red Power Corrupts...
    Eat more venison.

    Please provide details. The GSR Hive Mind is nearly omniscient, but not yet clairvoyant.

    Celeriter equita, converteque saepe.

    SUPPORT THIS SITE! DONATE TODAY!

    Co-host of "The Riding Obsession" sport-touring motorcycling podcast at tro.bike!

    Comment


      #3
      Taking the swing arm out is quite easy, I'd recommend it. That way way you get to inspect and grease up all the bearings too. Just my 2c

      Comment


        #4
        How do I get the shaft unbolted?

        Still not sorted out how to get the shaft drive disconnected before taking out the engine. The rubber boot covers the bolts. How do I get around this:

        See my blog here: GS1100 Blog[/URL]


        I need to get the gold bolts out but it is proving impossible.

        Any ideas?

        Greetings
        Richard
        sigpic
        GS1150 EF bought Jun 2015
        GS1150 ES bought Mar 2014: ES Makeover Thread AND blog: Go to the Blog
        GS1100 G (2) bought Aug 2013: Road Runner Project Thread AND blog: Go to the Blog
        GS1100 G (1) Dad bought new 1985 (in rebuild) see: Dad's GS1100 G Rebuild AND blog: Go to the Blog
        Previously owned: Suzuki GS750 EF (Canada), Suzuki GS750 (UK)(Avatar circa 1977), Yamaha XT500, Suzuki T500, Honda XL125, Garelli 50
        Join the United Kingdom (UK) Suzuki GS Facebook Group here

        Comment


          #5
          A different spanner that is not quite so offset will do wonders.

          Removing the swingarm is not much more than removing the rear wheel, as in doing a tire change.

          After removing the wheel, release the brake hose from its clamps, loosen the swingarm pivot bolts, the swingarm will slide right back.

          .
          sigpic
          mine: 2000 Honda GoldWing GL1500SE and 1980 GS850G'K' "Junior"
          hers: 1982 GS850GL - "Angel" and 1969 Suzuki T250 Scrambler
          #1 son: 1986 Yamaha Venture Royale 1300 and 1982 GS650GL "Rat Bagger"
          #2 son: 1980 GS1000G
          Family Portrait
          Siblings and Spouses
          Mom's first ride
          Want a copy of my valve adjust spreadsheet for your 2-valve per cylinder engine? Send me an e-mail request (not a PM)
          (Click on my username in the upper-left corner for e-mail info.)

          Comment


            #6
            You need a spanner that's not offset, as Steve noted.

            Also, you want to remove the black bolts holding the driveshaft to the flange. Do not remove the gold bolts holding the output gear to the engine. In your last photo, your prybar is pointing to and partially covering one of the bolts you need to remove.

            Or, remove the swingarm as noted. The rear end of the driveshaft is splined to the final drive, so it just slides out. But I've done this several times without needing to remove the swingarm. In your case, it looks like you've already mostly removed the left swingarm stub axle, so you don't have far to go.
            Last edited by bwringer; 11-11-2012, 01:12 AM.
            1983 GS850G, Cosmos Blue.
            2005 KLR685, Aztec Pink - Turd II.3, the ReReReTurdening
            2015 Yamaha FJ-09, Magma Red Power Corrupts...
            Eat more venison.

            Please provide details. The GSR Hive Mind is nearly omniscient, but not yet clairvoyant.

            Celeriter equita, converteque saepe.

            SUPPORT THIS SITE! DONATE TODAY!

            Co-host of "The Riding Obsession" sport-touring motorcycling podcast at tro.bike!

            Comment


              #7
              Originally posted by old_skool
              Now, what will **** you off is if you put the motor back in and forget to put the driveshaft back in first(don't ask me how I know), in that case, I did remove the swingarm in lieu of taking out the motor again, but other than that, I'll stick to theres no reason too aside from painting, or greasing up an old neglected bike.

              Yeah, I, um, might have heard that this is really frustrating, too...


              Also, one detail -- you'll need to start the bolts moving with a ring spanner, but switch to an open-ended one in order to get them out the rest of the way. There's just barely enough room -- the bolts are a nonstandard length. But there really is room to remove them.
              Last edited by bwringer; 11-11-2012, 10:14 AM.
              1983 GS850G, Cosmos Blue.
              2005 KLR685, Aztec Pink - Turd II.3, the ReReReTurdening
              2015 Yamaha FJ-09, Magma Red Power Corrupts...
              Eat more venison.

              Please provide details. The GSR Hive Mind is nearly omniscient, but not yet clairvoyant.

              Celeriter equita, converteque saepe.

              SUPPORT THIS SITE! DONATE TODAY!

              Co-host of "The Riding Obsession" sport-touring motorcycling podcast at tro.bike!

              Comment


                #8
                Once you undo the shaft coupling and engine mounts you can pick the motor from the frame, Just as the manual shows. Its gotta come out the right side, hard lesson learned.

                Comment


                  #9
                  This is how I did it in the end!

                  So thanks everyone. I got lots of advice and help that gave me ideas. Unfortunately for me I still had some learning to do. Let me see if I can run you through it:

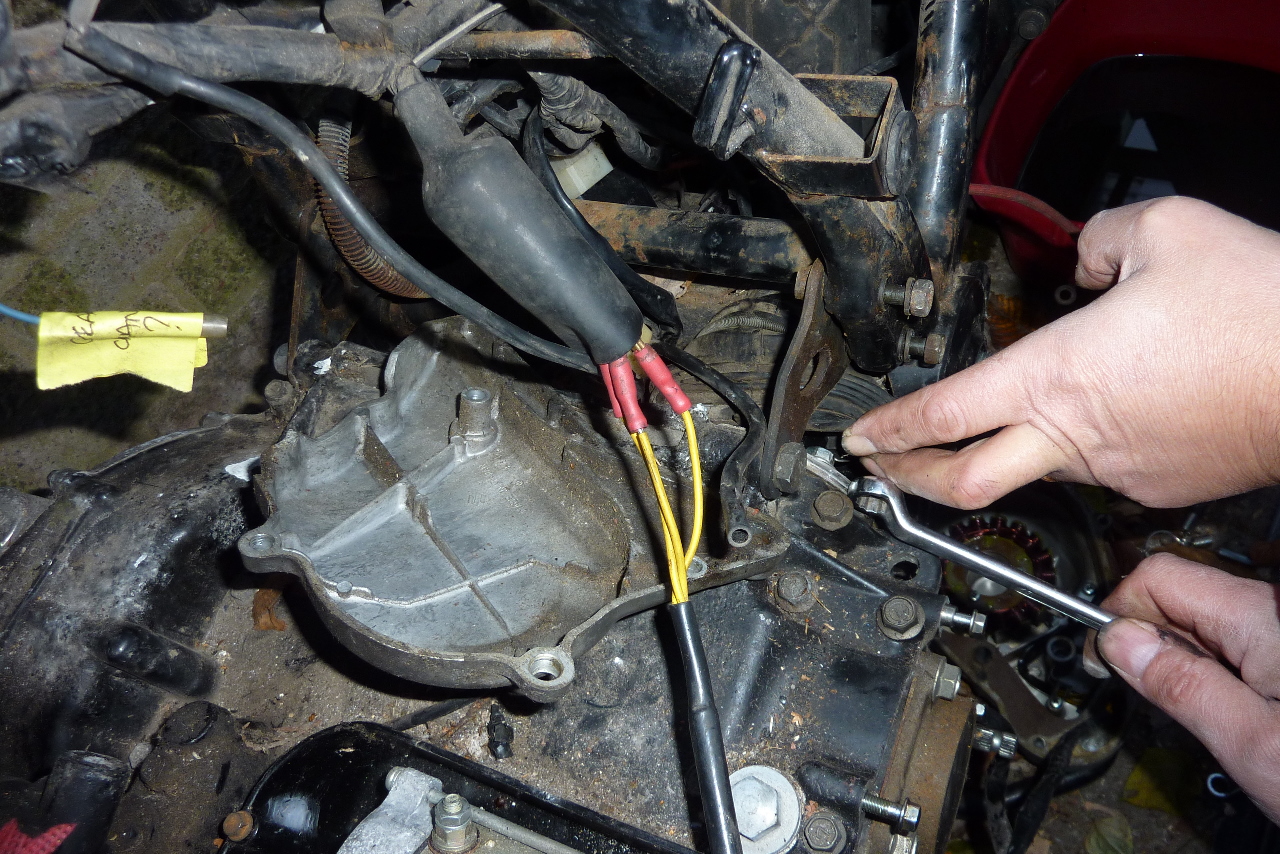
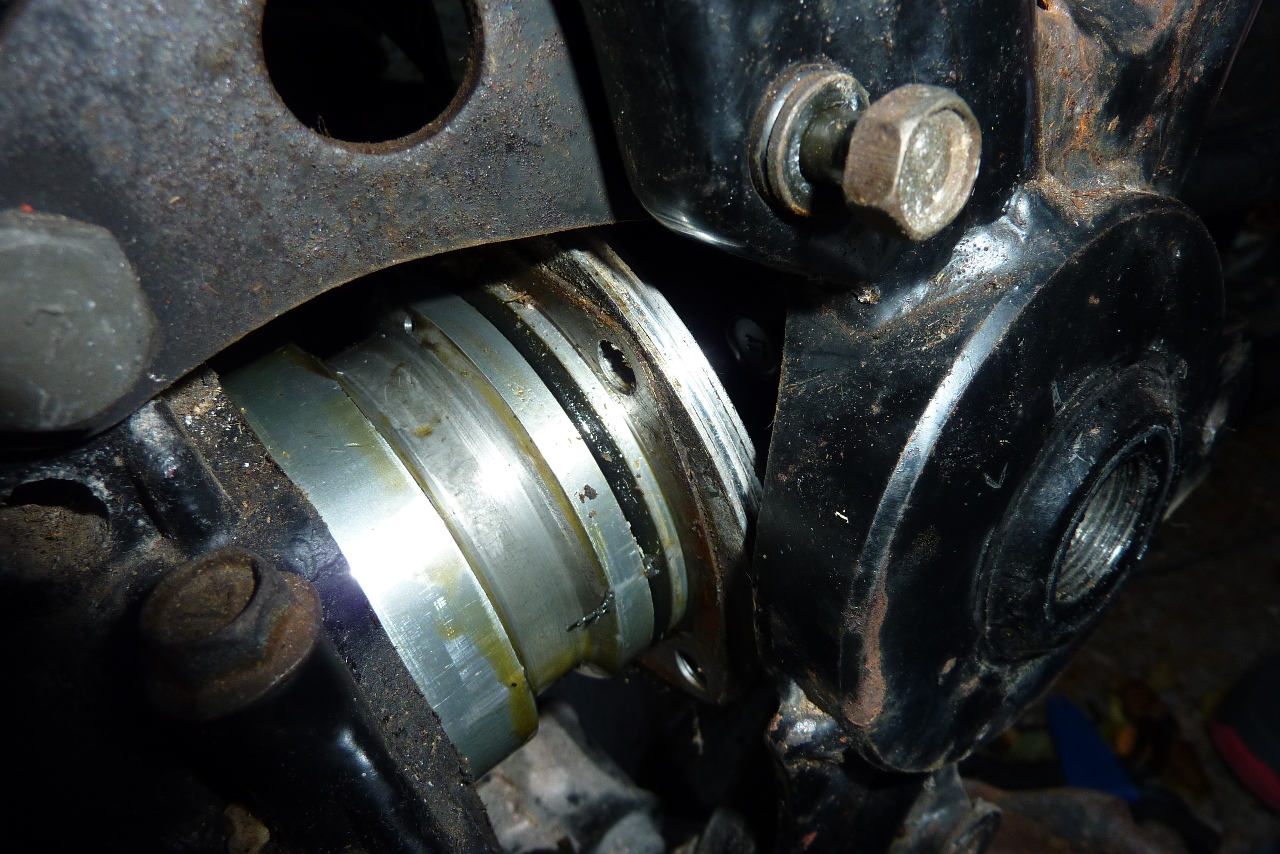
                  I didn't know about the splined shaft at the wheel end. I imagined it to be another screw type affair (thanks bwringer). What I was trying to do (in my mind and in reality) was to break the link between the engine and the shaft drive at the universal joint near the engine end of the shaft by undoing the gold bolts (or at least darker bots) that join the shaft to the universal joint. The bolts point (by this I mean the head faces the engine and the threaded end points to the rear wheel) to the back of the bike and can be seen here (the one that the screwdriver head is touching):


                  My idea was to remove these bolts and then the shaft would be disconected and the engine could be removed. The problem is that without removing the rear swing arm (I didn't want to remove it as I wanted to wheel the bike to the garden to do the engine removal on it side "trick") it is very difficult to get to these bolts and remove them. Well I found it impossible.

                  See my blog here: Go to my Blog

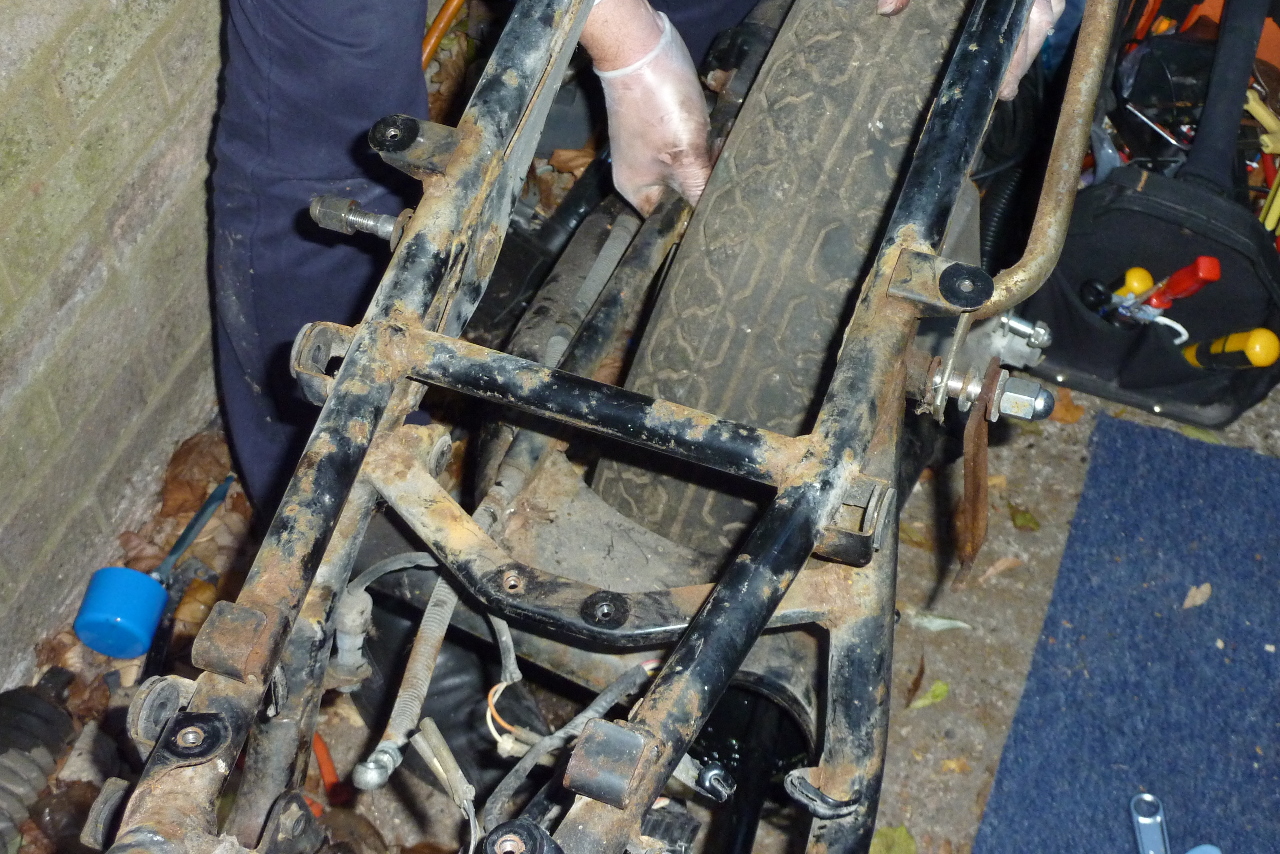
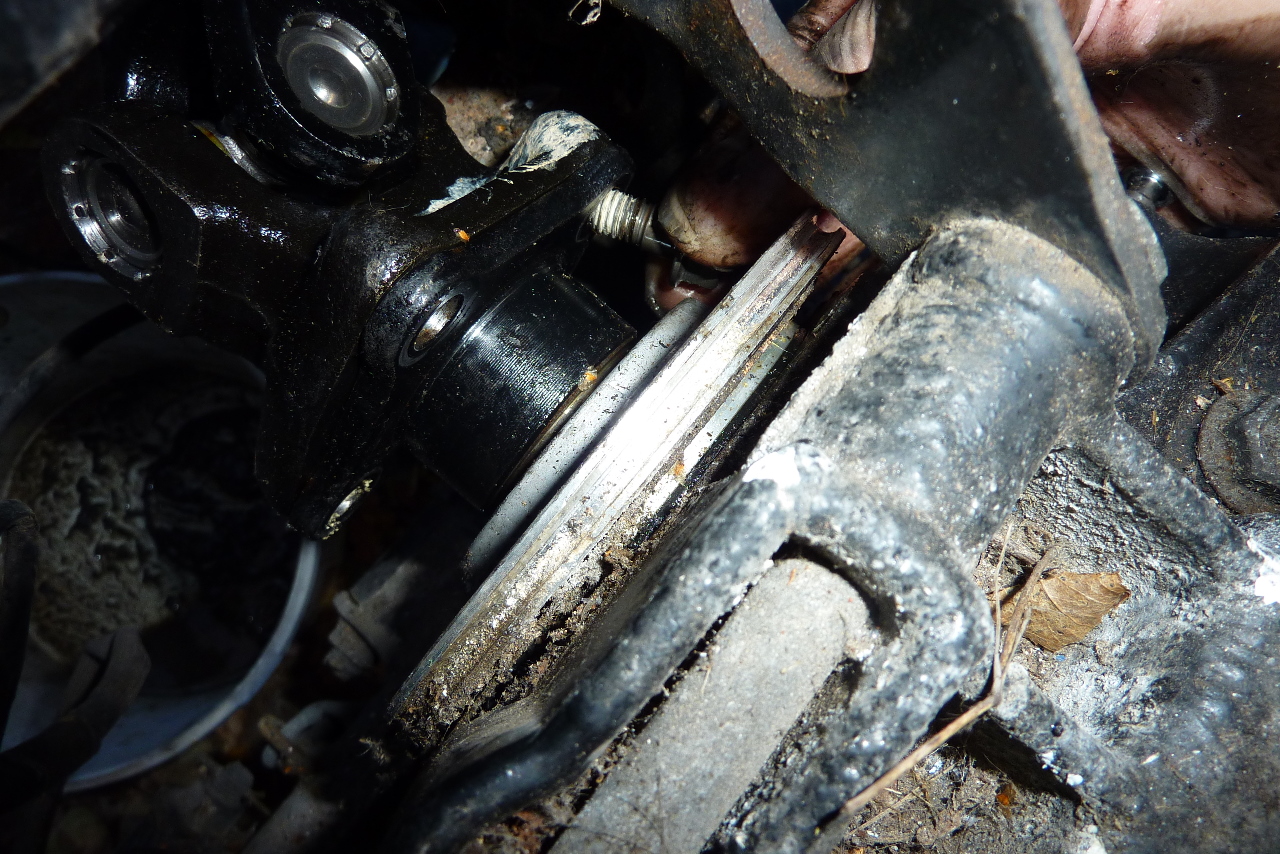
                  There were problems so I removed the swing arm to get better access:


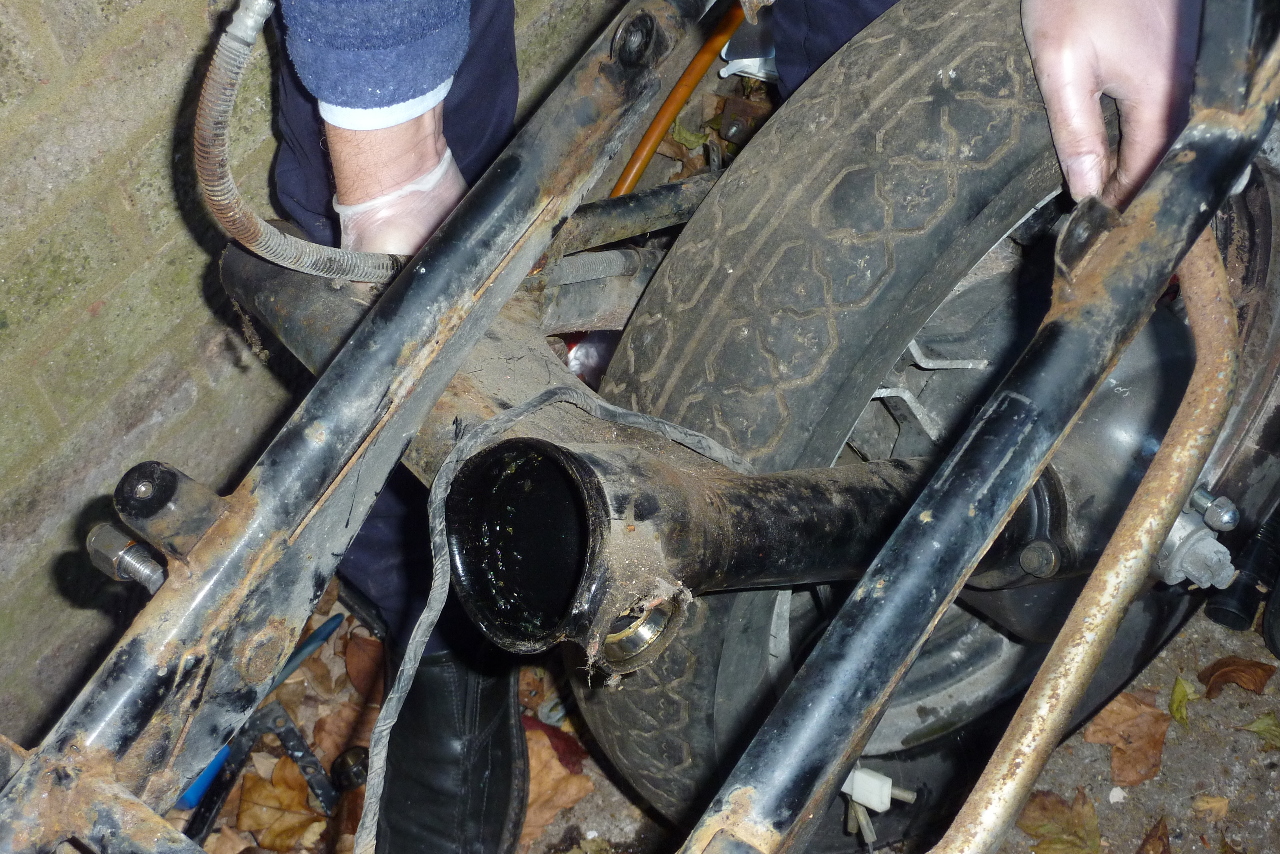
                  Now to get the shaft off. I started on the bolts that go into the engine casing:


                  This would allow me to get the shaft off surely (and quit calling me Shirley) but I didn't know it was the helical gear housing and not the shaft connector.


                  And that it would not come out completely as it hits the frame here:


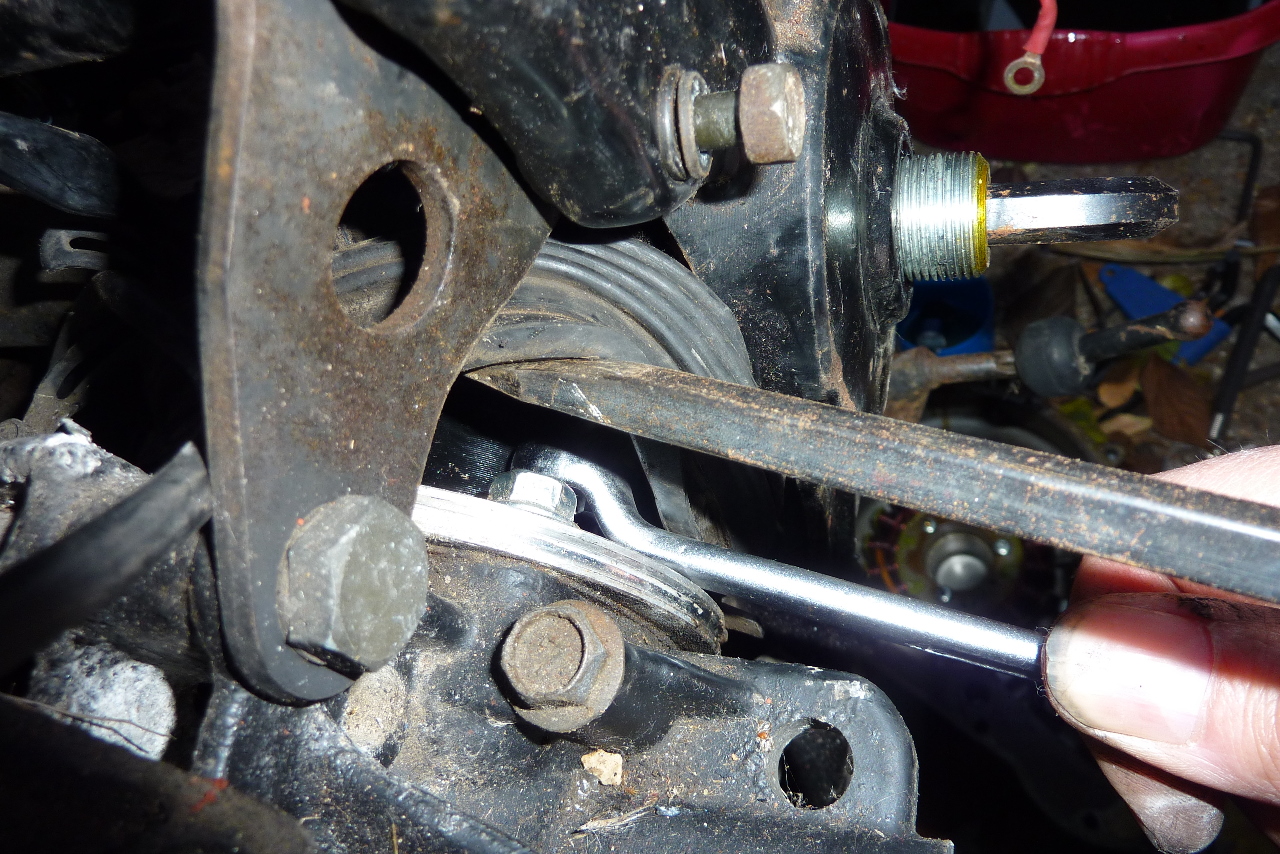
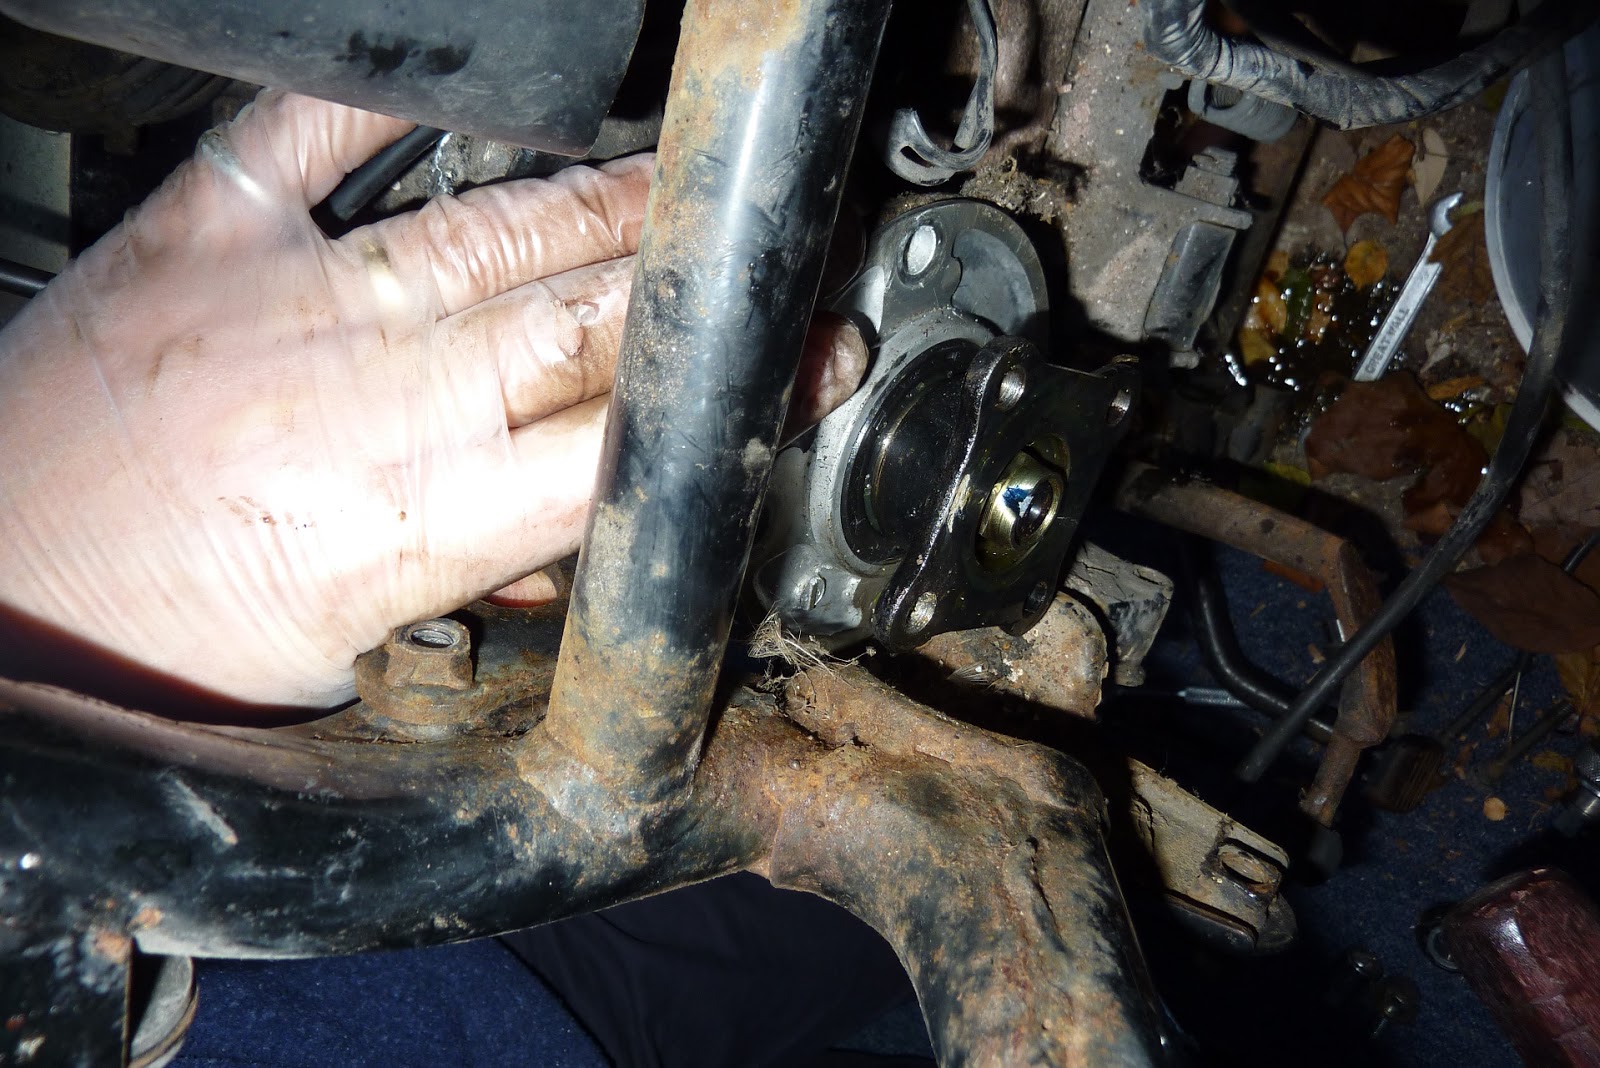
                  So it was back to the idea of trying to get the shaft disconnected. But the shaft kept turning when you applied any pressure on the spanner. I had to use another spanner and lay it against the tops of 2 of the bolts and jam it against the frame in order to get any leverage. I did it in the end.


                  You can see the other spanner at the bottom of the picture. I didn't actually work like this but I did not get a photo of the actual arrangement I used.


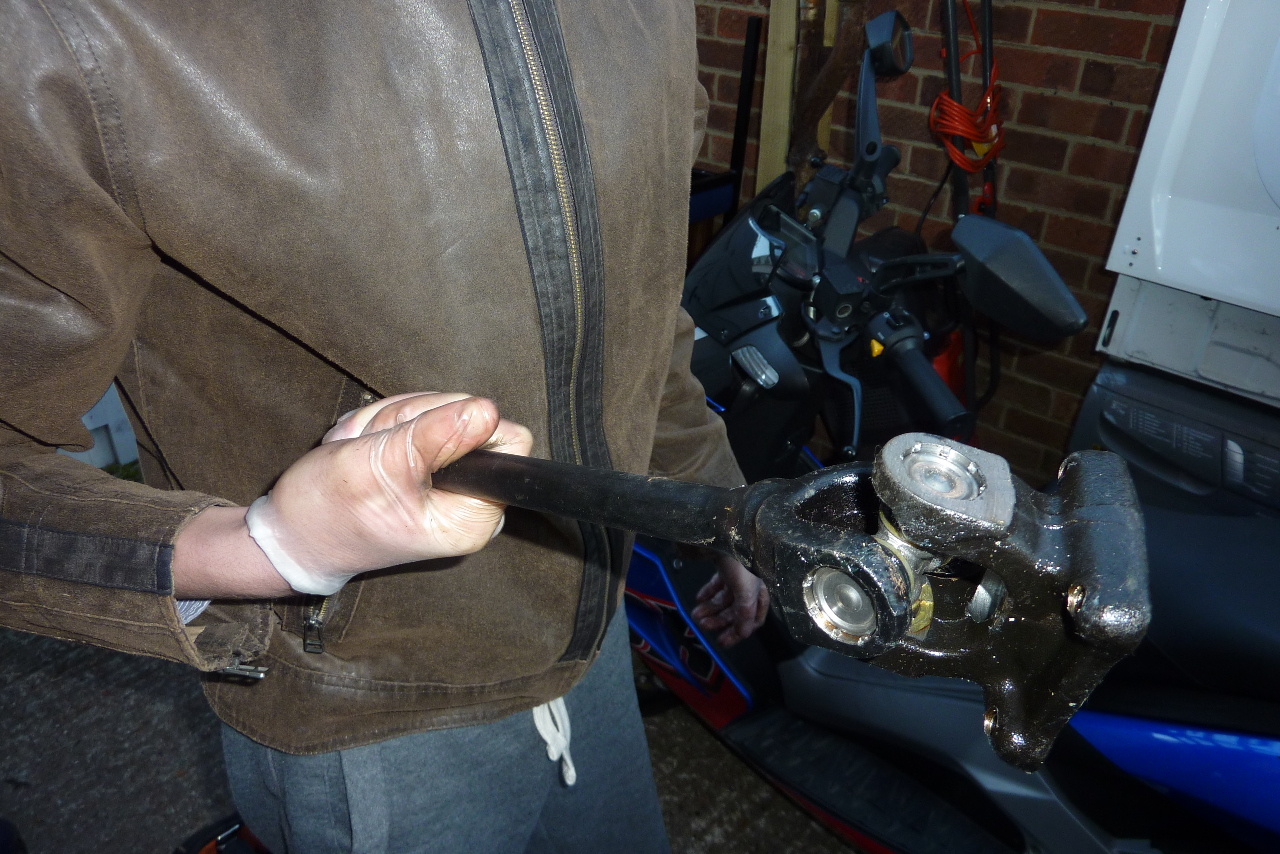
                  That's how I got the shaft off. Now to get the engine out.
                  Richard
                  sigpic
                  GS1150 EF bought Jun 2015
                  GS1150 ES bought Mar 2014: ES Makeover Thread AND blog: Go to the Blog
                  GS1100 G (2) bought Aug 2013: Road Runner Project Thread AND blog: Go to the Blog
                  GS1100 G (1) Dad bought new 1985 (in rebuild) see: Dad's GS1100 G Rebuild AND blog: Go to the Blog
                  Previously owned: Suzuki GS750 EF (Canada), Suzuki GS750 (UK)(Avatar circa 1977), Yamaha XT500, Suzuki T500, Honda XL125, Garelli 50
                  Join the United Kingdom (UK) Suzuki GS Facebook Group here

                  Comment


                    #10
                    You must surely be joking: "pick the motor from the frame". I have been eating my spinach but there is no way I could have done that even with the 3 of us. What is it that they put in your water over there?

                    Greetings
                    Richard
                    sigpic
                    GS1150 EF bought Jun 2015
                    GS1150 ES bought Mar 2014: ES Makeover Thread AND blog: Go to the Blog
                    GS1100 G (2) bought Aug 2013: Road Runner Project Thread AND blog: Go to the Blog
                    GS1100 G (1) Dad bought new 1985 (in rebuild) see: Dad's GS1100 G Rebuild AND blog: Go to the Blog
                    Previously owned: Suzuki GS750 EF (Canada), Suzuki GS750 (UK)(Avatar circa 1977), Yamaha XT500, Suzuki T500, Honda XL125, Garelli 50
                    Join the United Kingdom (UK) Suzuki GS Facebook Group here

                    Comment


                      #11
                      I just had another look at the manual. Problem I had is no brakes as they were seized and I could not get the rubber boot back far enough as it had gone hard.

                      Thanks for reminding me about the workshop manual again. I have been working from the Cylmer manual and had forgotten that I had the original workshop one from BassCliff's site.

                      It still makes me laugh though with statements like:

                      "Gradually lift up engine and lower the engine ass'y on the right side making sure it does not make contact with the rear bracket"

                      Just like that eh. I wish I had know it was that simple!

                      Great fun.

                      Greetings again.
                      Richard
                      sigpic
                      GS1150 EF bought Jun 2015
                      GS1150 ES bought Mar 2014: ES Makeover Thread AND blog: Go to the Blog
                      GS1100 G (2) bought Aug 2013: Road Runner Project Thread AND blog: Go to the Blog
                      GS1100 G (1) Dad bought new 1985 (in rebuild) see: Dad's GS1100 G Rebuild AND blog: Go to the Blog
                      Previously owned: Suzuki GS750 EF (Canada), Suzuki GS750 (UK)(Avatar circa 1977), Yamaha XT500, Suzuki T500, Honda XL125, Garelli 50
                      Join the United Kingdom (UK) Suzuki GS Facebook Group here

                      Comment


                        #12
                        Not joking, just working with the right stuff (engine hoist). I put the bike on the side stand, come at it with the hoist on the right side. Do not forget to remove the breather cover atop the valve cover, it gives you just enough room to wiggle it out. Drop 4 ratchet straps: 3 to the obvious places in the rear and front rt; the third I sling around the rotor cover. Start at appropriate lengths to match the angle it naturally sits in and ratchet/ jack as necessary until she's free. Then I set it right on the workbench and commense surgury. Its a one man job like this. Its not easy, but its not terribly difficult either

                        Comment


                          #13
                          I had a tough time getting the 1000G engine out. It reinforces the observation that the folks that design stuff like this never have to work on it. Another 1/2" here & there on the frame would work wonders.

                          I saw the "lay the frame onto the engine" method somewhere and it does look interesting. Since I'm redoing the front forks and rear wheel bearings, at some point I'll have a minimal frame- kind of like what is left of my ST1100. I can pick that up, but cannot pick up the engine. If I go the conventional method, I'm planning to put it back in w/o the head so I'll have more room to move it as needed.

                          Comment


                            #14
                            Even if you do use the "lay it on its side" method, it goes much easier if you have two people to lift the frame.

                            I have found it easier to use those same two people to just lift the engine out of the frame while it's upright.

                            .
                            sigpic
                            mine: 2000 Honda GoldWing GL1500SE and 1980 GS850G'K' "Junior"
                            hers: 1982 GS850GL - "Angel" and 1969 Suzuki T250 Scrambler
                            #1 son: 1986 Yamaha Venture Royale 1300 and 1982 GS650GL "Rat Bagger"
                            #2 son: 1980 GS1000G
                            Family Portrait
                            Siblings and Spouses
                            Mom's first ride
                            Want a copy of my valve adjust spreadsheet for your 2-valve per cylinder engine? Send me an e-mail request (not a PM)
                            (Click on my username in the upper-left corner for e-mail info.)

                            Comment


                              #15
                              Go to the TIPS AND TRICKS section and sellect the thread...Eric asked me to post this for others to learn from. Use a floor jack and some plywood and your done in a matter of minutes..it really is just as easy as he makes it look in the video.
                              MY BIKES..1977 GS 750 B, 1978 GS 1000 C (X2)
                              1978 GS 1000 E, 1979 GS 1000 S, 1973 Yamaha TX 750, 1977 Kawasaki KZ 650B1, 1975 Honda GL1000 Goldwing, 1983 CB 650SC Nighthawk, 1972 Honda CB 350K4, 74 Honda CB550

                              NEVER SNEAK UP ON A SLEEPING DOG..NOT EVEN YOUR OWN.


                              I would rather trust my bike to a "QUACK" that KNOWS how to fix it rather than a book worm that THINKS HE KNOWS how to fix it.

                              Comment

                              Working...
                              X