Announcement

Collapse
No announcement yet.

1982 GS 850 Cam installation

Collapse
X
 
  • Filter
  • Time
  • Show
Clear All
new posts

    1982 GS 850 Cam installation

    I am trying to finish replacing the top end gaskets on my GS850.

    My problem is, that when I install the cams, the engine will not turn clockwise (correct direction) but it will turn counter-clockwise.

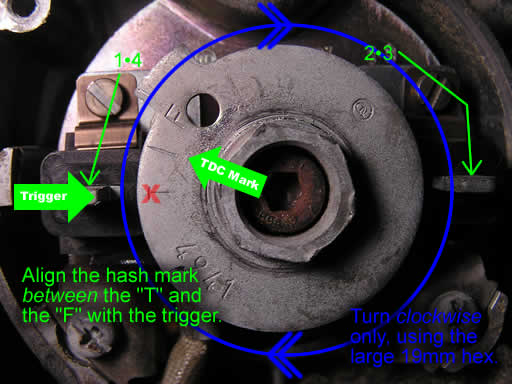
    With the cams out, I can rotate the crank all day long without a hitch. I have tried to follow the TDC timing instructions, but I can't find any sort of marking behind the right side ignition cover.

    Could someone post a picture of what a 1982 GS850G timing line up should look like for the crank at the ignition cover?

    This bike ran before I started replacing gaskets, I had a few small leaks and I'm in engineering, so I thought I'd give it a try. Now I'm kicking myself because now I have a dead bike instead of a dirty running bike...

    #2
    You are putting cams in without having the bike at TDC 1-4?
    I'm pretty sure you don't have a mechanical advance but you do have a plate with a notch on it. The plate is behind the pickups. The rotor that bolts on to the end of the crank has timing marks on it.
    You may have to get a flash light and shine it through a round window.
    Make sure you have the EX cams at the exhaust end and the IN cams next to the carbs.
    1983 GS 1100E w/ 1230 kit, .340 lift Web Cams, Ape heavy duty valve springs, 83 1100 head with 1.5mm oversized SS intake valves, 1150 crank, Vance and Hines 1150 SuperHub, Star Racing high volume oil pump gears, 36mm carebs Dynojet stage 3 jet kit, Posplayr's SSPB, Progressive rear shocks and fork springs, Dyna 2000, Dynatek green coils and Vance & Hines 4-1 exhaust.
    1985 GS1150ES stock with 85 Red E bodywork.

    Comment


      #3
      Hi,

      Maybe this will help. This was my bike, set to TDC, just before I took the cams off last weekend.


      There should be 19 pins between the #3 mark on the intake cam and #2 on the exhaust cam (20 if you count the starting pin directly above #3).

      Drat! Brian's (bwringer) site seems to be down. He's got a great tutorial on how to find TDC.
      EDIT: Found it! Where the ^%$#@! is TDC (Top Dead Center)?

      Have a look at THIS THREAD for lots of disassembly pictures. I'll take more when I put it back together.


      Thank you for your indulgence,

      BassCliff
      Last edited by Guest; 05-30-2013, 03:24 AM.

      Comment


        #4
        Okay, thank you for the picture, guys. Since I couldn't find the TDC mark, I was trying to do it with just watching the #4 piston to see when it was fully at top.

        I Couldn't see behind that window, but those pictures helped immensely. Exactly what I was hoping for. Here's to hoping that I can get this bike running again!

        I'll post an update next week once I can work on it again, sadly I can only have my garage as a workshop every other week since my dad is a truck driver. Week on week off nonsense.

        -TheCleekster

        Comment


          #5
          Hi,

          Does yours have the electronic advance? If so, use the information on Mr. bwringer's page. You can also download a manual from the links below.

          Here's even more information for you...

          If you are here you probably have a 30 year old motorcycle that needs about 20 years worth of maintenance. In the links below you'll find maintenance lists, documentation, wiring diagrams, "how to" guides, vendor links, tips, tricks, and a whole lot of GS goodness. This is your "mega-welcome". Let's get started.

          Let me dump a TON of information on you and share some GS lovin'.

          I just stopped by to welcome you to the forum in my own, special way.

          If there's anything you'd like to know about the Suzuki GS model bikes, and most others actually, you've come to the right place. There's a lot of knowledge and experience here in the community. Come on in and let me say "HOoooowwwDY!"....

          Here is your very own magical, mystical, mythical, mind-expanding "mega-welcome". Please take notice of the "Top 10 Common Issues", "Top 15 Tips For GS Happiness", the Carb Cleanup Series, and the Stator Papers. All of these tasks must be addressed in order to have a safe, reliable machine. This is what NOT to do: Top 10 Newbie Mistakes. Now let me roll out the welcome mat for you...


          Please Click Here For Your Mega-Welcome, chock full of tips, suggestions, links to vendors, and other information. Then feel free to visit my little BikeCliff website where I've been collecting the wisdom of this generous community. Don't forget, we like pictures! Not you, your bike!

          More links to helpful threads in the forum:
          Help! Your Bike Won't Start
          DON'T DO THESE THINGS
          Help! Your Bike Won't Run Well
          Oh God! Pods!


          Thanks for joining us. Keep us informed.

          Thank you for your indulgence,

          BassCliff

          Comment


            #6
            In my confusion, I finally understand where to put TDC at, I'll tackle this problem tomorrow, because I have a Calculus II test tomorrow :/

            But just for reference, here's my ignition plate, I was trying to do it like the one BassCliff posted, but not, mines a different version. I feel like an idiot. I really should eat before I try to work on bikes so I can think straight.

            Comment


              #7
              Hi,

              Yours has the electronic advance. Mine does not.

              With yours, the mark between the "T" and "F" needs to be lined up with the left trigger (pickup).


              In the picture below, you would line up the two big green pointers (from Mr. bwringer's site):


              ----------------------------------------------------
              Later Electronic Ignition Models (electronic advance)

              TDC for cylinders #1 and #4 is the hash mark between the "T" and the "F". Jon is actually just past TDC in this photo -- he needs to rotate the crank clockwise almost a full turn until the hash mark lines up with the #1/4 pickup.

              The ignition pickup for cylinders #1 and #4 is on the left, and the pickup for #2 and #3 is on the right. If you have a 2 cylinder bike, the left pickup fires #1 and the right pickup fires #2. Just pretend you never saw #3 and #4.

              The #1 cylinder is on your left as you sit on a bike. In case you were wondering.
              -----------------------------------------------------

              Thank you for your indulgence,

              BassCliff

              Comment


                #8
                Good news and devestation

                Good news first:

                I got the timing right and finally got the thing to crank over freely with everything installed and snug.

                Bad news:

                I didn't set the head gasket well or the mating surfaces weren't cleaned enough. So I'm only getting 30 psi on my cylinders. I torqued the headbolts to specification, bought myself a torque wrench and everything.

                I'm at a loss. I don't want to throw any more money at this bike. So I'm selling it and recouping some of my losses.

                You guys have been great! If I buy another GS, I'll definitely come back here. But it'll be a year before I save up enough money. This one only cost me $650 initially and $890 total invested in the end.

                Poor college student here, Electrical Engineer. It was a fun enough experience, I just want to get my money back and together to buy a well maintained and reliable bike.

                -TheCleekster

                Comment


                  #9
                  Put it together and ride it! You have to seat the rings before you can get good compression numbers.
                  Plus these numbers are on a cold motor and were the carbs installed? If they were you have to open the butterflies up to take readings.

                  Plus you may be a tooth off on the timing.
                  Last edited by chef1366; 06-07-2013, 11:05 AM.
                  1983 GS 1100E w/ 1230 kit, .340 lift Web Cams, Ape heavy duty valve springs, 83 1100 head with 1.5mm oversized SS intake valves, 1150 crank, Vance and Hines 1150 SuperHub, Star Racing high volume oil pump gears, 36mm carebs Dynojet stage 3 jet kit, Posplayr's SSPB, Progressive rear shocks and fork springs, Dyna 2000, Dynatek green coils and Vance & Hines 4-1 exhaust.
                  1985 GS1150ES stock with 85 Red E bodywork.

                  Comment


                    #10
                    I'm not sure if that'll fix it. I did the compression test with the carburetor off and cranked it over with the electric starter a good 10-20 times. But I'll try it. I have a potential buyer and will sell it monday if it doesn't work.

                    -TheCleekster

                    Comment


                      #11
                      If you put in used rings on a cylinder that was not honed then it will take a minute while running to seat the rings. If at all.
                      1983 GS 1100E w/ 1230 kit, .340 lift Web Cams, Ape heavy duty valve springs, 83 1100 head with 1.5mm oversized SS intake valves, 1150 crank, Vance and Hines 1150 SuperHub, Star Racing high volume oil pump gears, 36mm carebs Dynojet stage 3 jet kit, Posplayr's SSPB, Progressive rear shocks and fork springs, Dyna 2000, Dynatek green coils and Vance & Hines 4-1 exhaust.
                      1985 GS1150ES stock with 85 Red E bodywork.

                      Comment


                        #12
                        I only did the head gasket, I didn't take it down to the base. I didn't mess with the rings at all. I just have to find my vacuum line and try to turn it over to see if it works. But I've got offers to buy it from craigslist. So we'll see.

                        Comment


                          #13
                          If it ran good before then I doubt it's the head gasket or the rings.
                          Double check your cam timing.
                          1983 GS 1100E w/ 1230 kit, .340 lift Web Cams, Ape heavy duty valve springs, 83 1100 head with 1.5mm oversized SS intake valves, 1150 crank, Vance and Hines 1150 SuperHub, Star Racing high volume oil pump gears, 36mm carebs Dynojet stage 3 jet kit, Posplayr's SSPB, Progressive rear shocks and fork springs, Dyna 2000, Dynatek green coils and Vance & Hines 4-1 exhaust.
                          1985 GS1150ES stock with 85 Red E bodywork.

                          Comment


                            #14
                            Originally posted by TheCleekster View Post
                            I only did the head gasket, I didn't take it down to the base.
                            Good luck.

                            About 99.9% of the time, the process of removing the head also disturbs the base gasket.

                            As a general rule, any time you replace the head gasket, you should replace the base gasket, too.

                            .
                            sigpic
                            mine: 2000 Honda GoldWing GL1500SE and 1980 GS850G'K' "Junior"
                            hers: 1982 GS850GL - "Angel" and 1969 Suzuki T250 Scrambler
                            #1 son: 1986 Yamaha Venture Royale 1300 and 1982 GS650GL "Rat Bagger"
                            #2 son: 1980 GS1000G
                            Family Portrait
                            Siblings and Spouses
                            Mom's first ride
                            Want a copy of my valve adjust spreadsheet for your 2-valve per cylinder engine? Send me an e-mail request (not a PM)
                            (Click on my username in the upper-left corner for e-mail info.)

                            Comment


                              #15
                              I don't have the tools to take the base off, I wouldn't be able to reinstall the rings, and I can't afford 4 new sets of rings. Plus the base gasket doesn't effect compression, does it?

                              I just have one question, when I took the head off, the side with the valve cover, there were these humps between cylinders 1&2 and 3&4. I didn't know what they were, and they kinda just flaked off. These humps rested over some sort of oil passages. It looked like rust/old baked on head gasket. Did I make a grave mistake?

                              Comment

                              Working...
                              X