.png "Powered by vBulletin")
http://members.dslextreme.com/users/bikecliff/ this is the site you need to visit.
-
Larry
'79 GS 1000E
'93 Honda ST 1100 SOLD-- now residing in Arizona.
'18 Triumph Tiger 800 (gone too soon)
'19 Triumph Tiger 800 Christmas 2018 to me from me.
'01 BMW R1100RL project purchased from a friend, now for sale. -
Hi Ken.
Maybe this will help. This is from a head I have torn down. The bucket and shim here are what's under the cam lobe. Slide the feeler gauge under the lobe, on top of the shim.
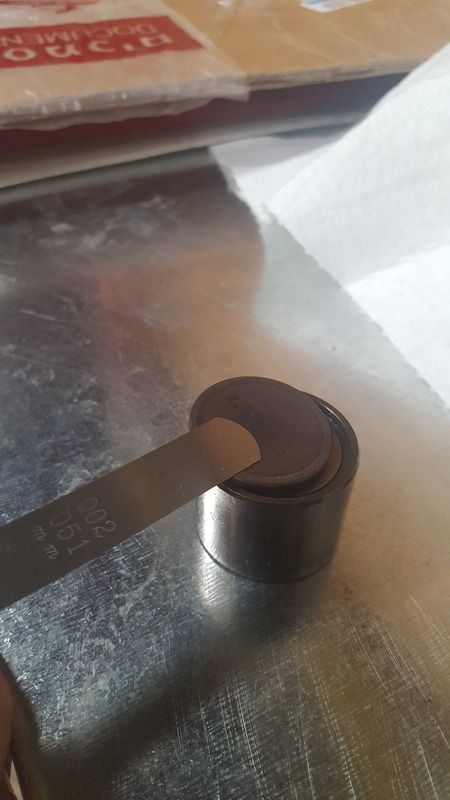
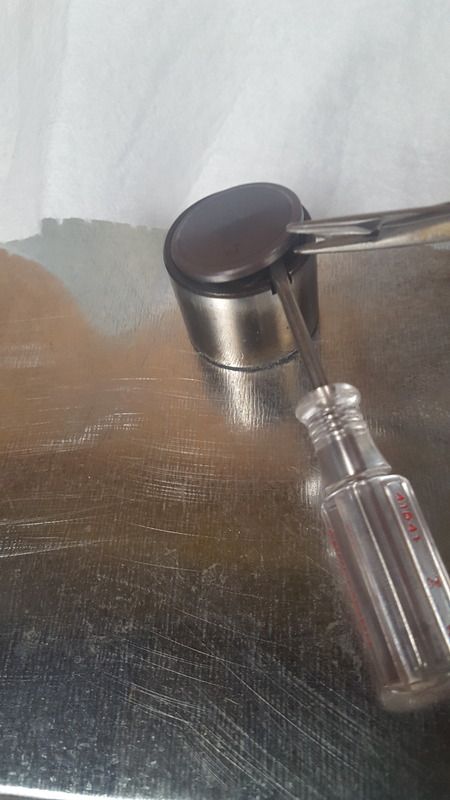
Getting the shim out can be tricky. Tweezers work well. If you don't have a micrometer pick one up. Got mine at Home Depot. Those shims might not be labeled correctly, if at all.
RogerRoger
'83 GS850G Daily rider
'82 GS1100GK Work in (slow) progress
Comment
-
I made one of those tools to push the bucket down. Much easier to order one. Check out this thread.
Roger
'83 GS850G Daily rider
'82 GS1100GK Work in (slow) progress
Comment
-
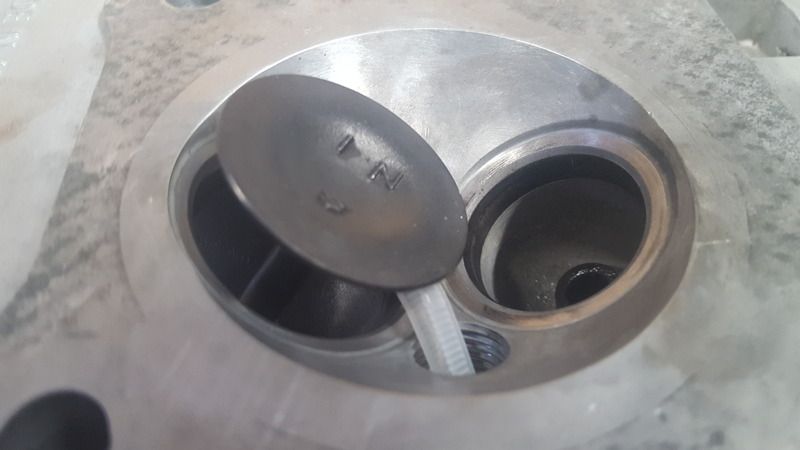
One more thing. You may have read about the zip tie method. That works too. Here's what it does from the inside. Just holds the valve open for you.
 Roger
Roger
'83 GS850G Daily rider
'82 GS1100GK Work in (slow) progress
Comment
-
First, get an old butter knife out of your kitchen drawer and narrow the blade end and cut the blade end off and sharpen. Makes a good RTV removal tool. The better you can clean that glop off, the more chance your valve cover gasket will work as it should. It likes clean metal to seat on. The reason for the RTV in the tach drive area was there obviously was a leak. Get a new tach drive seal and oring and that will fix that problem.
I recommend you get the Motion Pro valve shim tool. It works; there are other ways to go about this but that tool seems the simplest to me. Look at your manual. When you get ready to adjust valve clearances, be aware that your bike most likely has been neglected and you will need some new valve shims. The kit that is sold with the "assortment" is pretty useless as they supply far too many real fat shims which are typically not the ones used. Get a digital caliper from Harbor Freight or the like. It is fine for measuring the thickness of the shims you remove to measure. First time around you should measure all of them and record what you have in there even if you have the required clearance. .
Take your plugs out and put some rags of the plug holes (don't ask me how I know to do this...). This makes checking much easier. Get a 19mm socket for turning the nut on the crank end under the points cover. Rotate the crankshaft to the location specified in your manual and you will be able to check two shims. Before doing anything else, rotate the buckets so that the notch faces inward. Check the clearance and record. Then use the tool to pry down the bucket by fitting the tool to its edge. It will stay in place. Then use a dental pick or very small flat screwdriver to pop the shim up. Keep in mind that the oil under the shim will resist this but it will pop up. To fetch it out, I use one of little magnets that look like a pen and extend. The magnet is easier than tweezers but they will work as well.
Measure the shim thickness and record it. Oh, if you get into a situation where you can't spin the bucket with the cam lobe off it, this means the valve clearance is really tight and you will just have to remove the shim and replace it with a significantly thinner one (maybe 2 or 3 sizes) and recheck the clarance.
If you need to swap the shim to gain the required clearance, a member here has a chart of sorts for doing this but you can also learn to do the math in your head as you go. If you don't have the right shim on hand, order it. There are sometimes eBay auctions where folks sell shim lots where the sizes may be better than what is supplied in the K&L kit. You may also be able to find someone local to you up in the frozen North who would be willing to swap some shims with you. Follow the instructions in the manual for cam position and repeat till all valves are completed.
This would be a dandy time to take care of the nasty mess made by the RTV with the tach drive. It will probably be a bit tough to remove the sleeve since the guy who went crazy with the RTV effectively glued it in place and hopefully I am wrong. Not sure if there is anything out there that will loosen RTV or help remove it.Comment
.png)
Comment