Announcement
Collapse
No announcement yet.
Tappet tool?
Collapse
X
-
Tappet tool?
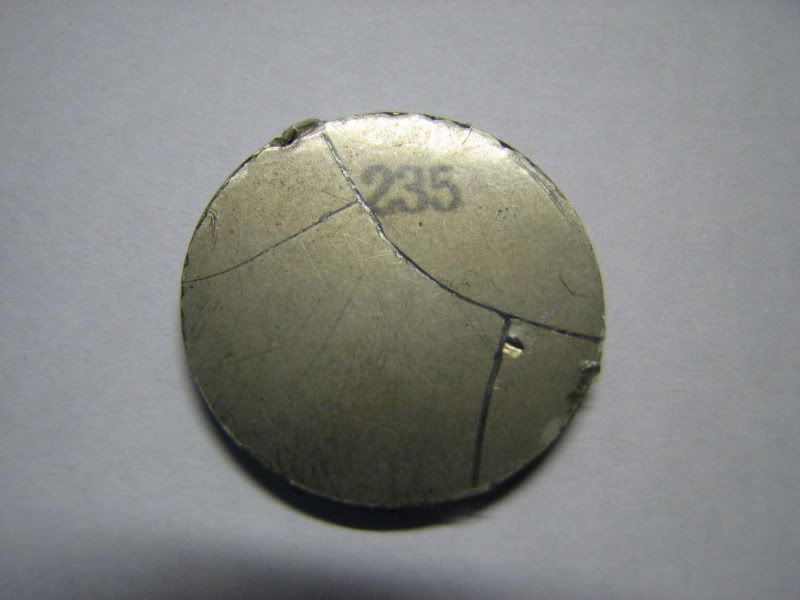
I feel like I was sold a garbage tool. Should it be getting shredded like this, or am I doing it wrong? This checking valve clearances thing is very frustrating.Tags: None
-
 Nayt G
 -
That's a weird texture on the underside of your tool. Mine, which is made by Suzuki, is smooth and slides under the cam shaft without issue. No chipping of whatever coating is on it either.
There is a simple method involving a zip tie which may suit you better. Each takes a little getting used to but both methods work.
Oh, also if you go into edit your first post and find admin options you can move the thread to another forum.
Comment
-
 Nayt G
Is says "for Suzuki and Kawasaki" on the side. It was smooth when I bought it, but it is getting cut up trying to actually use it. It keeps popping off the side when I am trying to press down and it's getting worse. I don't remember if I ordered this tool from Bikebandit or Z1. I need to find out. It's either really bad, or I'm really bad at this.
Comment
-
I have a similar non-Suzuki tool. I have never mastered the art of using it, and use the zip-tie method exclusively now.
Some don't like using zip-ties because it might dislodge some carbon pieces or it might break, leaving pieces in the engine, but neither fear has been experienced by me. If there <was> carbon, it needed to be dislodged anyway. When the zip-tie tool is properly made, there are two thicknesses. If either one gets cut, it gets dragged out by its mating piece.
Some also don't like using zip-ties because you are required to turn the crank to insert, use, then remove the tool. There are two full rotations required for ever use of the zip-tie. The first time you check your clearances, you will also need to inventory your shims and enter their values in the spreadsheet I sent. If you then have to change a shim, that involves a few more turns of the crank. In my opinion, I have to agree with Garfield (the cartoon cat) on that one, "big, fat, hairy deal".
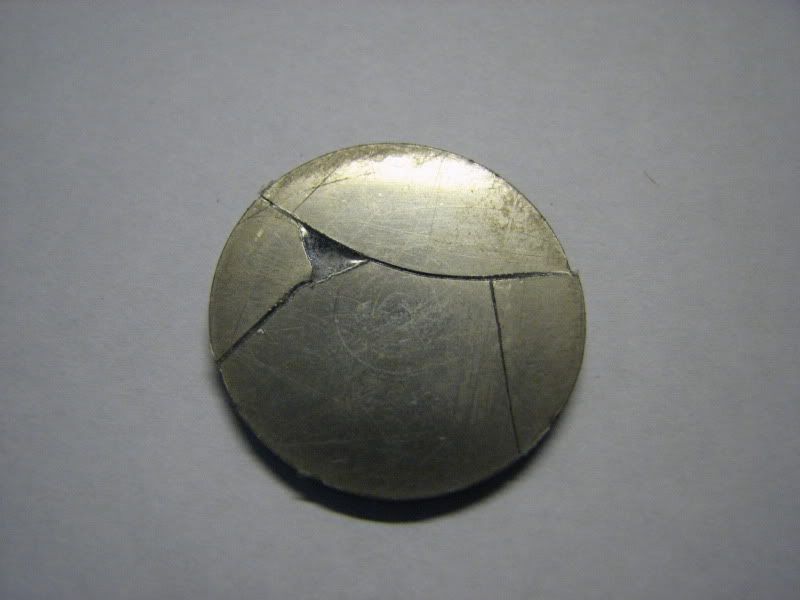
It certainly is a lot safer, in my opinion, as you will not have the chance of the tool slipping off the side, allowing the valve to slam shut. If you happen to have a shim not quite fully in-place, you can easily end up with a shim that looks like this:


That was on my Kawasaki, but the tool slipped off the side, shattering the shim. A bit of time fishing with a magnet, followed by a bit more time assembling the pieces until I had found enough to make me feel comfortable, then I looked for another method and found ZIP-TIES.
.sigpic
mine: 2000 Honda GoldWing GL1500SE and 1980 GS850G'K' "Junior"
hers: 1982 GS850GL - "Angel" and 1969 Suzuki T250 Scrambler
#1 son: 1986 Yamaha Venture Royale 1300 and 1982 GS650GL "Rat Bagger"
#2 son: 1980 GS1000G
Family Portrait
Siblings and Spouses
Mom's first ride
Want a copy of my valve adjust spreadsheet for your 2-valve per cylinder engine? Send me an e-mail request (not a PM)
(Click on my username in the upper-left corner for e-mail info.)
Comment
-
I used the same tool until Steve showed me the zip tie method which is actually less stressful. Here's a good link to it http://members.dslextreme.com/users/...ol_zip_tie.pdf
and I made a video of the process at one time. Let me try to find that again
I found the video; let's see if this works
Last edited by cowboyup3371; 08-25-2018, 05:54 PM.Cowboy Up or Quit. - Run Free Lou and Rest in Peace
1981 GS550T - My First
1981 GS550L - My Eldest Daughter's - Now Sold
2007 GSF1250SA Bandit - My touring bike
Sit tall in the saddle Hold your head up high
Keep your eyes fixed where the trail meets the sky and live like you ain't afraid to die
and don't be scared, just enjoy your ride - Chris Ledoux, "The Ride"
Comment
-
 Downs
Downs
I've got the motion pro tool and haven't experienced such drama with it. If you position the tool properly on the camshaft it pretty much self guides. I'd much rather deal with the Shim overbucket or screw and locknut type adjusters like on the Suzuki Bandit than deal with shim under bucket and pulling cams and whatnot.
Comment
-
 ChicagoBob
I've had better luck with the zip tie method (I think it's described on BikeCliff's site) . A big zip tie inserted in the plug hole and under an open valve will hold it open enough to swap shims with no drama or oil splashes in your eye.
Comment
-
Nayt,
I have the Motion Pro tool and have used it for about 18 shim swaps. It does show some polishing on the rib that bears against the shim bucket, but nothing like yours.
I do find that I need to be careful to align that raised rib with the edge of the bucket.
Cheers, Alan'82 GS650G 27k
'00 GZ250 5k "Pocket Hawg"
('98 GS500E 18k, new project - moved on to new home)
'98 GSF1200 39k, new project, fixed the blown out spark plug, waiting on time
'05 Moto Guzzi Nevada 750IE (the Pocket Hawg's days are numbered)
Comment
-
Forum LongTimerBard Award Winner
GSResource Superstar
Past Site Supporter
Super Site Supporter- Oct 2003
- 17455
- Indianapolis
That style tool works fine, but you may need to dress that one with a file to smooth that out. Or it may be some no-name that's just too soft. Never seen that before.
The Motion Pro tool is known to be decent quality, but there's often a pronounced line in the middle of that rib from the casting process. Dress with a file before using so you have a flat surface and it'll work a lot better.
The other main secret to using these tools successfully is to apply sideways pressure toward the cam lobe you're working on as you're pushing the tool down (for example, if the tool is pushing on the left side of the bucket, pull to the right a bit as you push down). If you just push straight down, or you're not paying attention to sideways pressure, they can slip off. The zip-tie method is fairly foolproof, and you're not going to risk shattering a shim.
Using the tool is a little faster, but most of us don't care about that.1983 GS850G, Cosmos Blue.
2005 KLR685, Aztec Pink - Turd II.3, the ReReReTurdening
2015 Yamaha FJ-09, Magma Red Power Corrupts...
Eat more venison.
Please provide details. The GSR Hive Mind is nearly omniscient, but not yet clairvoyant.
Celeriter equita, converteque saepe.
SUPPORT THIS SITE! DONATE TODAY!
Co-host of "The Riding Obsession" sport-touring motorcycling podcast at tro.bike!
Comment
-
Forum LongTimerGSResource Superstar
Past Site Supporter
Super Site Supporter- Mar 2006
- 35640
- Torrance, CA
I suspect at least some of the damage shown is because the tool is popping out. I use a small screwdriver along side the tool applying pressure to assure the tool doesn't slide off the bucket. Takes a little practice but you will get the hang of it.Ed
To measure is to know.
Mikuni O-ring Kits For Sale...https://www.thegsresources.com/_foru...ts#post1703182
Top Newbie Mistakes thread...http://www.thegsresources.com/_forum...d.php?t=171846
Carb rebuild tutorial...https://gsarchive.bwringer.com/mtsac...d_Tutorial.pdf
KZ750E Rebuild Thread...http://www.thegsresources.com/_forum...0-Resurrection
Comment
-
Nayt G, if you need any help with this just let me know. I have the Suzuki shim tool and have used it for many years. Just offering up help if needed. PM me if you want to take me up on my offer.Larry
'79 GS 1000E
'93 Honda ST 1100 SOLD-- now residing in Arizona.
'18 Triumph Tiger 800 (gone too soon)
'19 Triumph Tiger 800 Christmas 2018 to me from me.
'01 BMW R1100RL project purchased from a friend, now for sale.
Comment
-
 Nayt G
Thanks, all. nejeff stopped by and dropped off his Suzuki tool and shim kit and I'm all fixed up! The Suzuki tool was night and day better than the one I have. I'll have to try the zip tie method next time and see which I prefer.
Comment
-
I have successfully used the Honda tool for the F bikes. I have a 1983 CB1100F and the tool wedges very securely.NO PIC THANKS TO FOTO BUCKET FOR BEING RIDICULOUS
Current Rides: 1980 Suzuki GS1000ET, 2009 Yamaha FZ1, 1983 Honda CB1100F, 2006 H-D Fatboy
Previous Rides: 1972 Yamaha DS7, 1977 Yamaha RD400D, '79 RD400F Daytona Special, '82 RD350LC, 1980 Suzuki GS1000E (sold that one), 1982 Honda CB900F, 1984 Kawasaki GPZ900R
Comment
.png)

Comment