Announcement

Collapse
No announcement yet.

cylinder studs overtorqued into crankcase, heli-coil repair?

Collapse
X
 
  • Filter
  • Time
  • Show
Clear All
new posts

    cylinder studs overtorqued into crankcase, heli-coil repair?

    EDIT: Changing subject from "Are GS550 crankcases the same 77-79 kickstart vs 80-81/82 8v?" to "cylinder studs overtorqued into crankcase, heli-coil repair?'"


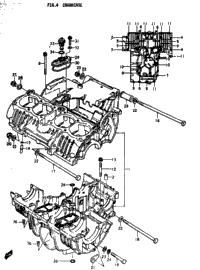
    [S]I was wondering if anyone could tell me if a 1980 GS550 crankcase still have provisions for the kick-start mechanism used in 77-79? or if they redesigned the crankcase without this for the 1980 model year? it would make sense to me that they would just use the same crankcase without having to re-tool (as well as being able to supply exact replacement warranty engine cases for the older models), & just use a new clutch cover with the kick-start shaft/seal opening area deleted. [/S]


    I have a '77 GS550B crankcase on my workbench that I already have just degreased/cleaned, sanded for paint, & clearanced for 650 cylinders, and then when cleaning the Athena base gasket material off of the crankcase from a previous owner's repair job, I realized that 3 of the cylinder studs (via torquing the head nuts too tight on reassembly) had been over torqued significantly by the previous owners, and the metal was actually pulled up a several thousandths of an inch around 3 studs.

    Although the studs seem very firmly in place now, I'm not sure about how much I trust it now especially one of the three which looks pretty stressed, .006"- 009" pulled up directly adjacent to the stud threads only within 1mm of the stud hole. when the light hits it right, you can see that it is distorted, and I noticed when scraping gasket material that my scraper would rock back and forth on it. I suppose I could go to great lengths to remove the studs if they will cooperate, drill it out for a Time-Sert insert, true up the surface area if drilling it out 1 size up for the thread repair does not remove all if the distorted metal, and loctite Time-Sert thread repair insert in place. Or I could just run it as is? The stud seems very well in place, but you never know. Upping the displacement from 548 to 673... More power than it had ever seen previously.

    I have two 1980 or 1981 parts engines on the shelf but have not pulled them apart yet and would rather keep them in one piece how to keep track of loose transmission parts and crank cases, I am already overflowing with GS engines and parts, have a shelf full of spare parts bike (friends' vintage salvage yard closed) GS engines...
    Last edited by Chuck78; 02-10-2019, 12:19 PM.
    '77 GS750 920cc heavily modded
    '97 Kawasaki KDX220R rugged terrain ripper!
    '99 Kawasaki KDX220R​ rebuild in progress
    '79 GS425stock
    PROJECTS:
    '77 Suzuki PE250 woods racer
    '77 GS550 740cc major mods
    '77 GS400 489cc racer build
    '76 Rickman CR1000 GS1000/1100
    '78 GS1000C/1100

    #2
    I'd use helicoils.
    Ed

    To measure is to know.

    Mikuni O-ring Kits For Sale...https://www.thegsresources.com/_foru...ts#post1703182

    Top Newbie Mistakes thread...http://www.thegsresources.com/_forum...d.php?t=171846

    Carb rebuild tutorial...https://gsarchive.bwringer.com/mtsac...d_Tutorial.pdf

    KZ750E Rebuild Thread...http://www.thegsresources.com/_forum...0-Resurrection

    Comment


      #3
      i suppose you could compare the crankcase parts number between the years. "partsfish" shows the same numbers between my bike ( a 79 gs550e ) and an 80 gs550e.

      Shop online for OEM Crankcase parts that fit your 1979 Suzuki GS550E, search all our OEM Parts or call at 800-964-1882


      Shop our large selection of Suzuki OEM parts, original equipment manufacturer parts and more online or call at 800-964-1882

      Comment


        #4
        Yes I looked up crankcases, crank parts, rods, etc last night and saw they were all the same for 77-82 GS550 & even GS650E on the crank (maybe the crankcase even? If so it must've been a superceeded part # as 650G cylinders dont fit a 77-79 550 case without some slight clearancing).

        I suppose the bigger question and focus of this thread now is, should I try to pull these studs and helicoil the three that show distortion of the aluminum crankcase in the base gasket area from being over torqued? it did not seem to be going anywhere, but if I am increasing the displacement of this bike and trying to build something reliable oh, it is probably a good idea. That and I don't want to have to tear down another one of my parts engines. I already have this one torn down completely, spent $12 at the car wash power washing it, as well as a few hours scrubbing it in every nook and cranny, sanding it down to prep for paint, as well as spending some time with a die grinder to clearance it for GS650G cylinders... I should have cleaned the base gasket material off first before doing any of the other work! That is when I first saw the distortion in the aluminum. It is really just at the very base of the studs, less than 1 mm away from the edge of the stud, but I am worried about the integrity of the aluminum threads.

        An acquaintance of mine kept having head gasket leaks on his aftermarket Harley style engine built by S&S, high performance stuff if you want a Harley, he kept having major head gasket leaks and it turned out that his studs were pulling out of his crankcase. I believe he did a helicoil repair on those. I think it was still holding up just fine.

        Photos to follow, gotta run for now...
        Last edited by Chuck78; 02-10-2019, 10:59 AM.
        '77 GS750 920cc heavily modded
        '97 Kawasaki KDX220R rugged terrain ripper!
        '99 Kawasaki KDX220R​ rebuild in progress
        '79 GS425stock
        PROJECTS:
        '77 Suzuki PE250 woods racer
        '77 GS550 740cc major mods
        '77 GS400 489cc racer build
        '76 Rickman CR1000 GS1000/1100
        '78 GS1000C/1100

        Comment


          #5
          Photos. I didn't quite capture the distortion quite right in the light with the camera, it looks much more clear with the naked eye vs a smartphone photo, but you can see with the razor blade photos the light under the sides of it


          Same stud as the .009" reading, but from the opposite side:


          Here you can maybe make out a bit of the curvature the distorted area of aluminum directly adjacent to the stud, it is a very minimal area but definitely something to be concerned about:


          I believe in this one, I rocked the razor blade all the way to one side, so the far-right of it is actually much higher than what the metal is raised in the center. This one was the least distorted, and I could not get a convincing photo of any distortion or clearance under the razor blade it holding parallel.


          I suppose what I am after here is what people's thoughts are on doing a helicoil or Time-Sert thread repair on these, or if I should just throw these in the scrap bin and abandon them forever and let them get turned into aluminum beer cans...???
          I've got a fair amount of time into cleaning them up oh, but very little money invested (car wash, degreaser). I hate to just scrap them but if there is any doubt of their integrity after a thread repair, then so be it. Scrap bin.
          Last edited by Chuck78; 02-10-2019, 12:09 PM.
          '77 GS750 920cc heavily modded
          '97 Kawasaki KDX220R rugged terrain ripper!
          '99 Kawasaki KDX220R​ rebuild in progress
          '79 GS425stock
          PROJECTS:
          '77 Suzuki PE250 woods racer
          '77 GS550 740cc major mods
          '77 GS400 489cc racer build
          '76 Rickman CR1000 GS1000/1100
          '78 GS1000C/1100

          Comment


            #6
            This is a bit large to set in the deck of my drill press, and I still have not assembled the old well used Enco RF30 round column vertical milling machine that I bought over a year ago in a huge lot of tools with a South Bend Heavy 10L lathe, horizontal Altlas MFB mill, welders, etc..,

            Also, the base gasket surface is kicked forward at an angle in relation to the case halves mating surface anyhow.

            The fella that I know that did a similar repair onto aftermarket S&S "Harley Davidson Evo-style" crankcases had a machinist buddy that made him up a drilling guide plate to hand drill the hole perfectly perpindicular. Perhaps a repair approach like this woukd yield more accurate and longlasting/strong results to minimize any chance of misalignment and this side-loading the repair job when the stud flexes to its most direct vertical position when torqued.
            Last edited by Chuck78; 02-10-2019, 12:16 PM.
            '77 GS750 920cc heavily modded
            '97 Kawasaki KDX220R rugged terrain ripper!
            '99 Kawasaki KDX220R​ rebuild in progress
            '79 GS425stock
            PROJECTS:
            '77 Suzuki PE250 woods racer
            '77 GS550 740cc major mods
            '77 GS400 489cc racer build
            '76 Rickman CR1000 GS1000/1100
            '78 GS1000C/1100

            Comment


              #7
              Enlarge the bolt hole of the head gasket to stay away from those "lifts". That seems easiest to me.

              Comment


                #8
                I thought about opening up the holes in the base gasket, but the aluminum integrity is what I was concerned about.
                '77 GS750 920cc heavily modded
                '97 Kawasaki KDX220R rugged terrain ripper!
                '99 Kawasaki KDX220R​ rebuild in progress
                '79 GS425stock
                PROJECTS:
                '77 Suzuki PE250 woods racer
                '77 GS550 740cc major mods
                '77 GS400 489cc racer build
                '76 Rickman CR1000 GS1000/1100
                '78 GS1000C/1100

                Comment


                  #9
                  can these surfaces not be planed? Strength of material aside
                  1983 GS 550 LD
                  2009 BMW K1300s

                  Comment


                    #10
                    Yes, that's not a problem at all, the problem is worrying about all of the threads being lifted upwards between .002" and the worst, .009" (almost 0.25mm!). The integrity of the aluminum threads torque holding ability is in question, as well as the strength after a heli-coil repair (which is probably totally fine, but I am a big fuss about things, very very particular).


                    (I'm lifting my shop rag up in the photo above to expose the graduated marks on the deck swivel of the drill press)

                    I just confirmed that the crankcase upper half will easily load onto my dril press deck/table, and it even has an axis rotation adjustment so that I can tilt the bed to the angle at which the cylinders are mounted to obtain far better than incosistent/wallowed/mis-aligned hand-drilling results. I haven't done any critical operations on the drill press for a long time and forgot that I could even swivel the deck like that... I need to be in the shop more! That is my New Year's resolution! Focus, focus, focus! Get down to business! Every day possible!


                    I also had already purchased a quality German-made V-Coil thread repair kit and optional longer 2.5D or 3D thread repair inserts (2.5 or 3 times longer than the diameter of the thread being repaired), to repair 3 botched exhaust bolt holes on this '83 GS650 head. M8x1.25 is the thread size of both
                    '77 GS750 920cc heavily modded
                    '97 Kawasaki KDX220R rugged terrain ripper!
                    '99 Kawasaki KDX220R​ rebuild in progress
                    '79 GS425stock
                    PROJECTS:
                    '77 Suzuki PE250 woods racer
                    '77 GS550 740cc major mods
                    '77 GS400 489cc racer build
                    '76 Rickman CR1000 GS1000/1100
                    '78 GS1000C/1100

                    Comment


                      #11
                      I used to know a lot about this stuff.
                      If I'm not mistaken when a bolt pulls a hole it's the top thread that gets the bad news.
                      The bolt is stretching and the lower parts of the hole may not have any deformation worth talking about.
                      These things are over engineered as well.
                      I might take out the top thread with a countersink tool.
                      97 R1100R
                      Previous
                      80 GS850G, 79 Z400B, 85 R100RT, 80 Z650D, 76 CB200

                      Comment


                        #12
                        Originally posted by Brendan W View Post
                        I used to know a lot about this stuff.
                        If I'm not mistaken when a bolt pulls a hole it's the top thread that gets the bad news.
                        The bolt is stretching and the lower parts of the hole may not have any deformation worth talking about.
                        These things are over engineered as well.
                        I might take out the top thread with a countersink tool.
                        Ahhh... I had not considered this possibility! However, I would think that the aluminum would distort and fatigue before the steel would stretch, however aluminum is very stiff, but the thread ridges / peaks are very small, and I would think that they would go before the steel would bend / stretch.

                        Any other opinions on this?


                        I suppose if I can get the studs out easily, I can just use a thread pitch gauge on the stud to see if in fact it appears to have stretched. I would really not think it would stretch there, as they are much thinner in the middle sections, and thicker where the threaded ends are top and bottom. Like a butted or double-butted spoke, they are designed to stretch in the middle, instead of putting additional stress on the threads or the 90-degree elbow bend at the hub, or the head of the spoke if it is a straight pull.
                        '77 GS750 920cc heavily modded
                        '97 Kawasaki KDX220R rugged terrain ripper!
                        '99 Kawasaki KDX220R​ rebuild in progress
                        '79 GS425stock
                        PROJECTS:
                        '77 Suzuki PE250 woods racer
                        '77 GS550 740cc major mods
                        '77 GS400 489cc racer build
                        '76 Rickman CR1000 GS1000/1100
                        '78 GS1000C/1100

                        Comment


                          #13
                          Also, does anyone have any tips for stud removal? Heat upper crankcase half in oven to 180 degrees? Just use thedouble nut method with several nuts?
                          I was thinking of making some long rod coupler type nuts, two of them, to crank against each other. I believe there is a specific stud pulling tool as well, but I have never seen one nor have I needed one.
                          '77 GS750 920cc heavily modded
                          '97 Kawasaki KDX220R rugged terrain ripper!
                          '99 Kawasaki KDX220R​ rebuild in progress
                          '79 GS425stock
                          PROJECTS:
                          '77 Suzuki PE250 woods racer
                          '77 GS550 740cc major mods
                          '77 GS400 489cc racer build
                          '76 Rickman CR1000 GS1000/1100
                          '78 GS1000C/1100

                          Comment


                            #14
                            On my KZ engine build double nutting didn't work; I tightened the heck out of the nuts but they kept turning regardless. I was afraid of damaging the threads so had to go the stud puller route. Unfortunately, the stud puller deeply gouged the studs. I had a parts engine though and was able to find enough good studs to do the job but overall the entire project was not pleasant. I used a Harbor Freight stud puller so maybe a better tool? Not sure.
                            Ed

                            To measure is to know.

                            Mikuni O-ring Kits For Sale...https://www.thegsresources.com/_foru...ts#post1703182

                            Top Newbie Mistakes thread...http://www.thegsresources.com/_forum...d.php?t=171846

                            Carb rebuild tutorial...https://gsarchive.bwringer.com/mtsac...d_Tutorial.pdf

                            KZ750E Rebuild Thread...http://www.thegsresources.com/_forum...0-Resurrection

                            Comment


                              #15
                              I use an electric heat gun on the top case - applying it to the cast boss of the stud I'm working on. Double nutting usually works with heat but I have occasionally had to use a stud remover. Yes, some marks on the studs. Most unlikely to cause a problem as you're never torquing them to yield point.
                              Set the case up in your drill press - tilting table, Luxury....Countersink the tops of the holes to get rid of the stretched top surface

                              I've had to recover a couple of cases like yours - a Z1 and CB350/4

                              Comment

                              Working...
                              X