With the exception of the speedometer (more on that below), installation went rather smooth. I just sat down with the wiring chart from the manual and determined what wire needed to go where.
Most of the connections were simple one-to-one - for example, the headlight indicator from the cluster went to the headlight indicator on the Acewell. Same with the neutral, oil pressure, fuel. I forget what I connected the Acewell hazard indicator to. I believe it was something on the bike's diagram that said "this indicator is for the side stand warning or X". Since I don't have a side stand indicator, it is whatever the "X" is on the diagram.
Since I was removing the whole cluster, there were plenty of switched sources of power. Furthermore, since I was running a new feed from the battery for my new headlight and horn, I was able to get an "always on" feed to the unit for the clock. Actually, the "always on" is a misnomer on my bike. It actually is "on when the bike is off".
I had forgotten that I needed power when the bike was off. Luckily, I was using two relays to provide power to the headlight (one to turn the light on when the bike was on and one to determine high / low beam). I used a switched power source for the first relay coil and the original low beam feed for the second relay coil. When the bike is off, the N/C post (87a) feeds battery power to Acewell. When the bike is on, it gets power from another switched source. This is possible because there are two power inputs on the device (one for "always on / on when bike is off" and one for "on when bike is on").
This left two inputs: tach and speedometer.
For tach, I have a wire wrapped around one of the spark plug wires near the coil. It works, but not great. The RPMs jump around over a 700 RPM range and don't seem to be that accurate. I've tried setting the spark signal ratio to 0.5, 1.0, and 2.0 and it doesn't seem to change the response or accuracy. Not a big deal, so I'll leave it alone for now.
The speedo provided a bigger challenge. Acewell provides a Reed sensor and a magnetic head bolt for the speedo. However, I could not find a way to use it on the bike, unmodified. I searched and searched for a device that would convert the rotation of the original speedo shaft into 4 pulses per revolution, but couldn't find one that was cost effective (best I could do was over $100). What I ended up doing was:
- welding an extra bar of metal onto the right brake line support and mounting the Reed switch there
- JB Weld four small, but really freaking strong, magnets to the rim, 90 degrees apart from each other (PartsExpress #329-040). In case you want to try this, I found this method worked pretty well:
- mark out 4 locations on the rim - make sure they are 90 degrees apart
- lay out 4 12 - 18" strips of masking tape
- put magnets in center of length of tape
- apply jb weld (note that JB Weld, being a suspension of metal particles, will actually "jump" to the magnet)
- place each magnet in place, wrapping tape around wheel. I used the flat surface just inside the rim as the mounting point.
- apply extra tape, making adjustments to the magnet placements as necessary
- don't touch bike for a day
- mark out 4 locations on the rim - make sure they are 90 degrees apart
After I had everything together, I had to calibrate the speedo. I put a small mark on the tire and the ground and then rolled the bike so the wheel rotated exactly once. I measured how far the bike rolled from the original point and then divded by four (one for each magnet). This is the number I used to calibrate the Acewell.
How did it do? When I zip tied my GPS unit to my handlebars, the speedo on the bike was always within a few tenths of a MPH that the GPS reported, so I say it did pretty well.
The benefit to using four magnets is (a) the wheel should stay in balance and (b) if you want to hook your turn signal controller, it expects 4 pulses per revolution.
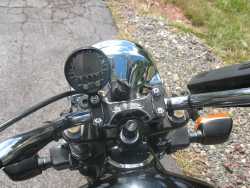
For mouting, the original handlebar bolts would have worked fine, but I decided to order a few M8 x 35mm chrome button head bolts. I like that look a little better.
I can say that I love the new gauge. First, it is small - really opens up the front of the bike. Second, I have two trip odometers ... one for gassing up and one for knowing how far I've gone on every time out. Third, a clock ... though I can't really use the "I didn't realize how long I'd been out" excuse with the wife anymore.
If you have any questions about the connections or mounting, please feel free to drop me a PM or respond here (preferred, since that will get the info out in the open).
Here are some pictures (click for full size):
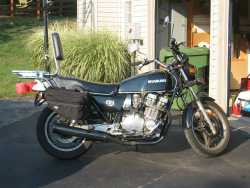
The original bike:

The modded bike:

Acewell:

Brake mount
You can see the two of the magnets on the rim, one close and one far. I still need to get in there and grind off some of the excess JB Weld:

Thanks,
- Tony
 Does yours? Did you have to calibrate it? And how much did you pay for it?

Comment