Announcement
Collapse
No announcement yet.
Project 700ES
Collapse
X
-
 jwhelan65
As soon as the temps here drop below 102 degrees I'll get my sorry arse back in the garage and get er fired up some how some way. If I dont buy the sync tool , I'll take it and have it done. Hopin to have this thing out on a ride this month!Originally posted by Nessism View Post
-
 jwhelan65
Thanks man,Originally posted by Rkt-Rch View PostYou gotta fire the thing up !!! Iv'e been waiting also to get a few extra bucks so I can seal my tank, and then I can put her back on the road. Every few days I pull out the temp 1 gal Hawwain Punch bottle and listen to her run. LOL You better watch out you might get a ticket for being nude in public. Still a great job. Right now the valve cover is off mine (valve adj) and I started to attempt to polish it but I think I'm going to do the same as you and just paint it so I can get it back together,
How long does it take to paint body parts ?? I've painted 3-4 cars,boats,planes,tricycles,houses,etc... Just kidding, hope they hurry I want to see the coplete finshed project...
http://www.thegsresources.com/_forum...6&d=1240191796
I here ya on the body work, the problem was he took on my project at his busiest time and he was backed up with several ahead of me. Pretty certain I'll have it next week. getting impatient though...
Comment
-
 jwhelan65
Im hopin to.. I really wanted to get the 1100 finished but that probably wont happen. Been talking to PJ about maybe trailering the bikes to him and than riding out from there. May bring the FZ as a back up As long as I can arrange coverage at work , there is a good chance I'll be there.
Comment
-
 jwhelan65
The crank case is leaking oil out the seal. The seal is brand new, but one thing I noticed when I installed the stainless allen replacement bolts is they were just a bit to long and wouldn't snug up tight. Thinking on just trimmg each of them or cleaning up the old ones.
BTW ..Bodyparts are done..whoo hoo!
Comment
-
Forum LongTimerGSResource Superstar
Past Site Supporter- Oct 2006
- 14009
- London, UK to Redondo Beach, California
Can't wait to see it
You're making more progress than I am on mine... 1980 GS1000G - Sold
1978 GS1000E - Finished!
1980 GS550E - Fixed & given to a friend
1983 GS750ES Special - Sold
2009 KLR 650 - Sold - gone to TX!
1982 GS1100G - Rebuilt and finished. - Sold
2009 TE610 - Dual Sporting around dreaming of Dakar..... - FOR SALE!
www.parasiticsanalytics.com
TWINPOT BRAKE UPGRADE LINKY: http://www.thegsresources.com/_forum...e-on-78-Skunk/
Comment
-
 cyclefvr2
Originally posted by jwhelan65 View PostThe crank case is leaking oil out the seal. The seal is brand new, but one thing I noticed when I installed the stainless allen replacement bolts is they were just a bit to long and wouldn't snug up tight. Thinking on just trimmg each of them or cleaning up the old ones.
BTW ..Bodyparts are done..whoo hoo!
take them out, put 2 nuts on the bolt, tighten together, then grind or cut to lenght needed, take nuts off, file edge, or use a tap/ die on it to clean the threads , a lil patience and its bettr thn new
Comment
-
 jwhelan65
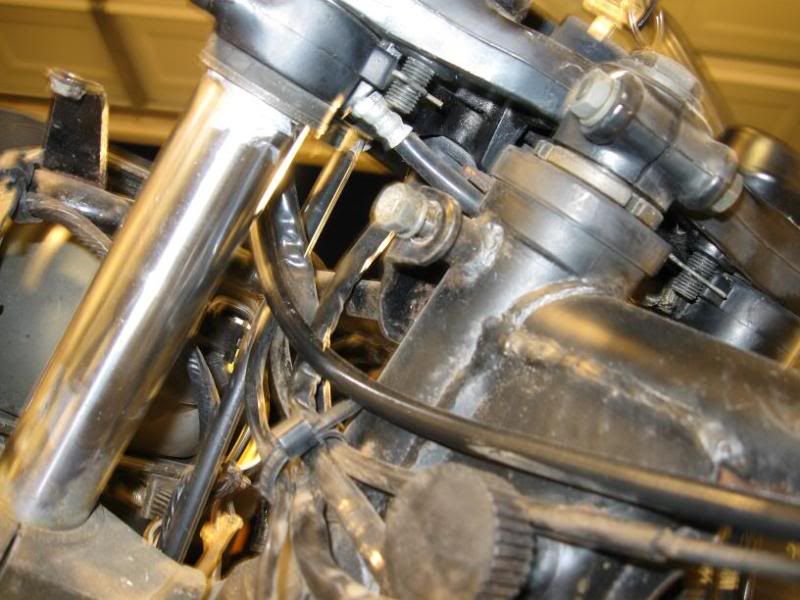
Trying to remove the front forks to replace the seals, I have loosened the upper and lower clamps but they will not budge. Talking with Ed there is a air collar with a spring and clips attaching to the forks. All I can see is a hose connecting the two ..top center in the photo...Any ideas?

Comment
-
 reddirtrider
It doesn't on the 750 I'm rebuilding.Originally posted by renobruce View PostI think you have to unscrew that air nipple going onto the collar on the fork tube. I think it embeds into the fork tube.
I'd take the handlebar risers off if you haven't already. Mine were forged to the forks with corrosion. If you have all the bolts loose and you can't turn the forks try using a strap wrench.
Comment
-
 cyclefvr2
i think the forks are locked in a certain position, to allow air through the hole in the tube/clamp you know??
if so DONT FORGET TO INDEX THEM on re assembly lol
i would suggest looking at the microfich online (its free) and see what it looks like, mine 83 750ed has the nipple on the side of the clamp, to air them up,
you need to put it on the center stand ,and take all pressure off them b4 you add air (check your manual) on your models!!
i assume that you do this so you will not have too much air in them from all the weight on them when the bike sits regular,because your onl;y suppose to have a few psi in them, or theyll blow, (no wheelies)haha, or all work is for nothing
i dunno how dirt bikes last so long but street bikes dont
maybe you guys can make seal drivers out of some pvc plastic pipe?? its less than 60 set , i dont understand why there so expencive, you would think the companies would get smart, its just 2 pieces of metal
Comment
-
 reddirtrider
The forks aren't indexed. They have a hole for the air and the collar the fits over them has a groove all the way around the inside to so that no matter what position the forks are in the hole isn't blocked. The collar is indexed to the top triple. There's a slot on the collar that fits in a tab on the top triple. You'll see it when you assemble them, it's hard to miss.Originally posted by cyclefvr2 View Posti think the forks are locked in a certain position, to allow air through the hole in the tube/clamp you know??
if so DONT FORGET TO INDEX THEM on re assembly lol
i would suggest looking at the microfich online (its free) and see what it looks like, mine 83 750ed has the nipple on the side of the clamp, to air them up,
you need to put it on the center stand ,and take all pressure off them b4 you add air (check your manual) on your models!!
i assume that you do this so you will not have too much air in them from all the weight on them when the bike sits regular,because your onl;y suppose to have a few psi in them, or theyll blow, (no wheelies)haha, or all work is for nothing
i dunno how dirt bikes last so long but street bikes dont
maybe you guys can make seal drivers out of some pvc plastic pipe?? its less than 60 set , i dont understand why there so expencive, you would think the companies would get smart, its just 2 pieces of metal
I broke down and bought the seal installation tool for the forks. If you need it let me know. It makes short work of those seals as they need to be driven in. It's also nice for installing the top bushing prior to the seals.Last edited by Guest; 07-12-2009, 10:19 AM.
Comment
-
 tejasmud
Originally posted by jwhelan65 View PostTrying to remove the front forks to replace the seals, I have loosened the upper and lower clamps but they will not budge. Talking with Ed there is a air collar with a spring and clips attaching to the forks. All I can see is a hose connecting the two ..top center in the photo...Any ideas?

Joe,
The collars for the air pre loading should just slip off as the fork tubes are pulled down. They are not in any certain position, there is a 0.80" hole in each upper tube, and the collars have a recess in them between two o-rings about 3/4" so indexing is not necessary. The collars do have a notch that mates with the top clamp, but it's not connected to the clamp.
If you are just replacing the seals, before you pull the air collars you may be able to pop the seals out with air pressure. Pull up the dust seals, pull the ID snap ring, and apply pressure into the Schrader valve on the collar. The seals might pop out.
If you are doing a full rebuild the cap screw on the bottom will allow them to come apart. As you pull the tube out of the lower it should pull the seals. Upon reassembly, just be careful when putting them back together and not damage the oil locking valve. They are aluminum and can be damaged when stabbing them back together. Best is to get them out, and put them back in as an assembly. Easiest is to put them back together with the tubes in the horizontal position.
Looks like the he ES has a little different mehod for retaining the air collar. The 700E collars are held by the headlight bracket. You have the collars on each side, looks like a rubber ring then a washer under it, and looks like a wire clip ring under the washer. There is a groove in the tubes for it. Need to be careful slipping the new seals past the grooves, I used a piece of a plastic 20oz coke bottle to make a sleeve to protect the inside diameter of the seal as I slid them down the tubes. Once past the grooves for the clips, just slide the seals off the sleeve.
To get the tubes to budge, a piece of wood and a hammer, or a dead blow hammer (even better) to pop the top of the tubes, and it might break them free. Would be eaiser to pull the bar risers if you haven't, they also could be putting a little load on the tubes. PB Blaster in the clamp joints might not hurt either. Strap wrench like reddirtrider mentioned would work to try and rotate the tubes as well.
If the new seals are oem a 3ft piece of PVC, 1.5 or 1.25", I can't remember, can be used as a driver. Just have the washer on top of the seals if using the PVC, it will help press them in evenly. Leak Proof seals dont have the metal inside them and are easily worked in by hand.
At this point in the game, I would flush and change the oil.Last edited by Guest; 07-12-2009, 10:09 AM.
Comment
.png)


Comment