Maybe a mini size reservoir from a dirt bike nestled behind the frame right near the engine.
-
-
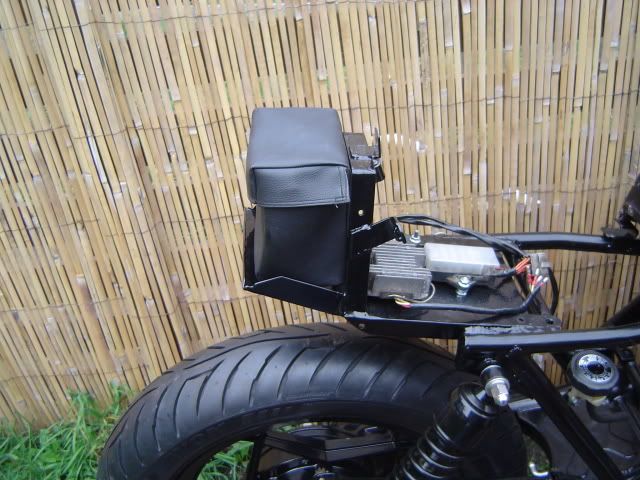
Battery Bag
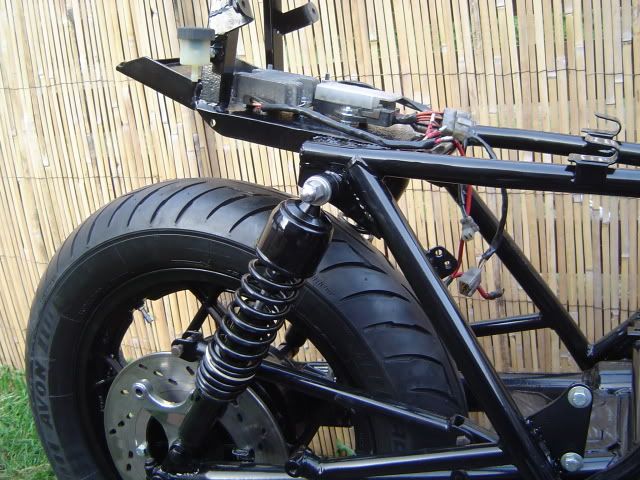
Thanks for the inspiration Old Colt, you've made me some more work now! hahahahah. I've got a tiny (about 20mm dia) reservoir that mounts in the same way as the one shown. See the hole in the frame behind the battery? I could maybe tap this out with a 6mm thread and mount the reservoir there, these holes are for the battery strap to hook onto to secure the battery. I can always adapt and overcome somehow if i have room in there for the rear brake cup.
Here's a bit of custom work for you, not seen it before but i doubt it's a first. One home made battery bag, thought it might help keep road crud from getting to the terminals. Lid is fastened down using velcro with open slots for wires to exit cleanly. A small hole will be made for the battery breather tube to exit and run down the frame.
Comment
-
I like that
Comment
-
One rear brake reservoir mounted behind the tail unit. Brill idea there Old Colt, i've been saving this reservoir for the front but i'll get another no problem. Frame looks much cleaner now (to me anyway), and i'll just knock a little ally or stainless bracket up for the old mount and secure the brake pipe and battery breather with it
Comment
-
Clean look, but weight's moved higher?
OK, this is just a thought:
I like the clean, empty space look in front of the rear tyre, and many people try to get that look too. However keeping the heavy battery low and as close to center would be best for handling, true? 1982 GS1100G-
1990 GSX750/1127
1987 Honda CBR600F Hurricane
1985 Kawasaki GPz750Comment
-
Very true Bill,
moving the sprung weight higher will deffo affect the handling somewhat. Whether it's moved enough to make a noticeable difference is another story.
Overall, the bike should be a tad lighter than stock, the electrical components have not moved very fall and don't weigh a great deal anyway, a possible solution would be to purchase a smaller, lighter GEL battery to reduce the affect somewhat. Overall, the seat, tail unit, rear light etc should all weigh less than the stock parts i've taken off so i don't think it's going to make things worse. I've been considering getting a gel battery anyway because of the vent tube route.
Placing the battery as low and central to improve handling is debatable, placing it LOW is the best option but central all depends on the weight distribution of the bike as a whole. Moving the weight backwards works in MY favour very much, people prefer different setups and i like heavier rears (joke there somewhere?). I'm known to be a bit "ham fisted" with the throttle and tend to break the rear away on my R1. I do quite a few track days throughout the year so i understand a little of what can be gained (or lost!) from subtle changes to the geometry, tyres, suspension etc. In this case, while you make a very valid point as it WILL of made some difference, I'm not at all worried by it as i still imagine the bike will perform reasonably well for me.
The fibreglass tank weighs quite a bit less than stock too, so this is going to lower the centre of gravity and have yet another affect on the handling, i'll never be tracking the bike though and having never ridden the thing as yet, i probably won't even notice any little quirks as being anything other than standard.Comment
-
Hey Yaddy, I see your project is moving along nicely!! Keep posting pics as you complete things. Looks very cool so far. That alum is nicely polished.
CheersComment
-
Keen to see this one finished.Comment
-
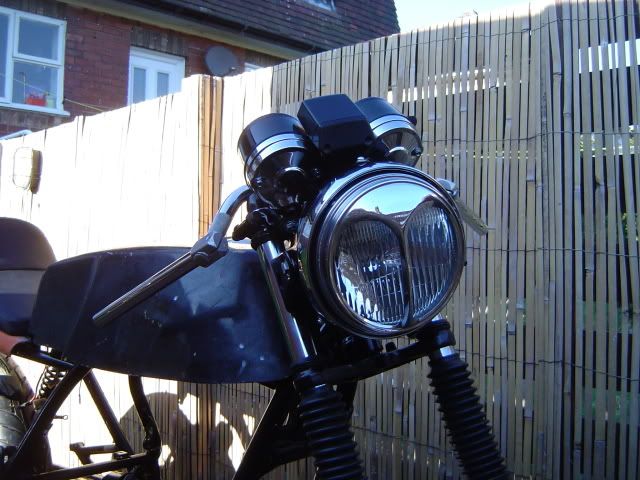
Headlamp assembly
So here's my headlight assembly and rebuilt clocks. I had to rattlecan the headlight bowl and clock plastics as i couldn't find any decent ones on eGay, turned out pretty nice i have to say, will need a bit of "rub n buff" once the paints cured properly though.
Check out the shiny chrome clock backs, kindly donated to the project by Bribird, one very kind and generous chap.
So if anyone wants Bri's number to see if he will donate anything to their project too, pm me and i'll give it to you! Only joking Bri, your top banana, you know that. Cheers dude!
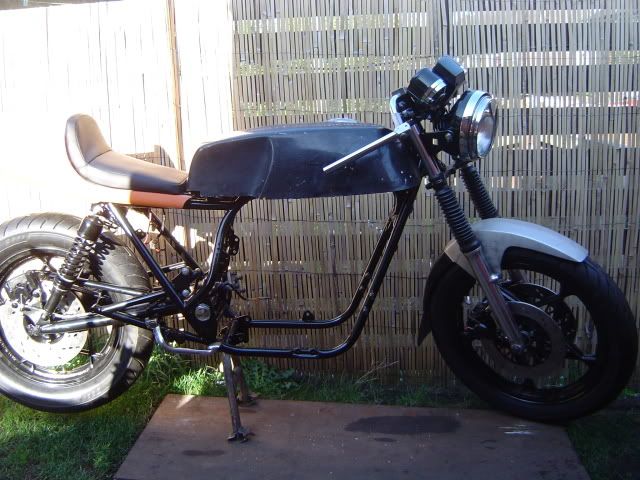
I've now decided i'm going to try to lower the headlight and clocks a bit, i think they stand a little high if anything. Not sure how to do it just yet, i'll have to have a brew while staring at it for a while methinks. All the calipers are back on too, just rebuilt them with new seals, pistons, pads etc. Got a new braided hose for the rear fitted, just waiting for the braided hose to arrive that runs up the frame to the rear cylinder now mounted under the tail. Front hoses will have to wait until i've sourced a front cylinder setup. The original is way too big for these bars so the hose lengths may change (top one at least).
Can't wait to get the tank leakproof and mountings sorted but i've realised that i need the motor and carbs back in first. I need the carbs in place to determine how high the tank needs to be for the tap to clear. Going to pull the motor apart later today and see what 30,000 miles has done to it. Hope to get the bottom end rebuilt and back in by the end of the week if poss, i took the lump out in one go and it nearly broke my back, hahah, deffo rebuilding it in the frame!
Comment
-
easy peasy.
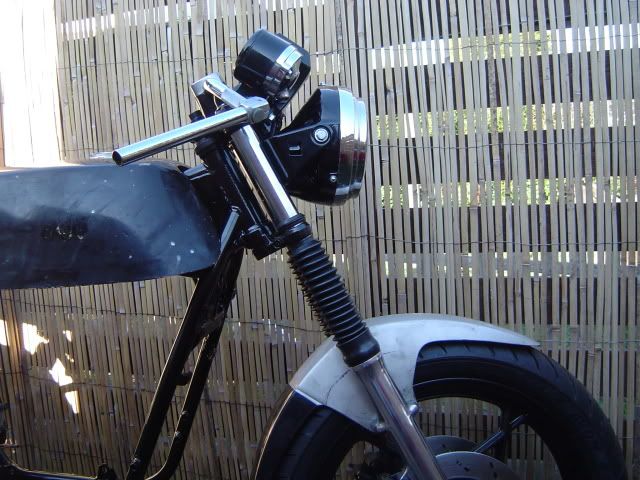
The headlight is just a case of turning the 'ears' (brackets) upside down on the fork tubes.
For the clocks you can 'reverse' the way it is mounted at the moment and get it an inch or two lower.
To explain - the clocks are usually mounted to above the top triple. I pulled mine off and remounted them under the triple clamp with longer bolts going through the same holes. You can even use a few washers as spacers and get them to sit a bit lower. The only problem is that the plastic housing (where the ignition barrel sits) will foul on the triple. I used a dremel with small cutting wheel to cut two notches in the plastic so it sits down around this part of the triple clamp.
If this is hard to follow I can try and take a pic for you.Comment
-
Thanks for the reply Zooks,
so i get the headlight ears, just drop the fork tubes out and spin them the other way up.
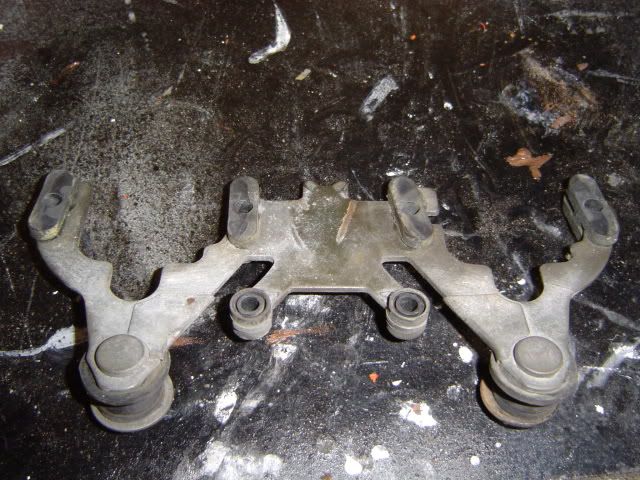
This pic is my clocks mount before it went for coating. So i just flip this on the clocks so the studs face uphill instead of down, again it sounds easy.
I don't follow your "longer bolts" statement, did you drill the studs out then, or did you extend them using rod connectors or does your bracket not have studs at all? Either way, i'm pretty sure i can do something here, don't want to trash my coating but it should be a simple mod to complete.
Thanks for the tip, i'll try that later today.
Comment
-
Yeah it wasn't a Kat that I did this to. It was my 750. It has bolts that hold the clocks to the top triple tree. The concept is pretty much the same though. If you just flip things upside down (basically) you should find that they sit lower (hopefully). You'll probably have to do some grinding / cutting / bending but I'm guessing that originality is not something that you're too worried about considering what you started with.
Good luck. I love the way this is coming along.Comment
-
I lowered my gauges, Mine are the standard GS/GS-E gauges so these have the bolt going through rather than the stud as your style.

I machined an aluminum nut that has a 10mm shaft with the 6mm internal thread and used a Delrin spacer to move the gauges down. Originally I moved them down to far , therefore the spacer was split to move stuff around.
On your style with the stud, machine the nut the same way but where mine uses a bolt from underneath yours would spin onto the stud.
Also note the headlight bracket has been shortened so it is all below the clipons.
Here is a view of the nuts from above.

What does not show well in these pics is the key switch is lowered down 25mm also.Comment
-
Detailed info there chaps, many thanks for the input. I'll be trying to lower them over the next day or two, along with stripping, rebuilding and painting the bottom end of the engine.
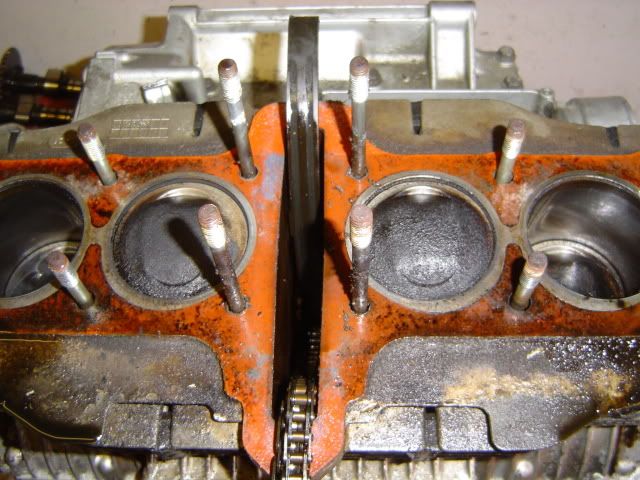
Here's what 30,000 miles looks like:
Pulled the head off and saw these pistons, i have to say at this point i was pleasantly surprised at how clean everything looked, i know it has a decent carbon build up but i expected a lot more.
Then i flipped the head over and realised it was as bad as i expected, haha. Check out the white-hot exhaust valve on no2 cylinder.

Closer inspection here reveals a crack in the exhaust valve, 1 of the studs has been snapped off from the head that secures the exhaust clamp, obv this is why the valve has run hot and cracked. Best add new valve/s to the list of parts then.
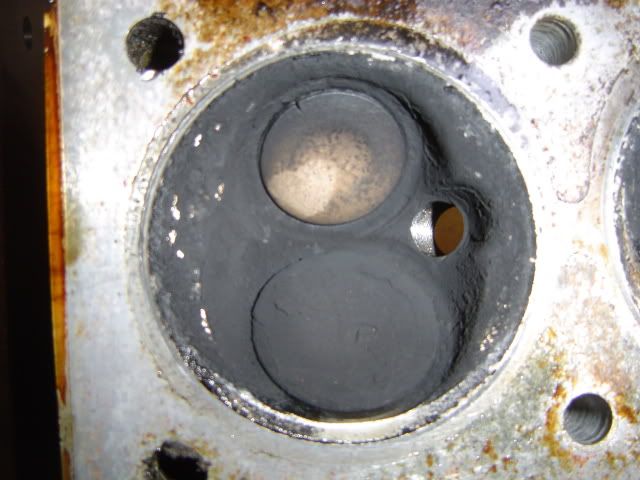
Any advice here? I've already ordered new rings, circlips and gudgeon pins, got new stem seals too. when i remove these valves and mic them up, if they are within Suzuki tolerances, would it be ok to use the existing valves and just replace the one damaged exhaust valve, or is it best to play safe and replace the lot? A friend says if the old valves measure ok and are lapped in sufficiently, there's no real benefit to replacing them, does anyone agree with this?Comment
-
yaddy, those studs in your guage mounting plate are pressed in and should be able to be knocked with some care. i use a socket slightly larger than the heads of the studs on the top side and tap on the threaded end of the stud beong careful not to hit the mounting plate. for spacers a piece of chrome accesory tube works from a junk backrest or crash bars, a couple of cheap deep sockets works tooComment
Comment