Announcement

Collapse
No announcement yet.

I have paint gun & compressor, what else do i need?

Collapse
X
 
  • Filter
  • Time
  • Show
Clear All
new posts

    I have paint gun & compressor, what else do i need?

    I have never done any paint work using a spray gun and compressor. Rattlecan, yes, many times. I am getting ready to have my first go at spraying the "Proper Way".

    I have purchased two HVLP spray handpieces, I have a compressor. My compressor hose is about 30 metres long, I might have to shorten that up a bit or buy a shorter one. What else do I need before I can spray.

    I have seen a pressure gauge attached to the handle of the gun, do I need one of those? I have a gauge on my compressor.

    I have a water drain plug on my compressor, do I need something in the compressor hose line to trap water, moisture from getting to the gun and spoiling the finished job (it will probably get spoilt anyway, seeing as it's my first time).

    Is there anything else that I need before I can start?

    On a slightly different issue concerning the paint. Which paint is best to use? and do I just purchase it from the local guy that supplies the body shops around here? Does he give instructions on how to mix the different portions in the correct ratios, etc.

    Thanks for any help that can be given to this amateur. I am reticent to say I will show pics of finished product (in case it's a complete failure).
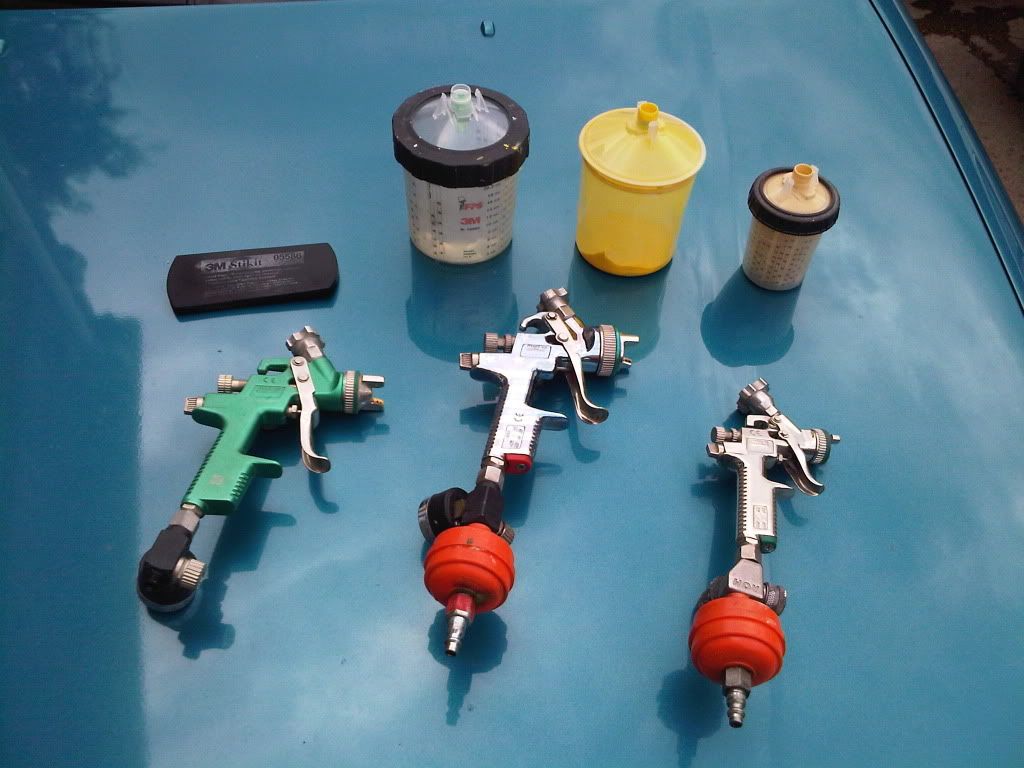
    Last edited by Guest; 02-09-2010, 06:35 PM.

    #2
    the gage thing on the gun would be a regulator, you should probably invest in one the compressor gages are not very accurate. As for a filter I'd do some test sprays and see if you are getting strange results like little bubbles or an orange peel affect if so probably get one of those too.

    Comment


      #3
      CAUTION! long reply

      Originally posted by Suzuki_Don View Post
      I have seen a pressure gauge attached to the handle of the gun, do I need one of those? I have a gauge on my compressor.
      A gauge would be very helpful in getting a nice paint job out of the HVLP gun, they are available at most auto parts stores, same place you can buy your paint. Check your manual that came with the gun for correct "at gun" pressure to make sure the paint will atomize properly when it exits the paint gun.

      Once you have found the pressure setting in your manual, put a small amount of thinner or reducer in the gun and test the spray pattern by spraying a quick 1 second burst onto some paper, it should be a nice thick line from top to bottom like this ||, it may be a bit more like this (), ovaled in the center. Adjust as necessary as per the manual.

      Keep this pattern in mind when spraying. Try to visualize the paint going on in your head before you paint the part. Look at the shape of the part, all of it's edges and curves, and picture how the paint will build up on the part when spraying, and how you need to move the gun to avoid the paint going on too heavy in the curvy area.

      I recommend practicing on a couple things first, before painting your bike parts. I had a co-op student at the shop who wanted to learn to spray, so I filled the paint cup with water and told him to go "paint" his car so that there isn't enough water per coat to make it run down the panel. I was just looking to teach him how to move the gun to develop consistant speed of movement.
      It's kind of fun to do too! Just make sure you dry out your gun before putting it away for the night.


      Originally posted by Suzuki_Don View Post
      I have a water drain plug on my compressor, do I need something in the compressor hose line to trap water, moisture from getting to the gun and spoiling the finished job (it will probably get spoilt anyway, seeing as it's my first time).
      You can buy small disposable in-line water filters at the auto parts/paint store. They look like a small barrel with an inner tube around the center, and have threaded end on top and bottom. Usually around 5-6 bucks IIRC.

      Later on, once you have painted a few bikes/cars/whatever, and you feel like you need a better moisture trap, you can get an in-line dessicant dryer which pulls the moisture out of the air as it travels through it. Just like the little disposable ones, just better.

      Originally posted by Suzuki_Don View Post
      Is there anything else that I need before I can start?
      Prepare for all stages of the paint job before you start, including prep and clean-up, so you will need:
      -sand paper appropriate to the work done
      +filler putty/fiberglass = 80-180 grit to start, up to 1000 grit depending how picky you are
      +primer = 320 to 1000 G
      +basecoat = 600 to 1000 G
      +clearcoat = not needed unless you plan to buff it, whole other subject
      -Reducer, used with the paint to thin it, and for clean-up of equipment after painting (Never let paint dry in the gun! Give it a good clean as per the manual.)
      -Wipes, preferably lint free
      -Tack-rags to remove any dust before priming and painting
      -A proper NIOSH filtered mask rated for fumes, not particulates, they do nothing against fumes

      Originally posted by Suzuki_Don View Post
      On a slightly different issue concerning the paint. Which paint is best to use? and do I just purchase it from the local guy that supplies the body shops around here?
      Most paints are similar in form and function, so if you aren't picky, you can use any brand and quality level you like, but... if you are looking to do more painting in the future, check around and see what the prevalent brand in your area is, and make sure to ask if it is low V.O.C. compliant. The rules are changing this year on what paint can be sold in North America, and you need to make sure if you want to keep using the same stuff for other jobs, that you aren't buying materials which won't be able to be used with anything else later on.

      What I'm getting at in my wordy way is, if you just want to worry about this job, buy small quantities and save a bit of money. If you are painting basecoat/clearcoat, 1 quart will be oodles of paint, same for the clearcoat, but you may be stuck buying clearcoat in a 1 gallon can, depending on what your local guys stock/order in. The clearcoat needs a hardener additive too, so a small amount of that depending on your mix ratio.

      If you are planning on painting in single-stage paint which does not need clearcoat on top, it's cheaper since you don't need anything else, just the paint. You can also get a hardener for single-stage paint as well, I recommend it. It will make the paint much more resistant to wear, and chemicals.


      Single-stage usually isn't able to provide the same quality as basecoat/clearcoat for shine, unless you buff it. Even then it likely won't give the same feeling of "depth" in the paint job, but it is easier and cheaper to work with. 1 quart should be enough, but won't leave much for repair/touch-ups/accidents.

      Originally posted by Suzuki_Don View Post
      Does he give instructions on how to mix the different portions in the correct ratios, etc.
      They can give you TDS and MSDS sheets on the product which will include all of the mixing ratios, compatible products, and the most important, the health and safety information for the chemicals in the paint.

      I hope this has helped, and feel free to ask more questions, I am sure the others here can help fill in the gaps.

      Comment


        #4
        Get an inline filter also a proper breathing mask

        Comment


          #5
          Originally posted by Macguyver View Post
          You can buy small disposable in-line water filters at the auto parts/paint store. They look like a small barrel with an inner tube around the center, and have threaded end on top and bottom. Usually around 5-6 bucks IIRC.
          Thanks heaps, lots of great information here for a novice like me.

          Just one question. Where in the setup does the filter fit. A picture of a typical setup would be good. Does the filter go on the compressor end, the gun end or in the middle somewhere. Is there any particular length the air hose should be or diameter for that matter.

          Sorry for the basic questions.

          Comment


            #6
            Excellent information from Mac. I just want to add a few things relative to the gun, hose, fittings and compressor.

            Most small home compressors are not very efficient and are prone to lose pressure easily through the fittings so it is always a good thing to use teflon tape on all the threads. The pressure in the tank drops quickly so with some it will be necessary to spray in "bursts" to allow the compressor to keep up. This is why guages at the gun and compressor are necessary.

            Its a common error for new painters using HVLP guns to set the output pressure too low at the compressor and not watching the input pressure at the gun. With the home compressors its best to crank up the output pressure and adjust the gun input pressure a few pounds higher than the suggestions on the paint MSDS sheets.

            On completion of the job it is very important to properly clean the gun and that means stripping it down and dipping the parts in the appropriate thinners or cleaners. Even a little bit of hardend paint in a gun can ruin it.
            Once parts are washed, reassemble the gun and blow air through it until dry.

            Once you get into it, you'll wonder why it took you so long.

            Show us what you can do.

            Good luck with it & enjoy.

            Spyug

            Comment


              #7
              Originally posted by Suzuki_Don View Post
              Just one question. Where in the setup does the filter fit. A picture of a typical setup would be good. Does the filter go on the compressor end, the gun end or in the middle somewhere. Is there any particular length the air hose should be or diameter for that matter.
              Questions are a good thing, it shows when people are thinking.

              On your gun you should have the male quick connect to the moisture trap to the regulator, to the gun. The same as the center and rightmost guns in the picture.


              The typical recommended setup is to go from compressor through regular 3/8" ID airhose to your female quick connect, preferably a high flow, but it will work fine with normal connectors. Air hose length doesn't matter so much, I used to use a 60 foot in the booth so I could do a complete circuit around a full size hydro truck on the same line. A longer hose simply means you have slightly more volume of compressed air available.

              Hope this helps,

              Comment


                #8
                planning to do this myself for the first time soon, so just want to say good luck Don
                GS850GT

                Comment


                  #9
                  Thanks PSY, and I gleaned a lot of info from your thread as well. I couldn't find any mini guns here in OZ so went for a couple of the larger HVLP guns.

                  MAC, your help and info has been most helpful.

                  Comment


                    #10
                    Those filters on the gun are good but you need one on the compressor too. Actually, I have three: one near the compressor, one out in the work area, and a third on the gun. The filter in the work area traps a LOT of water, many times more than the one at the compressor. I'm not sure why but it seems that the close one just gets blown though.

                    Good luck
                    Ed

                    To measure is to know.

                    Mikuni O-ring Kits For Sale...https://www.thegsresources.com/_foru...ts#post1703182

                    Top Newbie Mistakes thread...http://www.thegsresources.com/_forum...d.php?t=171846

                    Carb rebuild tutorial...https://gsarchive.bwringer.com/mtsac...d_Tutorial.pdf

                    KZ750E Rebuild Thread...http://www.thegsresources.com/_forum...0-Resurrection

                    Comment


                      #11
                      Originally posted by Nessism View Post
                      Those filters on the gun are good but you need one on the compressor too. Actually, I have three: one near the compressor, one out in the work area, and a third on the gun. The filter in the work area traps a LOT of water, many times more than the one at the compressor. I'm not sure why but it seems that the close one just gets blown though.

                      Good luck
                      ED, what do you mean by "one out in the work area".

                      Comment


                        #12
                        Originally posted by Suzuki_Don View Post
                        MAC, your help and info has been most helpful.
                        Hey, no problem, glad to help a fellow GS'er.
                        Also, to help keep moisture out of your lines, make sure to empty the water from the main compressor tank before you start it up, there should be enough pressure left in the tank to blow it all out.

                        You can run multiple moisture traps on the system if you wish, but it does reduce the Cubic Feet per Minute (CFM) that your compressor supplies to your equipment. Each one restricts air flow a bit, so I would say two max per line, one from compressor to line, and another between quick connect and regulator. If you still have trouble with moisture, then your intake for the compressor is drawing in too much moist air, which is really not good for the compression cylinder(s) since heavy, moisture laden air takes much more force to compress. At that point, I would run ducting to draw fresh air for the compressor from a different source, ie. outside vs. inside and vice versa.

                        Please take pics for us so we can all admire your handiwork!

                        Hope this helps,

                        Comment


                          #13
                          Spraypainting

                          Mr Don,

                          Not sure if Girraween is close to you but check out these guys:

                          LocaliQ is a marketing platform that helps businesses find, convert, and keep customers with a suite of marketing products.


                          They have an excellent reputation as straight shooters and I know someone who has done this training and they reckon it's the ducks guts. It's free and yes they do try and sell their own stuff but the amount you can learn in one morning with a pro can take years at home on your own.

                          And while your at it, check out Lacnam paints just down the road from them. They sell a non iso two pack, won't poison you and it's as hard and glossy as normal iso stuff. 4 litres of black gloss cost me about $110 AUS, about the same as 1 litre of POR15.


                          I've just painted my frame and shock springs and I'm really happy.

                          Let us know how you go.

                          BR

                          Mike

                          Comment


                            #14
                            something you need- paitience, really it helps a ton
                            -love of colors ,and be subtle with them, you know,
                            wash the floor,keep the dust down, cover your tools ect...
                            keep the hose out of the paint!!!, practice with a dry gun
                            paint top to bottm, after you do seems---- or you might get your clothes in your wet paint!, and runs run down so you wont cover a run ect... you can let it dry and sand it out ect...
                            and if you do a hood or top of a car ,you wont reach over your wet paint
                            think through you processes before jumping into it,and you will have a great paint job


                            oh and use the right air pressure,and fluid amount at the gun!!- the most critical,

                            Comment


                              #15
                              Originally posted by Suzuki_Don View Post
                              ED, what do you mean by "one out in the work area".
                              Compressor is in the garage with one water trap at outlet. After this a piece of hose is used to move the line outside the garage and into the second water trap - this is the one that gets most of the water out. After this the air goes into another piece of hose and to the gun. On my blast cabinet, the hose leaves that second water trap and into another one just in front of the cabinet. It always amazes me how much water the last trap catches. You'd think the air should be dry already but no. Maybe my system sucks but there is tons of water so you can't have too many traps.
                              Ed

                              To measure is to know.

                              Mikuni O-ring Kits For Sale...https://www.thegsresources.com/_foru...ts#post1703182

                              Top Newbie Mistakes thread...http://www.thegsresources.com/_forum...d.php?t=171846

                              Carb rebuild tutorial...https://gsarchive.bwringer.com/mtsac...d_Tutorial.pdf

                              KZ750E Rebuild Thread...http://www.thegsresources.com/_forum...0-Resurrection

                              Comment

                              Working...
                              X