-
-
cold air has more water than hot, hot air is dry
to bad there isnt a alcohol evaporating kit used in lineComment
-
-
One should spray in a booth whenever possible. If you don't have access to a booth/don't want to rent one, you can use plastic dropsheets to make an impromptu booth. Just tape a plastic sheet to the ceiling and then tape up the "walls", and don't forget one for the floor. takes a while to set up, but when you have no other alternative, it can be a lifesaver. Don't forget about ventilation!
I have used a couple plastic dropsheets hanging from the rafters of a shed to make an impromptu booth before, and it works pretty well in a pinch.
This really depends on how much time you want to spend painting. I have seen some really well done BaseCoat/ClearCoat (BC/CC) jobs done by first time painters, but you need to take your time. Wetsand in between coats to clean up any unevenness or flow indicators (runs). It may take you anywhere from one night, up to a week or so to get it done, if you have to wait for the paint to be sandable to fix an oops.
You can only wetsand basecoat!
Dry sanding is too aggressive and will leave scratch marks in your paint job, which will really show once the clearcoat is on.
The good news is that BC is fairly forgiving with a bit of light sanding with a high grit wet sandpaper, like 600 or 800 grit.
The ClearCoat is not quite as forgiving for time and extended workability. Pretty much have to get it on in one sitting. The good thing is once the clear is on and cured, you can wetsand it and buff it smooth if need be.
Here is a link to a video of still of some guys' cb100 tank he repainted from bare metal. Pretty good at showing the intermediate steps he followed. Looks like he may have used single stage on it since it doesn't have that look of "depth" to the shine. Prep work is the key to a good looking paint job though, and if he sanded it smoother before painting with a high grit wetsand (1000 to 1500 grit) on a foam backer to even out the applied pressure, it would have looked smoother and shinier.
Speaking of single stage paint, it is similar to clearcoat in application.
Needs to be done in a single session of multiple coats.
There are a few different methods, as with everything, but this is how I do it. I start with a light first coat, called a tack coat. This gives the rest of the paint a leg up in sticking to the part. It should be "dusted" on. Hold the gun back a bit further than you normally would during application. We don't want a full shiny coat on here, just enough to change the color of the part.
Then a light to medium coat to put down the color, followed by one or two medium coats to unify the color.
Then last, but not least, one final light coat (called the control coat) to bring all of the metallic (if any) into line. The control coat must be applied when the 2nd to last coat is still tacky, so it will melt in and look proper. This coat should be applied from further back from the part, much like the tack coat was. We are just looking to mist it on because we don't want the solvents to totally liquify the previous coat, it should be just enough to get it to melt in and be smooth when cured.
If you are like me, visually oriented, and it would help to see it done, check youtube, there are a lot of really decent instructional videos there.
Keeping all of this in mind, if you feel adventurous, go BC/CC, but be prepared to spend the money. If you feel a little tentative about it, go single stage for ease of use and lower cost, but be warned that later on down the road you may want to repaint it with BC/CC to get that showroom shine, if you're into that whole bling bling look.
Hope this helps,Comment
-
MAC that's BRILLIANT. This information you have provided here is so much help. I am going to go through this thread and copy the relevant bits and make up a tutorial for myself to use. I'll put it in an ordered arrangement so when I am doing the spray job I will just have to follow logical sequences as laid down.
One more question: I have read that the strokes should be up & down or top to bottom if you like. If that is the case how do I go about spray painting a tank. It will be an older GS tank ('77 model). Do I spray the top from end to end first and then come down each side until it is all coated. Do I just do a single coverage as I have explained or do I go over it a couple of times?
Thanks again MAC for the great info you have supplied to date and I look forward to more from you.
Thanks to all the others that have contributed their knowledge as well.Comment
-
Glad I could help.
Paint direction is a very hotly debated topic, most painters spray along the horizontal axis, sweeping side to side over the part. Yet, I know painters who swear by the up&down method.
As far as I am concerned, it is all for moot since most of them don't even sand the part properly before paint to ensure maximum paint retention on the part. I always keep in mind how the part is going to be positioned while painting, and sand the part so that the sanding direction will be level with the floor. This helps to prevent our friend Mr. Flow Indicator from making an appearance. This of it like each time you pass the sand paper across the surface of the part, you are building in ledges for the paint to sit on, kind of like the terraced gardens in asian, if you follow. The general rule of thumb here is to think of how the paint would run off of the surface, and sand perpendicular to that direction.
Once that sanding is done properly, you can spray the part in whatever direction you wish, up, down, sideways, diagonal, twirling, ever twirling, whichever, it makes no difference since the paint has the parrallel to the floor sanding ledges to rest on.
When I paint tanks, I usually try to hang them from the forward mount if at all possible. For me this makes it much easier to get the front of the tank, and make sure the rest of the paint goes on nicely.
After hanging, I would go around any of the detail areas, such as gas cap lip, edges of seams, and mounts with a light coat of paint to make sure they get the attention, and paint film build required. These areas must be sanded properly, and get a good build of paint to keep the paint from flaking off down the road.
I would then be able to paint the front of the tank, and then go from top to bottom (front to back), and the added bonus of this method is that you can easily paint the underside of the tank just as easily as the top. Care must be taken to not run the paint when painting like this, and good to excellent lighting is a must!
If you prefer to paint the tank sitting like it does while on the bike, make sure to sand it so it is getting horizontal lines across it from front to back, and side to side on the top, then paint the underside first, so it can be set down for painting the top once the bottom is tack-free. This can be harder to paint in this position without getting runs, simply because the lower edges of the tank are not readily accessible, and will tend to get over-saturated with paint.
I have attached a poorly marked image showing how I would paint the tank if it had to be set down on the lower edges for painting. First, do the light coat around the detail areas, gas cap, and edges, then paint the front face, then go front to back(or back to front) down the center of the tank to split it in two halves, and work your way back and forth down the sides of the tank. Generally, we are looking for each "stripe" of the paint coat to have around a 25-50% overlap (depending on the paint type, and the spray pattern of your gun) with the previous movement, this will help it all knit together to give consistent coverage.
Remember how heavy you want each coat to be, and try to keep the spray gun a consistent distance from the part and I am sure you will have minimal trouble. If you feel you need practice before touching the parts, try and find something with a lot of curves and different faces on it to paint to get the feel for it. I would rather put down a run on a $2 kids toy from a yard sale or thrift store, than on prepped parts.
No problem at all, I am glad I could help a fellow GSR'r. (sp?)
If you have any other questions, feel free to ask, and good luck and Godspeed.Comment
-
Two more questions if I may:
1. If the petrol tank has a reasonable coat of paint on it and I just want to fix a few stone chips or very small dents and change colour, then is it necessary to sand the tank right back to metal all over as you see in a lot of the videos and pics on various sites? If you don't have to sand it all the way back to metal then what needs to be done to prepare the tank for painting? Do you still need a primer? Which is best?
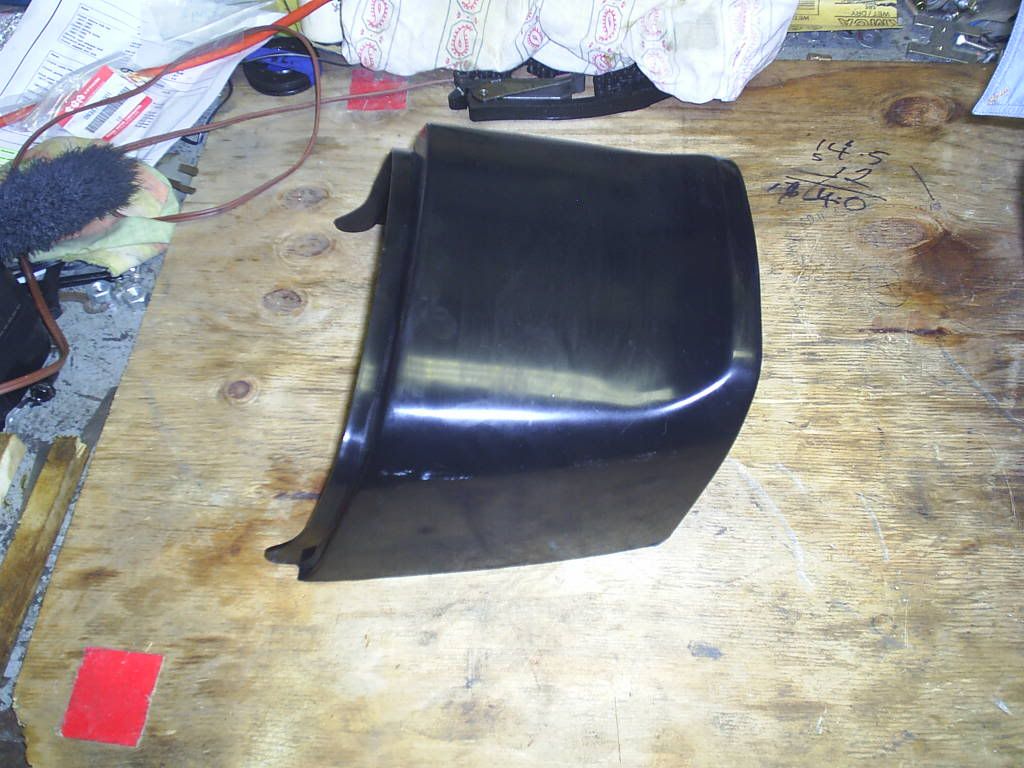
2. If spraying a new part that is plastic as in the duck tail part below, is there a process or any special preparation, or product used to bind the primer to the plastic? This piece bought brand new feels really shiny and slippery to the touch?
Comment
-
Chip repair
It is not necessary to take the tank right down to bare metal, what you would be doing then is called "spot repair". However, if the chip are right down to the metal, you will need to level the chipped area to the height of the surrounding paint, by either doing some careful filling of the chip with some surfacing putty, or by taking down the level of the paint surrounding the chip by sanding.
Both methods will work, but can yield dramatically different results depending on the preperation. When doing either type, I find it easier to sand the entire piece to be worked on, then do the repair. This ensures that everything will stick, since you have already roughed up the area, and if you need to extend the original repair area, you don't need to redo any sanding since the entire piece is already done. This saves time, and make sure to wear some nitrile or latex gloves while handling sanded parts, to keep the oils from your hands from transferring to the part, and soaking into the freshly opened surface. Fingerprints are NOT your friend!
Whenever I paint a vehicle I go over it one last time with a fine sanding sponge on "fingerprint patrol". Anywhere that it has been touched will have a small amount of residue transferred to the surface, and it can ruin your day when everything looks perfect, except for that one tiny spot where the paint pushes away from a fingerprint, usually right in the middle of the largest open area on the part.
I usually give the chipped area a sanding with some sanding sponge to give the putty something to grab on to, and then skim over the chip with surfacing putty. Surfacing putty sands quickly and easily, so be careful when sanding it smooth to match the height with the rest of the surface. If possible, use a high grit sand paper, say 600-800, on a sanding block, moving it back and forth over the putty while keeping the block as flat on the surface as possible. Be careful to not apply too much pressure since sanding could pull the putty right out of the depression if the paper really gets a hold of it while sanding.
Once sanded smooth and flat with the height of the rest of the surface, you should be able to clearly see the outline of the chip, and where the surfacing putty has filled. Follow this up with some primer (2-3 coats to seal the repair, sanding in between coat to disguise the profile of the repair), and you are ready for paint.
You could also take down the level of the surrounding paint to match up with the chip, but I don't recommend this method, it will open up more of the old paint and primer, and could cause a halo effect around the repair area when painting if not sealed properly.
If you decide to go this route, the area around the repair must be sanded down with a sanding block, usually with the same 600-800 grit paper. You will be applying more pressure to remove the old paint and primer.
Feather the edge so that it extends at least as far away from the repair as the repair is wide. In essence, what you are doing here is creating a new face on the part, one that is hopefully not too far off from the original level of the paint. The greater the difference in height between the chip and the topcoat, the more likely the repair will be visible.
If using this method, once the edge is feathered out, cover with surfacing putty, and try to recreate the level of the original surface with carefull sanding with a block similar to option #1. Seal up the repaired area with 2-3 coats of primer, finish sand with a sponge, and get ready for paint.
Make sure when using either repair option, that you let the primer fully flash off between coats, and give it a light sand in between coats of primer, this will help hide the ring around the repair by giving it a more uniform surface. I usually would feather the edge of the primer over the repair back about 20-40%, and recoat it on the next coat of primer. Once again, we are trying to disguise where the repair was done as much as possible. When sanded, primed, sanded, primed, sanded, primed, then finish sanded, the repair should look like a smoothly feathered blotch over the original sanded paint finish, and it should not have any distinct edging to it, whatever edges you see now will be magnified once the paint is applied, so try and get things as smooth as possible.
When doing a dent repair, scuff the inside of the depression with a low grit paper, like a 60 or 80 grit to rough it up so the filler really sticks in there. I use fiberglass to fill dents, most people use a bondo type polyester filler. If using a polyester filler, make sure to go over it with fiberglass to seal it! Polyester fillers are NOT waterproof, and turn into a hard sponge. They will draw in moisture, and will rust the metal behind them until they pop the filler right out. You can seal it with a surfacer, this is different than primer! Surfacers are specifically meant to go over primers, to completely seal the repair area. Once filled, sealed, and sanded smooth, proceed with priming and paint as usual.
What you have there is a fresh from the mold, injection molded plastic part. There will be a film of mold release agent over the surface of the part. Give the part a nice hot sponge bath in soapy water. Dish soap works the best, and leaves little to no residue. Once the part is clean, put on your nitrile or latex gloves, and give the plastic a light scuffing with a fine sanding sponge, or you could wet sand it with 1000 grit paper.
Plastic and paint don't stick to each other very well unless an adhesion promoter is used. I prefer the PPG sponge and wipe adhesion promoter, but it is a one use item, so after you open it, whatever isn't used, get disposed of since it will not keep once opened. One set (sponge and wipe) is enough to clean and prep 1-2 full size plastic bumper covers for a car, so unless you have a complete set of new plastics to paint, it's not really cost effective, but it does a great job.
Adhesion promoter is also available in a spray can, a little pricey, but more cost effective in the long term if you only need to paint one or two parts in the short term.
Either will work, and is mandatory to paint plastics and not have to worry about the paint flaking off the first time it is flexed. Do not use self-etch primer on plastics unless it is formulated for plastics! Metal self-etch doesn't really stop eating away at plastic, whenever it gets hot, it keeps working away, and will loosen your paint and cause flaking.
When your part is coated with adhesion promoter as per instructions on the can/bag/whatever, let it set up as per instructions, and then prime/paint as usual.
if you have any more questions, feel free to ask, and remember to take tons of pics!
EDIT: Primers are generally based off of the same chemistry, so most primers will do the trick for you, even the old style laquer primer will work well. Just don't try and use primer to fill a stone chip, this will not work since the primer contracts when curing, and will cause nothing but headaches down the road when an overly thick spot of primer delaminates from the surface and voila, the chip reappears.
Hope this helps,Comment
-
I am with Jim on this +100. Your technical knowledge is helping so much. As has been said it's great to have a professional giving such great advice -- I am learning on a daily basis.
It may be a little while before I start anything, so pictures may be a while. I am currently trying to get my motor back into the frame and unfortunately everything has to be prioritised.Comment
-
"I'm not sure why but it seems that the close one just gets blown though."-NESSISM
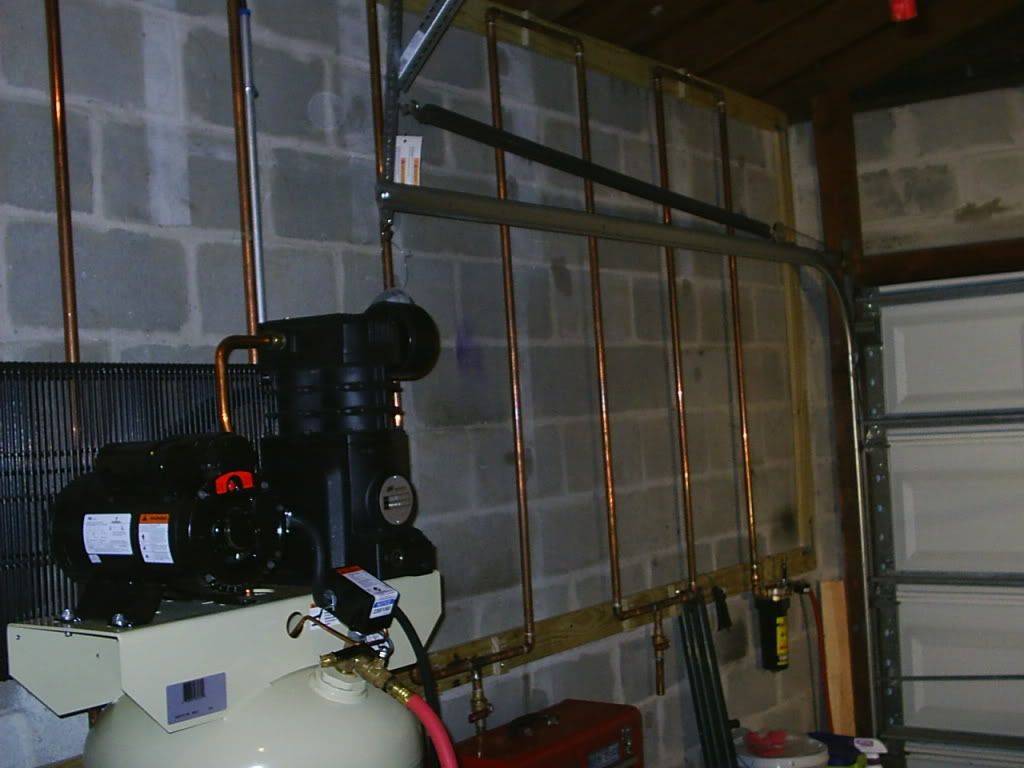
You are right on the money brother. I just bough a IR 18.1 CFM compressor and thought I could simply put my Devilbiss C3 water trap system right next to the tank and be good. It's a $150 system so I thought it would work perfectly. Not so, the air coming out of the compressor outlet is so hot, it's vaporized and hasn't condensed enough for the trap to catch it. I went on a few painting forums and "they" recommend about 50 ft min.of hard lines to allow the air to cool down in order for the water trap to do its job (copper is best (Type L is the heavy duty), followed by copper type M, Gavanized steel, black steel). About $200.00 in type L copper pipe, fittings, solder, torch, wood for a frame, and many other ods and ends (including wiring stuff too) you see this "condensor" I built to condense the water before it hits my trap (It wasn't my design, I copied someone elses and added 10 more feet of copper, the other guy had 40 feet).
Here's a pic
Comment
-
-
"Looks more like a front for a moonshine operation "
"
Well-look like I'll have an idea for a second business if the painting thing fails
As far as temp gradient, thats right. It's so cool at the end of the 50' run that the Camair C3 has no problem catching all the water!Comment


Comment