Announcement
Collapse
No announcement yet.
Painting my 450
Collapse
X
-
That would work, Pete. You just need to spray the clear over the stripes and the base color within 24 hrs of their application. If you can't do that, then I suggest spraying the base color and then putting a couple of coats of clear over that to protect the maroon metallic so you can sand it later. Then it can sit for as long as you want, you'd just need to sand it a bit before putting the stripes and more clear on.1979 GS1000S,
1982 Honda CX500 Turbo, 1982 Honda MB5 w/CR80 motor, 1977 Honda "nekid" Goldwing, 1976 Honda CB550F cafe', 1972 Honda XL250 cafe'
-
 Johnny Drummond
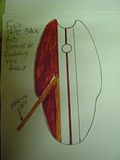
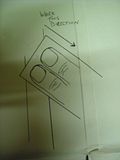
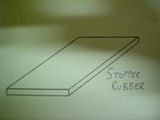
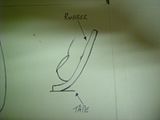 Pete,,here are the thumbnail sketches I mentioned.Sorry that they are so rough!.I really agree with nvr2old, leave the paint for the time he suggested, what I think the guy spoke to you from the paint company assumed was that you had an oven to "bake" the paint,(most pro paintshops use these and if you bake it then you can tape after 25-30 minutes)It is absoloutley safe to leave the paint overnight before applying the clear coat,I've done it numerous times with no ill effects and you don't have to deal with high humidity that we do here in Ireland.When I was learning I was given the rule of paintspraying"this job is 95% preperation and 5% skill" paitence is just one of the skills you have to perfect
 .take your time and when you are done bask in the glory of knowing that you have a new skill.Johnny
Comment
-
 spyug
spyug
A couple of comments Pete old chum.
When cleaning the work before paint, always wear vinyl or rubber gloves. Any oils from your skin can cause problems with the paint.
To make it easier to paint the pieces, make up some "stands" from pieces of left over lumber. You can pick them up and move them around as necessary without getting anywhere near the paint. Just make sure the pieces are secure to the stands and won't fall off when moved.
Contrary to what I've read here, you don't need to immediately clear coat after the base. I have, on several occasions, left the clear for up to several weeks. A couple of times I wet sanded the base with 1000 grit prior to the clear but on others I just wiped it down with cleaner and shot the clear. No difference that I could see.
If you need to speed the cure, you can use those halogen lights. Just position them about a foot to 18" inches from the work for an hour or so.
For cleanup after finishing a coat run some thinner/cleaner through the gun. I shoot it into a plastic washer fluid jug and take it to our local recycling center. If you leave the gun uncleaned for too long the 2 part paint will harden and clog the gun. When you're done for the day "field strip" the gun and immerse everything in cleaner for at least an hour or so.
If you're using a "booth" make sure you use old clothes and wear a hat and goggles along with your respirator. Paint fog is sticky. Fog also travels so make sure everything within about 10 feet is covered (even if you use a "booth")unless you want it painted too.
Last but not least, think safety......no flames around your supplies or when you're shooting so if the hot water heater or furnace is close, turn off the pilot flame.
As the guys say preparation is the key. Have everything close at hand and setup ready to go before you pull the trigger. Don't rush as that's when the accidents and mistakes happen. It seems like a lot of work and more effort than its worth but when you see what you can do you'll be chuffed I'm sure. Did I mention have fun with it?
So, we're waiting to see what you can do.
Cheers,
SpyugLast edited by Guest; 09-30-2011, 08:21 PM.
Comment
-
 Flyboy
Yes Pete, you have people from all around the world here, waiting to see what you can do................So, we're waiting to see what you can do.
No pressure, you understand
Comment
-
 apopleptic
You know not to worry. In a worst case scenario if something were to go wrong, you'll get more practice. Thats how we get to be experts
Comment
-
 Cdnpt1
"So, we're waiting to see what you can do."
No pressure though! Of course when your 450 looks amazing the rest of us are going to have to get off the pot too.
Comment
-
Cheers Larry, I think that's doable. At this stage it looks like Monday will be prep. day and primer, Tuesday will be primer sanding then base coat in the avo', and Wednesday morning will be white stripes, black rear mudguard, then clear coat. That should get it all in suitable time frames without rushing.Originally posted by nvr2old View PostThat would work, Pete. You just need to spray the clear over the stripes and the base color within 24 hrs of their application. If you can't do that, then I suggest spraying the base color and then putting a couple of coats of clear over that to protect the maroon metallic so you can sand it later. Then it can sit for as long as you want, you'd just need to sand it a bit before putting the stripes and more clear on.
Wow thanks Johnny! You definitely have some artistic ability there that I completely lack... and those sketches look great, they don't look rough at all to me!Originally posted by Johnny Drummond View Post


 Pete,,here are the thumbnail sketches I mentioned.Sorry that they are so rough!.I really agree with nvr2old, leave the paint for the time he suggested, what I think the guy spoke to you from the paint company assumed was that you had an oven to "bake" the paint,(most pro paintshops use these and if you bake it then you can tape after 25-30 minutes)It is absoloutley safe to leave the paint overnight before applying the clear coat,I've done it numerous times with no ill effects and you don't have to deal with high humidity that we do here in Ireland.When I was learning I was given the rule of paintspraying"this job is 95% preperation and 5% skill" paitence is just one of the skills you have to perfect
 .take your time and when you are done bask in the glory of knowing that you have a new skill.Johnny
That confirms what I was thinking you mean, so we're on the same page
I put my time above in reply to Larry's post, so I think I'll now have a comfort margin to work in where I won't be rushed but I won't be going beyond the 24 hour window either.
Cheers Spyug, I've been wearing latex disposal gloves every time I touch this thing now, even when sanding with the finishing sander, so I should be good as far as keeping finger oils off.Originally posted by spyug View PostA couple of comments Pete old chum.
When cleaning the work before paint, always wear vinyl or rubber gloves. Any oils from your skin can cause problems with the paint.
To make it easier to paint the pieces, make up some "stands" from pieces of left over lumber. You can pick them up and move them around as necessary without getting anywhere near the paint. Just make sure the pieces are secure to the stands and won't fall off when moved.
Contrary to what I've read here, you don't need to immediately clear coat after the base. I have, on several occasions, left the clear for up to several weeks. A couple of times I wet sanded the base with 1000 grit prior to the clear but on others I just wiped it down with cleaner and shot the clear. No difference that I could see.
If you need to speed the cure, you can use those halogen lights. Just position them about a foot to 18" inches from the work for an hour or so.
For cleanup after finishing a coat run some thinner/cleaner through the gun. I shoot it into a plastic washer fluid jug and take it to our local recycling center. If you leave the gun uncleaned for too long the 2 part paint will harden and clog the gun. When you're done for the day "field strip" the gun and immerse everything in cleaner for at least an hour or so.
If you're using a "booth" make sure you use old clothes and wear a hat and goggles along with your respirator. Paint fog is sticky. Fog also travels so make sure everything within about 10 feet is covered (even if you use a "booth")unless you want it painted too.
Last but not least, think safety......no flames around your supplies or when you're shooting so if the hot water heater or furnace is close, turn off the pilot flame.
As the guys say preparation is the key. Have everything close at hand and setup ready to go before you pull the trigger. Don't rush as that's when the accidents and mistakes happen. It seems like a lot of work and more effort than its worth but when you see what you can do you'll be chuffed I'm sure. Did I mention have fun with it?
So, we're waiting to see what you can do.
Cheers,
Spyug
I intend to sit the tank and tail piece on something (haven't figured out exactly what just yet) but the mudguards and seat trim I think will be easier to hang and I've got some brackets to hang them from.
I've got overalls, dodgy old boots, goggles, respirator, and a dodgy old hat all waiting for me, so should be good from that perspective. I'll be throwing a drop sheet over the bike and the cars will be put outside the garage with the closest garage door shut and the other open a little to allow some air to circulate.
I've got the thinners there ready for clean up so that should be good to go.
And I gave up smoking over a year and a half ago, so no naked flames from me any more
I will do my best to be patient and have fun!
Yeah thanks for reminding me StanOriginally posted by Flyboy View PostYes Pete, you have people from all around the world here, waiting to see what you can do................
No pressure, you understand

Actually knowing that others are encouraging me and want to see the end result helps me to be patient and do my best to get a good job done...
And no, no pressure at all...
So true! I really hope it doesn't come to that though... I'd really like to get it good first time around...Originally posted by apopleptic View PostYou know not to worry. In a worst case scenario if something were to go wrong, you'll get more practice. Thats how we get to be experts
Hahaha mate I really hope it comes out like that!Originally posted by Cdnpt1 View Post"So, we're waiting to see what you can do."
No pressure though! Of course when your 450 looks amazing the rest of us are going to have to get off the pot too.1982 GS450E - The Wee Beastie
1984 GSX750S Katana 7/11 - Kit Kat - BOTM May 2020
sigpic
450 Refresh thread: https://www.thegsresources.com/_foru...-GS450-Refresh
Katana 7/11 thread: http://www.thegsresources.com/_forum...84-Katana-7-11
Comment
-
Ok so today didn't turn out quite like I had intended...
A late start, then a trip to the city to drop my wife off and then go get the seat foam and a couple of other odds and ends and then finally a miscommunication ended up in only about 45 minutes on the job today. However my wife decided that the house mate and her can cope with cleaning the house tomorrow so I could get stuck into it then. So if that works out that would be awesome, otherwise I'm really gonna be struggling to get it all done properly in my week off.
Anyway, here's how it ended up with the fibreglass concoction on it and cured:


And I managed to at least get the fibreglass sanding done today, and I was able to sit the grab rail on where it belongs to make sure it's now all built up the the level it needs to be at:


So that should now be good for body filler to go over the top.
I blew all the fibreglass dust and crap off with the compressor so it's ready to wipe down and have the body filler applied.
So as I said earlier I went to get the foam for my seat today, and there's a paint shop 'round the corner from there that was open so I ducked in and got some of the fine line type masking tape and splurged and got a roll of masking paper as well (it was a whole $6.00).

That fine line type tape doesn't look porous like the standard masking tape does, so that should do a good job of stopping bleeding along with Johnny's suggestions for application and removal.
I also got some more nitto connectors for the spray guns and air regulator and water separator:

And these are the brackets I have sitting around that I'll screw to one of the rafters in the garage and hang the mudguards and seat trim from while painting:

Fingers crossed tomorrow works better than today...1982 GS450E - The Wee Beastie
1984 GSX750S Katana 7/11 - Kit Kat - BOTM May 2020
sigpic
450 Refresh thread: https://www.thegsresources.com/_foru...-GS450-Refresh
Katana 7/11 thread: http://www.thegsresources.com/_forum...84-Katana-7-11
Comment
-
 twotimeGSr
Pete: Why did you putty over the entire tail piece? I will hopefully paint my bike over the winter and I was just wondering if there is a reason because of the material it's made of? ... or was it just in bad shape?
Comment
-
Only because I made it. There's raw fibreglass under there so my intention was to sand it back and put something over the top to get a nicely shaped, smooth finish for paint. Putty was a bad choice...Originally posted by twotimeGSr View PostPete: Why did you putty over the entire tail piece? I will hopefully paint my bike over the winter and I was just wondering if there is a reason because of the material it's made of? ... or was it just in bad shape?
If you're just doing the stock pieces, you don't need to do that.1982 GS450E - The Wee Beastie
1984 GSX750S Katana 7/11 - Kit Kat - BOTM May 2020
sigpic
450 Refresh thread: https://www.thegsresources.com/_foru...-GS450-Refresh
Katana 7/11 thread: http://www.thegsresources.com/_forum...84-Katana-7-11
Comment
-
 Johnny Drummond
Pete, just remembered to make life easy with the side covers and the tailpiece if you get some boards and put 4 4x100 wood screws through them it will hold them up so you can paint them and you can then lift the board out of the way to do the next piece this lessens the likleyhood of you marking the paint along the edges of the panels and tail piece that you have worked so hard on(stuff it, I'm lousy with descriptions what I mean is this)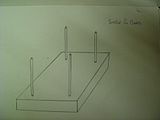 and to make life very easy when it comes to wet sanding the high build primer which I reccomend that you put on 4 coats of, the best way to know you have a nice smooth finish(and to see any hollows) is to get a rattle can-doesn't matter what colour and just shake it a few times so that it spatters paint rather than spraying on(something like this)
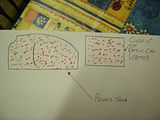 give it time to dry THEN get the 600 grit paper out, when all the spatter is gone you will have a smooth undercoat. Sorry about the lousy picture!,as for the drawings 10 years of engineering drawing classes and an inability to properly explain what I mean leads to me scribbling things so I can be understood. Good luck mate, you're nearly there.Johnny
Comment
-
Thanks again Johnny! I think I'm right without the boards as I'll be hanging everything except the tank. I should be able to hand them in such as way that if I need to turn them 180 degrees I can just unhook them and turn them around.Originally posted by Johnny Drummond View PostPete, just remembered to make life easy with the side covers and the tailpiece if you get some boards and put 4 4x100 wood screws through them it will hold them up so you can paint them and you can then lift the board out of the way to do the next piece this lessens the likleyhood of you marking the paint along the edges of the panels and tail piece that you have worked so hard on(stuff it, I'm lousy with descriptions what I mean is this) and to make life very easy when it comes to wet sanding the high build primer which I reccomend that you put on 4 coats of, the best way to know you have a nice smooth finish(and to see any hollows) is to get a rattle can-doesn't matter what colour and just shake it a few times so that it spatters paint rather than spraying on(something like this)
 give it time to dry THEN get the 600 grit paper out, when all the spatter is gone you will have a smooth undercoat. Sorry about the lousy picture!,as for the drawings 10 years of engineering drawing classes and an inability to properly explain what I mean leads to me scribbling things so I can be understood. Good luck mate, you're nearly there.Johnny
I think that makes sense for spray can tip. Just give it a little shake and allow it to squirt rather than spray.1982 GS450E - The Wee Beastie
1984 GSX750S Katana 7/11 - Kit Kat - BOTM May 2020
sigpic
450 Refresh thread: https://www.thegsresources.com/_foru...-GS450-Refresh
Katana 7/11 thread: http://www.thegsresources.com/_forum...84-Katana-7-11
Comment
-
Ok, so today didn't go quite to plan again, but I did get some time to do some stuff.
First thing I did was wipe the tail piece down again and mix up the body filler for it.


Unfortunately, I managed to screw up the amount of hardener. It was supposed to be 50:1 and I measured out 150 grams of filler and added some hardener, but I was using the kitchen scales which have no way to measure 1 gram, so it looks like I probably only added maybe a gram instead of 3 grams.
After about 40 minutes it was still almost the same as when I applied it.
I was tempted to take it off and start again but after chatting with the house mate I decided to stick it out in the sun for a while and see what happened.
While I waited for that I stuck the guards and seat trim in my marine clean bath to get any old crud off:

Then started sanding them.
After an hour or so in the sun, the body filler definitely had started to harden, so I left it there while I finished the sanding.


Got all the bits sanded except the tank which I'll strip on the Monday to prevent any surface rust appearing:

One question with the green front guard. I've sanded underneath to paint but can I assume it's safe just to prime and do the base coat without clearing? Seems like it would be a bit of a waste of time to clear coat the underside...
I did also get the guns cleaned today, soaked the tips in thinners as per the instructions and then ran thinners through from the cup until they were dry too, so hopefully no lube or crap sitting in there to cause spatter on the job.
I also discovered that the water separator I bought is faulty. It looks like when the relief valve was installed that they have overtightened it and there is a crack the length of the little plastic housing where it screws into which lets air pressure out constantly.
I checked the tail piece again tonight and it's almost hardened up properly. If it was to that point today I could've sanded, but I'll have to try to get down there tomorrow night and see how I go.1982 GS450E - The Wee Beastie
1984 GSX750S Katana 7/11 - Kit Kat - BOTM May 2020
sigpic
450 Refresh thread: https://www.thegsresources.com/_foru...-GS450-Refresh
Katana 7/11 thread: http://www.thegsresources.com/_forum...84-Katana-7-11
Comment
-
 Johnny Drummond
one more thing!!!!!
Pete, when you go to clean the guns between each paint layer ie. primer,basecoat& clear coat, fill the cup with thinners spray for a few seconds then bunch up a clean rag and press it tightly into the aircap(the cap with 2 horns) and press the trigger again for a few seconds this will blow the thinners backwards into the chamber and clean any residue-but sure to make it a big plug of cloth-you really don't want thinners in jected into your fingers .Johnny
Comment
-
Thanks again Johnny, that makes sense too, stop those little holes getting clogged. I have a couple of old thick towels I use so that'll work well.Originally posted by Johnny Drummond View PostPete, when you go to clean the guns between each paint layer ie. primer,basecoat& clear coat, fill the cup with thinners spray for a few seconds then bunch up a clean rag and press it tightly into the aircap(the cap with 2 horns) and press the trigger again for a few seconds this will blow the thinners backwards into the chamber and clean any residue-but sure to make it a big plug of cloth-you really don't want thinners in jected into your fingers .Johnny
And no, definitely don't want that!1982 GS450E - The Wee Beastie
1984 GSX750S Katana 7/11 - Kit Kat - BOTM May 2020
sigpic
450 Refresh thread: https://www.thegsresources.com/_foru...-GS450-Refresh
Katana 7/11 thread: http://www.thegsresources.com/_forum...84-Katana-7-11
Comment
.png)
Comment