.png "Powered by vBulletin")
Cool. When the lights come in I can match them up to the right bezel.
-
-
Got the paint done. Still need to clear coat, upholster the seat, install some lights and de-rust that tank.


Pretty stoked with the paint though.Comment
-
Very sexy! What is the tank badge about?
Spyug
PS You work quick
Comment
-
-
Lovely green, very Land Rover, will be perfect with those lights and chrome bezels. I recognise that symbol, is it Zelda?!Comment
-
Almost looks like the Last Starfighter logo:

Last Starfighter Logo/Icon/Insignia by Evil Game Boy, on Flickr
Which would actually look pretty sweet on a bike with the blue and red pin stripes.Comment
-
-
-
'tis indeed hardcore, reminds me of my youth, when I spent quite a bit of time stealing little models from Games Workshop to sell at school so I could buy snout.Comment
-
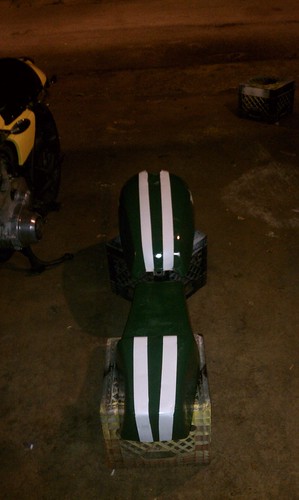
My tail-lights just came in. They seem larger than I expected. Will know for sure when I try laying them out against the seat, but there might not be room for both on that tail-piece.
Whether a single or a pair, the shape on these lights is bad-ass.Comment
-
Got everything finished up and mounted on the bike. I ended up having to pull one of the side covers (the left one) because the paint had crazed pretty hard. Am stripping/sanding it to redo, but the primer crazed again in one spot. Not sure what is causing the reaction, but I have plenty of sandpaper . . .
Here are some garage pics. Will take some better ones in daylight soon.


Comment
-
Looking pretty sweet there, lights look perfect from those angles, are they too big from the back? Paint probably has some sort of contaminant, oil or something under it, I'd take it right down, clean with some thinners and start again. Might be able to get away with a patch.Last edited by Guest; 06-21-2012, 12:35 PM.Comment
-
The lights are a little big, and they ended up much closer together than your bike.
I still dig them though, and they worked out great. Getting them to line up revealed some of the rough edges in my seat design (i.e., not all my shaping was even). So the lights and the striping don't quite line up right.
When I bored out the holes for the lights (they need like 1.5-1.7 inch openings to mount), the angle conflicts really stood out. I used a Dremel on the edges to the holes to adjust the position of lights. Since the lights are like a mushroom, with a 1.5 inch stem and 2.75 top, I could grind at the port edges to shift where the lights would mount. After a couple hours of grinding and checking, then grinding and checking, I ended up with the lights pretty much aligned on the shape of the tail, but possibly a little bit out of level.
Unless you bust out a laser or bubble tool, I am calling it
Comment
-
first close only counts in
horse shoes, hand grenades, washers, and thermal nuclear devices
but on a good note it looks awesome
the way i got my lines so stright
i measured from the bottom of the tank and found center from the left and the right side using a little math
4/2=2 lol
then i used some more math and measured the gas cap and did the same equation
4/2=2
then marked several points down the tank depicting a rough center line then drew it in pencil with a straight edge finally i mesured left and right from the center line and made my marks for the final lines and viola
perfecto linez just line them with a little tape and paint!!!
Comment
-
Thanks. My tank already has three center point references: (1) the neck opening; (2) the gas cap; and (3) the bolt mount at the back. I merely lined my tape up against those for the stripes.Originally posted by Reaper0001 View Post
The lines on my seat pan are the ones that ended up awry, though.
Part of the problem is that my curved edges on the back of the tail obscured the fact that the top/rear edge ended up out of level and tilts slightly up and to the right.
That would be no big deal with a single light, but lining up the pair forced me to align them either (A) level - highlighting the tilt on that edge; or (B) parallel to the top - compounding the error. The two stripes add to the problem because I tapered them slightly on the back face of the seat, throwing another skewed angle into the mix.
Ultimately, I had to fiddle the positions of the lights to "eyeball" it for the best look, geometry be damned.
Comment

Comment