Announcement

Collapse
No announcement yet.

Scratch-Built Seat Noob

Collapse
X
 
  • Filter
  • Time
  • Show
Clear All
new posts

    #16
    Made a lot of progress on the foam stage. Here are a bunch of pics:

    Smoothed out the rough shape. Initially, I wanted to go with a boxy Dunstall shape, but the harder edges contrasted with the lines of the tank -- even though the tank for this seat may not have knee-dents, but will probably just be a standard shape, sans the fuel door and badges.


    Then I shortened the back of the form and added a bit of a flair to the tail angle. Still a bit too boxy for the lines.


    From there, I decided to sharpen the vertical angles and bring more of a "Coke-bottle" curve to the tail shape. This is where I ended up.


    Now the curves actually pick up the knee dent lines, maybe I will hammer in the second tank after all.

    Although the foam version sits a bit high, the actual seat will be a bit lower. The board I am working with is 2", but I plan to reduce the base thickness to about 1" - 1.5" when I trim the fiberglass.

    I now see that the slight curve at the bottom of the back end will make glassing this a little more difficult, since I may not be able to simply lift the glass off the foam. Looks like there are a few ways to navigate that issue.

    1. Cut the form just past the mid-point and a few inches into the hump, so the front drops out of the glass allowing the back to shift forward and down.

    2. Glass the main pan to drop out and then glass the bottom of the tail afterwards.

    3. Just glass the thing and use acetone to get rid of the foam in the back.

    Thoughts?

    Comment


      #17
      First attempt at glassing was a catastrophe. As soon as I started laying glass, I knew my pieces were too big. Tried too work through it, but the results were horrid.

      Will start over, since the form cannot be salvaged. Going to stick with that coke bottle shape though. It's pretty sexy.

      One question, the ratio of hardener to resin on the package is unclear. Any good rule of thumb to tell when you have the right mix?

      Comment


        #18
        I think it is 2-5%, I weigh the resin in kg, work out 2-5% then translate that into ml. So 500g needs 10ml of hardener, put more hardener depending on how low the the temperature is where you are doing it. Did it melt that foam or did you just bust it up getting it out? after watching that video I may well start using that method.

        Comment


          #19
          Originally posted by EvilEnfield View Post
          I think it is 2-5%, I weigh the resin in kg, work out 2-5% then translate that into ml. So 500g needs 10ml of hardener, put more hardener depending on how low the the temperature is where you are doing it. Did it melt that foam or did you just bust it up getting it out? after watching that video I may well start using that method.
          Didn't melt foam, but the shape and extra glass make it impossible to retrieve the form.

          Comment


            #20
            show us a picture of what you have come up with so we can help you
            fix this problem!

            Comment


              #21
              Will post pics of new form when finished. The fiberglass atrocity is in the trash.

              Comment


                #22
                Round 2 on this project.

                After discarding the abomination of my first attempt, I finished fabbing up a new form last night. Taped it up and laid plenty of wax on it.

                Here are some pics:


                It's pretty close to the shape I used before, but I ditched the lower curves to make it easier to pull apart when the glass sets up. The angle in the back will still require some butchering of the foam, but whatevs.

                Tonight, I'll pick up some more materials and take another crack it the glassing process. Fingers crossed . . . .

                Comment


                  #23
                  So I am soaking up more information about the resin hardener puzzle. One thing I cannot get a lead on is working time. In a decent temp (75 degrees F?), roughly how long do you have to work with resin once the hardener is mixed in?

                  Comment


                    #24
                    Round two of the glassing went much better. Here are some progress pics:


                    Still some hiccups this time, but those should be easy to clean up with a skim coat of Bondo.

                    Now I need to puzzle out how best to upholster the seat. I might try to make a seat insert from some 1/4 inch MDF and fiberglass to which I can add padding and vinyl. I could resin/epoxy in 3-4 carriage bolts to act as studs that would pass through the seat pan to be secured by nuts on the bottom to attach it to the seat pan.

                    Other thoughts?

                    Comment


                      #25
                      Looking good. I doubt I'll do any fiberglass work on my bike but I'm having fun learning the process with you.

                      Comment


                        #26
                        I might try to make a seat insert from some 1/4 inch MDF and fiberglass to which I can add padding and vinyl
                        It is not necessary to do that and it may even be counterproductive. It will add weight, raise the seat height and probably make the seat harder.

                        If your glassing is good the seat is your pan and all you need to construct is the pad. There are numerous types of padding materials but I find the best to be close cell foam as used in garden "kneeler pads". They are much like neoprene rubber in texture (spongy) and fairly firm when about 1.5" to 2" thick. For extra comfort you can add other materials in combination (maybe like rubber waffle available from medical supply stores for folks in wheelchairs). You may have to try several things until you find comfort. Once you find the pad, cover in vinyl and on the underside glue on some woven material like the stuff used to cover speaker boxes in custom rides. Glue down some velcro tape on the seat and the pad will stay in place but will come off if you want to remove it.

                        Fixing the seat to the frame can be done a number of ways too. Bolts glassed in to the bottom of the pan that then go through holes drilled in the frame is likely easiest. Take a run down to Home Depot or Lowes and you might find several other ideas. That's what I usually do.

                        One thing about these seats, they are very hard and can cause severe injury to your butt, legs and or lower spine so make sure you have adequate padding.

                        Good luck with it.
                        Spyug

                        Comment


                          #27
                          Originally posted by spyug View Post
                          It is not necessary to do that and it may even be counterproductive. It will add weight, raise the seat height and probably make the seat harder.

                          If your glassing is good the seat is your pan and all you need to construct is the pad. There are numerous types of padding materials but I find the best to be close cell foam as used in garden "kneeler pads". They are much like neoprene rubber in texture (spongy) and fairly firm when about 1.5" to 2" thick. For extra comfort you can add other materials in combination (maybe like rubber waffle available from medical supply stores for folks in wheelchairs). You may have to try several things until you find comfort. Once you find the pad, cover in vinyl and on the underside glue on some woven material like the stuff used to cover speaker boxes in custom rides. Glue down some velcro tape on the seat and the pad will stay in place but will come off if you want to remove it.

                          Fixing the seat to the frame can be done a number of ways too. Bolts glassed in to the bottom of the pan that then go through holes drilled in the frame is likely easiest. Take a run down to Home Depot or Lowes and you might find several other ideas. That's what I usually do.

                          One thing about these seats, they are very hard and can cause severe injury to your butt, legs and or lower spine so make sure you have adequate padding.

                          Good luck with it.
                          Spyug
                          To attach the seat to the frame, I will use the seat hinges already there. That's how I attached my current seat.

                          I hear you on the pad/covering, but wont the pad need some kind of stiff backing to securely stretch/fit the vinyl over the foam?

                          Comment


                            #28
                            Originally posted by Toasty View Post
                            http://www.eagerplastics.com/

                            This place in Chicago sells fiberglass stuff.

                            I like this place also..

                            Fibre Glast Developments has specialized in the distribution of fiberglass and composite materials for over 50 years. In this time, we've built the largest and most comprehensive composites catalog in the industry; investing along the way in the product knowledge to support it. That means you can depend on Fibre Glast as a trusted and reliable resource for all your project needs. What's more, professionals look to Fibre Glast to deliver composite materials that are always First Quality. With an ISO Certified Management System in place, we work to ensure that our products meet the highest quality specifications, and that they are supplied to you promptly and with consistent characteristics each time you order. There is no exception. At Fibre Glast, we want your project to be a success, whether you're a beginner or an expert. And we're equipped to get you moving in the right direction. Let us know how we can help you.

                            Comment


                              #29
                              but wont the pad need some kind of stiff backing to securely stretch/fit the vinyl over the foam?
                              Not really. There are good glues that will stick anything to anything else but if you are sceptical, you could use a sheet of 1/8" "fiberboard", "doorskin" or something like that, even cardboard. You can glue or staple to that.

                              I guess it all depends on the shape you are going for. Here's a picture of my Tracker. The pad was done in marine vinyl and its just wrapped around the padding and glued to the underside. Its pretty ghetto but I wasn't concerned about a concours piece of padding.


                              Hope that helps.
                              spyug

                              Comment


                                #30
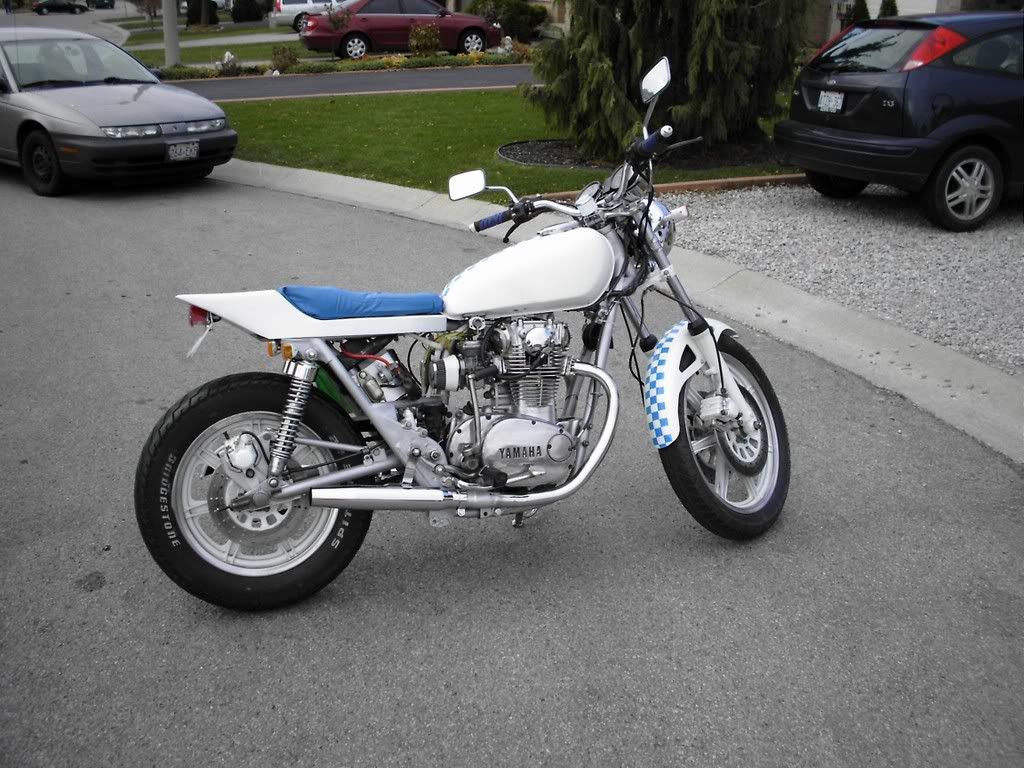
                                After plenty of bondo work and sanding, I have a couple coats of primer on the pan.


                                The surface smoothed out nicely with some 400 grit. Still one or two small chips/dings that I missed with the glazing putty, but I am moving forward with seat padding and vinyl now, and figuring out a good tail-light.

                                I don't want to do another cat-eye, but do want to mount the light on the rear surface, to break that up a bit.

                                Maybe a simple round light mounted flush or a pair of small rounds in there would be best. Might flirt with a Lucas style or even a tombstone, if I can get a better handle on their size and shape than just pictures on the Internet.

                                Any other suggestions?

                                Comment

                                Working...
                                X