Announcement

Collapse
No announcement yet.

First ever seat build (try not to laugh)

Collapse
X
 
  • Filter
  • Time
  • Show
Clear All
new posts

    First ever seat build (try not to laugh)

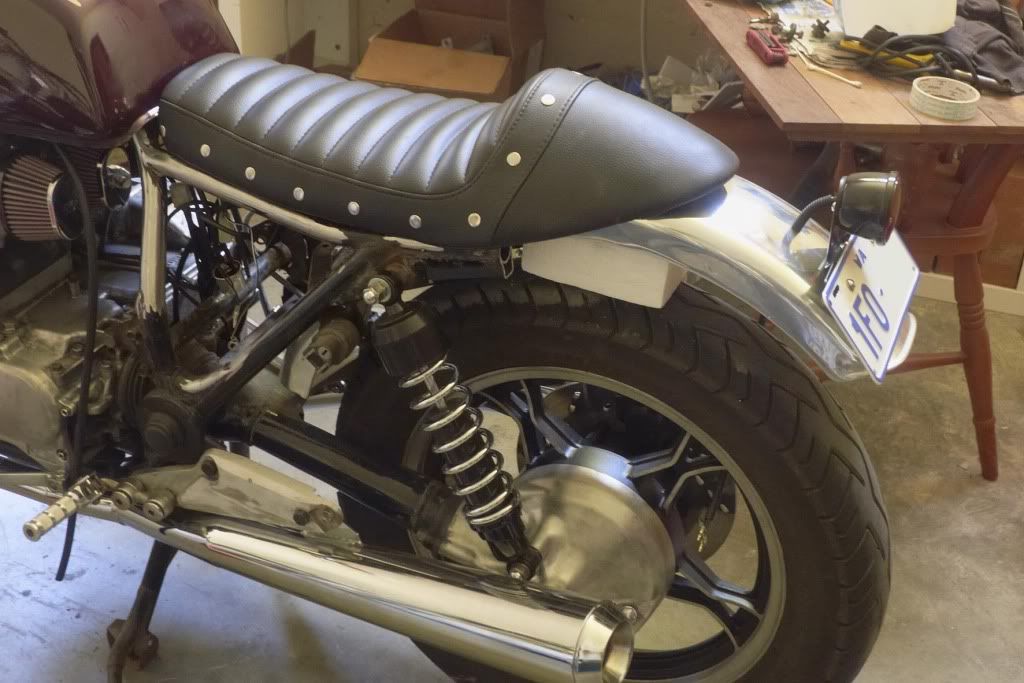
    Ok. So I decided to build a seat. This might get kinda long, I'll try to go a little easy on ya. I decided to do this because at a towering 5'4'' i could barely get my toes on the ground. I can ride just fine, but it was just a matter of time before I pull up to a stop sign, hit a slick spot and drop the bike. The last thing any of us want to happen. So I dove in head first. Original plan: uncover first seat, trim cushion, recover. As a semi-pro wood worker and metal worker I thought "this should be a breeze". Boy was I ever wrong. First issue: seat pan is too wide. Even with no cushion at all it the seat pan kept my legs too wide to touch the ground well. I didnt take me long to realize there's no real good way to mod the pan. better to make one from scratch and try to sell my pan and cushion (hopefully to someone on here as to support my fellow gs'ers). So here's my story. Pretty simple stuff to start off. Made myself a cardboard template. Then transferred that to a piece of 1/4'' plywood I had lying around.


    Since I had already bought vinyl and foam to fix the seat all I needed was to head to Lowe's and get plywood and hardware to mount. Transferred my template to the plywood and there's where the fun began.


    I had these two little brackets under the seat that weren't holding anything. (I'm sure one of you will tell me how I screwed up by doing this but that's ok) drilled them out for the 5/16 carriage bolts and put those in the wood for mounting. After a couple hours of cutting and shaping to the the width just right I put the wood on with the bolts the holes. IT GOT STUCK!!! I had drilled the holes a little off. Wiggled it and wiggled it and it would not budge. After 20 min or so I got angry. I then grabbed on the short side toward the back and the DAMN THING BROKE!!!! this will be the first time i get to start over.

    So I cut it again and got my foam stacked up and glued to cut the shape I want.


    It was getting late so I let that dry over night. That was an entire sunday btw. The next day after work I comence to cutting. Have you ever tried to cut and shape seat foam. Not me! I messed that up right off the bat. And that makes the second time I get to start over. You may see a pattern develop.

    #2
    What.... in the world are you doing..?

    Subscribed.

    Comment


      #3
      it might be a little late for this now, but did you think about lowering the bike? you could probably gain a good inch or two with the right set of rear shocks and dropping the front a little.

      Comment


        #4
        Keep going, this thread's gonna be fun!

        Comment


          #5
          part 2

          At that point I decided to change my plan and make it out of fiberglass. I changed to harder styrofoam which I figured out later I used the wrong foam. The only stuff I could find local was the green stuff the use in fake plants. It got the job done, but I will use something different on my next seat. The very first cut I made was wrong! I cut too much. but this time I got lucky. if you screw up you can just glue that stuff back on!!! So I let that dry and tried again. oh yeah I'm sorry for the lack of pics in this section but I had gotten frustrated and didnt want to do this thread. Meanwhile back at the ranch very very slowly I cut and shaped and got the back of the seat close to how I wanted. It took me four tries to get the little hump on the front shaped so I could cover the lip on the back of the tank. Now for the fiberglass. Remember that pattern I told you about. Well guess what!?!? I f@$&ed up. "Hey man, lets throw $60 on the ground and burn it!!!" If you are thinking about doing a seat like this, let me give you some insight that I found out the hard way.
          1) go ahead and buy the big can of resin. you'll need it.
          2) get 2 sheets of the fiberglass matte. you can find these at any parts store
          3) DONT USE PLASTIC CUPS LIKE THE GUYS ON YOUTUBE. they melt. I used mason jars my wife had for canning (the second time) pre poured 6oz in each jar 6 or 7 of them. but dont put in the hardener. had to throw that in just in case
          4)dont try to cut the matte to fit the profile. that takes practice. cut that thing into strips and put it on like paper mache. it dries just as hard and its wwaaaayyy easier to apply in small sections.

          my second shot worked out good. but the cone on the front came out flat. but I finally had a stroke of genius. i put painters tape on my tank. put the seat on and used bondo to fill in the crack. all the little holes are to give the bondo a little more to hold to.


          WORKED LIKE A CHARM!!!!!! This is the first thing that went well the first time!!. if you do something like this, put wax on the tape. it stuck and i thought i wouldnt be able to get it off but it finally came loose.


          So then while bondo dried and i wasnt sanding, made the cushion. the blue mat is a yoga mat from walmart. i used the 1/4'' plywood for the bottom to glue the mat and vinyl to and that was the only other thing that came out right the first time. next time i will have it professionally covered but thats after fram mods and all. next year sometime. ive lost too much riding time this year alredy.


          Comment


            #6
            I just used one of these:


            If you take the side covers off and relocate most of the stuff under there you can get the seat a lot lower and narrower. The frame is quite narrow under the seat. Hmmm... May be easier your way! :-)

            Comment


              #7
              part 3

              And after nearly two weeks and a rattle can paint job. . . the finished product. Am I happy with it? NO. Would I change things if i could go back? YES. but I learned a lot that I will take with me to my next seat project. now that it's over i can look back and laugh. i hope you did too as you read. Thanks for looking guys.


              Comment


                #8
                This is a fine example of why it's awesome to be a human!!! We want something, we think about it, we build it! A chimpanzee could not have figured this out.
                Rob
                1983 1100ES, 98' ST1100, 02' DR-Z400E and a few other 'bits and pieces'
                Are you on the GSR Google Earth Map yet? http://www.thegsresources.com/_forum...d.php?t=170533

                Comment


                  #9
                  This was supposed to be cheap and temporary. Just until I get my mods all worked out. I think ill get 12.5 springs and drop the front two inches. For now I'm satisfied. I can stand almost flat footed without altering the bike at all. I will be using the rear cowl on my next seat. I like the shape. To me this was the best way to ride comfortably and work out all the details before cutting the back of the bike off.

                  Comment


                    #10
                    Not the prettiest thing but if it works for you that's all that matters.

                    My standing word of caution on these seats however (and I speak from first hand knowledge) they can be dangerous in that you can severly injure your sciatic nerves and or spine. There is not enough padding to absorb shock or stop the muscles in your buttocks from compressing the sciatic nerve bundles in your legs. A compressed nerve is pain beyond belief requiring morphine to control. Worse than the pain can be loss of use of the leg. In my case, an episode of this and a flair up a year later kept me off the bikes for 18 months and I still (almost 5 years later) have only regained 85% of the strength in my left leg.

                    So use with caution and not for extended periods.

                    Good luck with it.
                    Spyug

                    Comment

                    Working...
                    X