Announcement

Collapse
No announcement yet.

Any gurus for the 450 carbs?

Collapse
X
 
  • Filter
  • Time
  • Show
Clear All
new posts

    Any gurus for the 450 carbs?

    I am working on a set of carbs for a new member. I don't remember seeing carbs like this before, so I don't think I had to do anything to the ones that were on #1 son's 450 for the short time we had it.

    I am trying to remove the idle mixture adjustment screw. I have removed the cap. The screw moves easily, but seems to run out of threads before it comes out far enough to grab it. Is there a port somewhere that I can put compressed air to and blow it out? How do I remove the screw?

    Next problem: the needle jet appears to be pressed into the float bowl. I can see a small o-ring on the part that sticks out, but I don't know if there is another o-ring below, that I can't see. I have tried gripping the jet with pliers and twisting to break it free, but there is no movement. I don't want to squeeze so hard that I distort the jet, but I need a good grip. How do I remove the jet from the float bowl?

    I need to remove these parts before putting them in "the dip", so everything is at a standstill for now.

    .
    sigpic
    mine: 2000 Honda GoldWing GL1500SE and 1980 GS850G'K' "Junior"
    hers: 1982 GS850GL - "Angel" and 1969 Suzuki T250 Scrambler
    #1 son: 1986 Yamaha Venture Royale 1300 and 1982 GS650GL "Rat Bagger"
    #2 son: 1980 GS1000G
    Family Portrait
    Siblings and Spouses
    Mom's first ride
    Want a copy of my valve adjust spreadsheet for your 2-valve per cylinder engine? Send me an e-mail request (not a PM)
    (Click on my username in the upper-left corner for e-mail info.)

    #2
    Originally posted by Steve View Post
    I am trying to remove the idle mixture adjustment screw. I have removed the cap. The screw moves easily, but seems to run out of threads before it comes out far enough to grab it. Is there a port somewhere that I can put compressed air to and blow it out? How do I remove the screw?
    How about a magnet to pull it out of the hole (assuming it's steel & not brass)?

    Maybe just turn the carb body over & give it a sharp rap to entice them out of the hole?


    Originally posted by Steve View Post
    Next problem: the needle jet appears to be pressed into the float bowl. I can see a small o-ring on the part that sticks out, but I don't know if there is another o-ring below, that I can't see. I have tried gripping the jet with pliers and twisting to break it free, but there is no movement. I don't want to squeeze so hard that I distort the jet, but I need a good grip. How do I remove the jet from the float bowl?.
    Check a parts fische to understand exactly how it's all stacked together - sorry, I'm not familiar with those either...

    I did just rebuild a set of Honda V45 keihin carbs & the needle jets were pressed into the carb body. I tried to tap one out using a mallet & small wooden block but only succeded in splitting the end of the jet (where it was sealed with a pressed in ball). I fixed it by soldering the split back together then realized they were NOT to be removed. Luckily it didn't impede the needle movement afterwards.

    Good luck...
    '85 GS550L - SOLD
    '85 GS550E - SOLD
    '82 GS650GL - SOLD
    '81 GS750L - SOLD
    '82 GS850GL - trusty steed
    '80 GS1100L - son's project bike
    '82 GS1100G - SOLD
    '81 GS1100E - Big Red (daily rider)

    Comment


      #3
      Originally posted by hikermikem View Post
      How about a magnet to pull it out of the hole (assuming it's steel & not brass)?...
      Well, ya know what they say about assumptions, ...
      Yep, they are brass, not steel.


      Originally posted by hikermikem View Post
      Maybe just turn the carb body over & give it a sharp rap to entice them out of the hole? ...
      Yep, tried that, too.

      That is why I was hoping to be able to apply air to the port that the pilot fuel jet feeds, and maybe get enough pressure in there to push the screw out.
      I have applied air to every hole I could see, but it might help to know exactly which one is the pilot circuit.


      Originally posted by hikermikem View Post
      Check a parts fische to understand exactly how it's all stacked together - ...
      The picture I saw showed the jet out of the bowl, with no apparent retention mechanism, but you know how accurate some of those pictures are.

      .
      sigpic
      mine: 2000 Honda GoldWing GL1500SE and 1980 GS850G'K' "Junior"
      hers: 1982 GS850GL - "Angel" and 1969 Suzuki T250 Scrambler
      #1 son: 1986 Yamaha Venture Royale 1300 and 1982 GS650GL "Rat Bagger"
      #2 son: 1980 GS1000G
      Family Portrait
      Siblings and Spouses
      Mom's first ride
      Want a copy of my valve adjust spreadsheet for your 2-valve per cylinder engine? Send me an e-mail request (not a PM)
      (Click on my username in the upper-left corner for e-mail info.)

      Comment


        #4
        Yeah, the carb fische I looked at for the Keihin's showed the needle jets out of the body as well... they in fact do not come out (easily anyway).

        Maybe you can push those idle adjust screws loose with a small pin from inside the throttle body ID, up into that small hole directly under the screw?? I dunno, I got nothin' . Perhaps the dip will loosen them so they'll come out ?
        '85 GS550L - SOLD
        '85 GS550E - SOLD
        '82 GS650GL - SOLD
        '81 GS750L - SOLD
        '82 GS850GL - trusty steed
        '80 GS1100L - son's project bike
        '82 GS1100G - SOLD
        '81 GS1100E - Big Red (daily rider)

        Comment


          #5
          Originally posted by Steve View Post
          I am trying to remove the idle mixture adjustment screw. I have removed the cap. The screw moves easily, but seems to run out of threads before it comes out far enough to grab it. Is there a port somewhere that I can put compressed air to and blow it out? How do I remove the screw? .
          Don't both the pilot & main jet passages feed into the small passage the idle screws is in??
          '85 GS550L - SOLD
          '85 GS550E - SOLD
          '82 GS650GL - SOLD
          '81 GS750L - SOLD
          '82 GS850GL - trusty steed
          '80 GS1100L - son's project bike
          '82 GS1100G - SOLD
          '81 GS1100E - Big Red (daily rider)

          Comment


            #6
            I have a set of bs34ss carbs on My 81 gs450s that I just rebuilt. Assuming we have the same carb setup, the needle jet DOES come out. One of mine came out with a tug. The o-ring was old and brittle. The other was wedged in there pretty tight but eventually came out after I removed diaphragm and shoot a healthy does of WD-40 in there and let it sit for a few hours. If you are doing a complete overhaul, you could leave them in, allow the dip to eat the rubber then pull them out. You would have to clean that passageway thoroughly after pulling them out. To ensure no residue was left. Just an idea.

            Comment


              #7
              Originally posted by hikermikem View Post
              Don't both the pilot & main jet passages feed into the small passage the idle screws is in??
              I don't know. I have tried to blow air through each of the holes to see if it would push the screw out, but have also been feeling to see if it comes back through another hole that needs to be blocked.

              Just got a PM from the bike's owner, he has contacted Robert Barr and ordered the kit that is available for the 450 carbs, so I might just go ahead and dip these things. Like you said, maybe the dip will destroy the o-ring and I can get the screws out.

              .
              sigpic
              mine: 2000 Honda GoldWing GL1500SE and 1980 GS850G'K' "Junior"
              hers: 1982 GS850GL - "Angel" and 1969 Suzuki T250 Scrambler
              #1 son: 1986 Yamaha Venture Royale 1300 and 1982 GS650GL "Rat Bagger"
              #2 son: 1980 GS1000G
              Family Portrait
              Siblings and Spouses
              Mom's first ride
              Want a copy of my valve adjust spreadsheet for your 2-valve per cylinder engine? Send me an e-mail request (not a PM)
              (Click on my username in the upper-left corner for e-mail info.)

              Comment


                #8
                If you can take the top of the carb off steve you might be able to use my handy little removal tool... a bic pen body. Works wonders on my 550 for removing the mains. The first time is an utter PITA to remove them after that its been smooth as silk.

                It looks like its a variable venturi type carb. So it should have the main screwed into the carb bowl side to retain it, then above it is a sleeve using the main jet to retain it down against the bowl so it dosent pop up and out of the carb. It should tap out upwards after you remove the upper portion of the carb for cleaning. Part 33 here.

                Last edited by Guest; 07-07-2010, 12:56 PM.

                Comment


                  #9
                  Needle jet - try tapping it gently with a wooden dowel. Goes inwards towards the slide.

                  Mixture screw - compressed air through the hole on the airbox side. You'll see where the air comes out in the main body - just put you finger over the hole and make sure you don't blast the mixture screw across the road....
                  Last edited by hampshirehog; 07-07-2010, 02:05 PM.
                  79 GS1000S
                  79 GS1000S (another one)
                  80 GSX750
                  80 GS550
                  80 CB650 cafe racer
                  75 PC50 - the one with OHV and pedals...
                  75 TS100 - being ridden (suicidally) by my father

                  Comment


                    #10
                    Originally posted by Danjal View Post
                    If you can take the top of the carb off steve you might be able to use my handy little removal tool... a bic pen body. Works wonders on my 550 for removing the mains. The first time is an utter PITA to remove them after that its been smooth as silk.

                    It looks like its a variable venturi type carb. So it should have the main screwed into the carb bowl side to retain it, then above it is a sleeve using the main jet to retain it down against the bowl so it dosent pop up and out of the carb. It should tap out upwards after you remove the upper portion of the carb for cleaning. Part 33 here.
                    Thanks for the info, but your 500 is not the same as the 450.
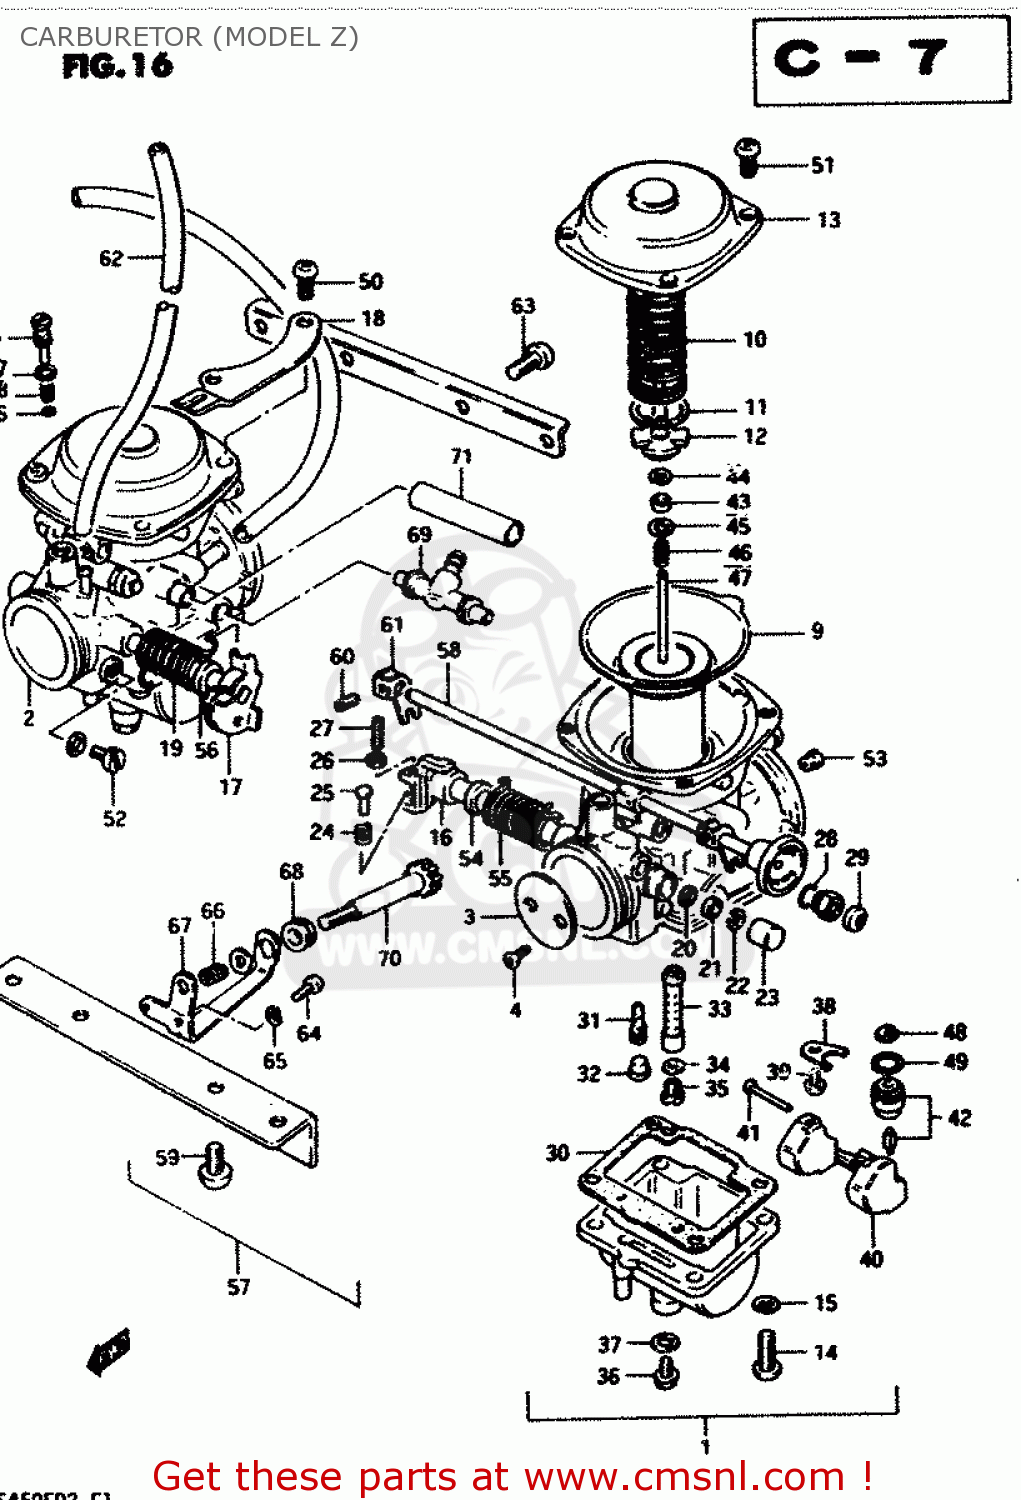
                    The 450 carbs are slightly different, as you can see in the drawing below.
                    Your carbs are much like the "normal" carbs on the larger bikes. On the 450 carbs, the mixture screw is horizontal, the enrichment plunger ("choke") is bolted on to the right side and moves vertically, the pilot fuel jet, the needle jet (emulsion tube) and the main jet all attach to the float bowl, not to the carb, itself. Definitely a different animal.

                    The mains are, indeed, screwed into the bottom, but it's the bottom of the bowl, not the bottom of the carb, which is then covered by the bowl.

                    The mains are also threaded into the bowl, not just the bottom of the emulsion tube (needle jet), which means there is no pushing it out with a BIC pen.

                    This picture does not quite properly show where the main gets attached, but it's #21.
                    It also does not show the parts for the mixture screw, but you can see that it is horizontal, over the carb outlet and just below the rod for the "choke" levers.


                    Again, I have everything removed except the mixture screw and the needle jet.


                    Originally posted by hampshirehog View Post
                    Needle jet - try tapping it gently with a wooden dowel. Goes inwards towards the slide. ...
                    On the "normal" CV carbs, yes, that works, but on these, the jets seem to bottom out in the bowl. I can look through the threaded area where the main jets screw in and see the change from aluminum to brass, where the needle jet starts. The threads are also in the aluminum, so the mains arenn't just held by the needle jet, they are also held by the threads in the bowl.

                    Originally posted by hampshirehog View Post
                    Mixture screw - compressed air through the hole on the airbox side. You'll see where the air comes out in the main body - just put you finger over the hole and make sure you don't blast the mixture screw across the road....
                    I have tried blowing into all the holes in the carb body. I have felt for areas where pressure might be escaping, hoping to increase my chances, but so far, no luck.

                    If necessary, I will be happy to break out the camera so you can see what's going on (or not coming off).

                    .
                    sigpic
                    mine: 2000 Honda GoldWing GL1500SE and 1980 GS850G'K' "Junior"
                    hers: 1982 GS850GL - "Angel" and 1969 Suzuki T250 Scrambler
                    #1 son: 1986 Yamaha Venture Royale 1300 and 1982 GS650GL "Rat Bagger"
                    #2 son: 1980 GS1000G
                    Family Portrait
                    Siblings and Spouses
                    Mom's first ride
                    Want a copy of my valve adjust spreadsheet for your 2-valve per cylinder engine? Send me an e-mail request (not a PM)
                    (Click on my username in the upper-left corner for e-mail info.)

                    Comment


                      #11
                      So another question along with this for the 450 carbs:

                      The main jet is supposed to be screwed all the way in correct? There isn't any 1/2 turn out or any adjustment like that except for the air screws on the side of the carbs?

                      Comment


                        #12
                        Originally posted by ERJpilot View Post
                        So another question along with this for the 450 carbs:

                        The main jet is supposed to be screwed all the way in correct? There isn't any 1/2 turn out or any adjustment like that except for the air screws on the side of the carbs?
                        The mains need to be seated tightly.

                        Comment


                          #13
                          Steve,

                          Not sure if you're still at it with the 450 carbs.

                          When cleaning out mine I had the same problem getting the pilot screw unseated ... no amount of lefty loosie or banging on the table top would get it out. Eventually I put a generous amount of super glue on the end of a q-tip and pressed it to the screw head for 30 seconds or so.

                          After the glue set a bit i was able to unseat the screw by simultaneously twisting to the left and pulling out. A quick scrape and scrub cleaned the semi-dried glue right off of the screw head. I think you will want to get that screw out before dipping as it has an o-ring that would most likely be destroyed by your dipping chemicals. This o-ring is included in the Robert Barr kit.

                          In regards to the emulsion tube. That was also a giant pain for me. What eventually worked for me was warming the bowl up in the oven (250 for 30 minutes or golden brown) then knocking it through by driving a wooden dowel of slightly larger diameter into the emulsion tube. The friction was enough to pull it out.

                          I did, however end up breaking off the dowel in the tube during the process. You can burn the seated wood out with a lighter/butane torch etc.... Regardless it's an involved process and might not be entirely necessary during the dipping cycle as long as your carb cleaner is coming through the pilot and main jets into the emulsion tube while spraying.

                          I'd be curious to know how yours is coming along. Good luck!!!

                          Comment


                            #14
                            Just read your post during dismantling of my bs34ss carbs on my canadian gs400e ( 8 valves head) Same carbs as the gs450ed . Just one question : about the needle jet ( some call it emulsion tube ) ...anyway the brass tube where you have trouble to remove with your stuck wood dowell . The question is : there a o-ring around this tube or not ???? Thanks

                            Comment


                              #15
                              Originally posted by brad-450Lz View Post
                              Not sure if you're still at it with the 450 carbs. ...
                              Carbs are done, back on the bike and it's running.

                              The owner stopped by this evening, hoping I had time to do a quick carb sync, but I was on my way out the door for another appointment. They sounded OK, did not sound like the sync was very far off, but will put the gauges on in the next couple of days or so.

                              Never did get the emulsion tube out. I used my Dremel with a cut-off wheel to cut a window on the side of the tunnel where the mixture screw lives. I screwed the adjuster screw all the way in, then cut the tunnel so I missed the top of the screw. When I backed the screw out as far as the threads would allow, I was able to use my dental pick to pull on the side of the screw. Sorry, did not get a picture of it, but it worked well. I will try to remember to get a picture when he comes back to do the carb sync.

                              .
                              sigpic
                              mine: 2000 Honda GoldWing GL1500SE and 1980 GS850G'K' "Junior"
                              hers: 1982 GS850GL - "Angel" and 1969 Suzuki T250 Scrambler
                              #1 son: 1986 Yamaha Venture Royale 1300 and 1982 GS650GL "Rat Bagger"
                              #2 son: 1980 GS1000G
                              Family Portrait
                              Siblings and Spouses
                              Mom's first ride
                              Want a copy of my valve adjust spreadsheet for your 2-valve per cylinder engine? Send me an e-mail request (not a PM)
                              (Click on my username in the upper-left corner for e-mail info.)

                              Comment

                              Working...
                              X