Announcement

Collapse
No announcement yet.

GS650E Carb woes

Collapse
X
 
  • Filter
  • Time
  • Show
Clear All
new posts

    GS650E Carb woes

    Hello fellow GS owner, riders, and enthusiasts,

    Here is the deal, I have a GS650EZ, and I can not for the life of me get the carbs adjusted correctly. I have had the bike since Sept '08, and have only up the mileage about 200 miles, to about 4650 miles. The reason I took it all apart in the first place was to remove rust from the inside of the tank and dip the carbs. I mistakenly removed all the jets and now I cannot get them fine tuned.
    All intake and carb o-rings have been replaced also.

    All the trouble I'm having with these carbs makes me just want to get rid of the bike, but I just can't convince myself to do it. I bought a new battery today to try to get this thing going, but it's just so disheartening when things need to come back apart.

    This is basically a plead for help. I'm located in NKY if there are an experts close...

    Now, the bike does run, in fact, it starts right up, but as of now i believe the pilots are too far in as the rpms hang. It idles on it's own, but rough, and revs ok most of the time. By this I mean that when I rev it, the RPMs go up and come back down most of the time.
    When you take off, the bike jumps on it with little throttle input, but then hits a brick wall around 6k RPM, and also it doesn't handle large throttle inputs well. Also if you are going in gear (say at 4k rpm) and pull in the clutch, the RPMs will hang, and sometimes ever try rising with no input. I have to cut ignition off and on until it goes back down.

    Any advice on setting pilot jet and the air jets (or anything else) would be wonderful. Please restrain yourself from simply direct me to the sticky thread, as I've seen it.
    Honestly, this is the first time I have asked for help for this bike. Call me stubborn and stupid, and i'll agree with you, but I am spent on working on this bike.

    Again, all help will be much, much appreciated. Best regards to all,

    Drew.

    #2
    Greetings and Salutations!!

    Hi Mr. EZ_650,

    That's a great looking bike. Those GS650E models seem somewhat rare.

    The carbs on these bikes are sensitive to any blockage in the small passages. Sometimes you must dip each carb body for 24 hours, rinse with water, then spray carb cleaner in all the passages, and finally blow out all the passages with compressed air. All of the jets just screw in and there is no adjustment other than using different sizes. If you have the stock airbox (Is it sealed up tight?) then the stock jetting should suffice, unless you want to shim the needle. The only adjustment, beside the vacuum sync screws, is the idle mixture screws. In your "mega-welcome" is a couple of maintenance lists with links and tips that should help. Let's get started.

    I just stopped by to welcome you to the forum in my own, special way.

    If there's anything you'd like to know about the Suzuki GS model bikes, and most others actually, you've come to the right place. There's a lot of knowledge and experience here in the community. Come on in and let me say "HOoooowwwDY!"....

    Here is your very own magical, mystical, mythical, mind-expanding "mega-welcome". Please take notice of the "Top 10 Common Issues", the Carb Rebuild Series, and the Stator Papers. Now let me roll out the welcome mat for you...

    Please click here for your mega-welcome, chock full of tips, suggestions, links to vendors, and other information. Then feel free to visit my little BikeCliff website where I've been collecting the wisdom of this generous community. Don't forget, we like pictures! Not you, your bike!

    Thanks for joining us. Keep us informed.

    Thank you for your indulgence,

    BassCliff

    Comment


      #3
      Did you follow the carb rebuild procedure on the GSR homepage? Is the stock airbox fitted and properly sealed? When cleaning the carbs did you hold each pilot jet up to the light to make sure the orifice open? How many turns open are the pilot screws? General rule of thumb is to set them to 2.5 or 3 turns open and then tune from there to achieve the best idle setting. Lastly, did you replace the intake boot O-rings?

      Don't give up, it ain't that hard. You just need to follow the process step by step.

      Good luck.
      Ed

      To measure is to know.

      Mikuni O-ring Kits For Sale...https://www.thegsresources.com/_foru...ts#post1703182

      Top Newbie Mistakes thread...http://www.thegsresources.com/_forum...d.php?t=171846

      Carb rebuild tutorial...https://gsarchive.bwringer.com/mtsac...d_Tutorial.pdf

      KZ750E Rebuild Thread...http://www.thegsresources.com/_forum...0-Resurrection

      Comment


        #4
        From your picture, I see that you still have stock pipes and airbox. That is good, for the purpose of keeping the jetting simple.

        As Nessism mentioned, the carbs have to be meticulously clean, along with all the jets. You mentioned that you had dipped the carbs, for how long? If you followed the instructions on the can, you need to to it again. The instructions say "15 to 30 minutes", but it's not really enough. Especially with the low mileage you report, you should dip them for "15 to 30 HOURS", each.

        When you put the carbs back together, all the jets should be installed snuggly, except the idle mixture adjustment screw. (That's the screw on the top of the outlet of the carb, over the runner to the engine.) That screw is covered (sealed) from the factory, so I hope you have removed the cover and removed the screw for cleaning. Anyway, when you get it back together, screw that in until it seatly lightly, then back it out 3 full turns, for a starting point. That will clear up a lot of your 'hanging RPM' problem, but will still require fine-tuning. When the engine is warm, adjust those screws for the highest engine idle speed and you will be set.

        By the way, I am not that far from you (right now), but am leaving for Mississippi for a month tomorrow. Please don't destroy your bike while I am gone, but if you are still having problems when I come back, I will come down and help you.

        .
        sigpic
        mine: 2000 Honda GoldWing GL1500SE and 1980 GS850G'K' "Junior"
        hers: 1982 GS850GL - "Angel" and 1969 Suzuki T250 Scrambler
        #1 son: 1986 Yamaha Venture Royale 1300 and 1982 GS650GL "Rat Bagger"
        #2 son: 1980 GS1000G
        Family Portrait
        Siblings and Spouses
        Mom's first ride
        Want a copy of my valve adjust spreadsheet for your 2-valve per cylinder engine? Send me an e-mail request (not a PM)
        (Click on my username in the upper-left corner for e-mail info.)

        Comment


          #5
          First of all, sorry to all for seemingly neglecting this thread and community. Life has really just been keeping a constant hold on me, and with a new semester just starting up last month, things have been hectic.

          Anyway, I haven't touched the bike since the night I made the OP. Let me address some of your responses.

          BassCliff:
          Thanks for the Mega welcome, but this is not my first time around here. You have given me that welcome before if I do remember right, but receiving it again makes me feel a bit special. hehe I posted a few times and started a thread back before the sit was "rebooted" so to speak.

          In response, IIRC, I dipped each carb over-night (they really weren't that bad), and sprayed out the passages with compressed air. The airbox is sealed, but if I had to pick a suspect for problem, I would say it is possible that the airbox to carb seals aren't 100% sealed. As for adjustments, I'm not sure now what the vacuum sync screws are set to, so question: How should I set them for a base tune?

          Did you follow the carb rebuild procedure on the GSR homepage? Is the stock airbox fitted and properly sealed? When cleaning the carbs did you hold each pilot jet up to the light to make sure the orifice open? How many turns open are the pilot screws? General rule of thumb is to set them to 2.5 or 3 turns open and then tune from there to achieve the best idle setting. Lastly, did you replace the intake boot O-rings?

          Don't give up, it ain't that hard. You just need to follow the process step by step.

          Good luck.
          Nessism:
          Yes, I followed the pictorial write-up. The pilot jets are new, but even the old ones (which are the same, old ones weren't really bad) are clean and clear. Right now the pilot jets are set at about 2 1/4 turns out. But I was turning them in because I was seemingly running rich (gas smell, and dark smoke).
          And as said in my OP, I have replaced intake boot seals.

          By the way, I am not that far from you (right now), but am leaving for Mississippi for a month tomorrow. Please don't destroy your bike while I am gone, but if you are still having problems when I come back, I will come down and help you.
          Steve:
          I'm still up for some help, maybe I'll take another crack at it first though. I'm really grateful for you offering your help though.

          Comment


            #6
            An additional note:

            At first I was having trouble with my pilot jets backing out a little bit after running for a short time. This led me to use very small amounts of blue loc-tite on the jets. Is this advised against?

            Comment


              #7
              Do not use loctite on the pilot jet screws, in fact don't use Loctite on any carb component screws etc.

              Are we mixing up jet terms here? Are the pilot jets inside the float bowls backing out OR are the idle mixture screws (That's the screw on the top of the outlet of the carb, over the runner to the engine.) backing out? I can only imagine the idle mixture screws which Steve mentioned are backing out. We are talking about the screws that were under the seal, right?

              If that is the case the small spring that resides under the idle air mixture screw may have to be replaced because the spring constant has been reduced. I find that hard to believe considering the low miles on your 650E. If that is indeed the case use the suzuki OEM stuff if still available

              PS: Your 650E is worth the effort so be analytical in your problem solving approach, use the correct terms and we collectively will get it sorted out
              Last edited by srsupertrap; 09-04-2010, 12:00 AM.
              Steve

              1979 GS1000E (45 Yrs), 1981 GPz550 (11 Yrs)

              Comment


                #8
                No, supertrapp, it was the pilot jet, the one under the plug in the float chamber. And yes, the springs seem to in good condition on the air mixture screw. As for term usage, working on this bike would be/have been a much easier process if term were not so often mixed up. I'm very mechanically minded so when I see an unknown term my mind matches it to a function until it can rightfully be put to use. Obviously with multiple loose terms for different parts, it can be easy for anyone to make mistakes.

                I'm also the kind of guy who get paranoid about small problems and must fix them entirely and rightly before feeling good about everything. Maybe I shouldn't own 3 sports vehicles all over 20 years old...
                Anyway so now I'm thinking I may tear the carbs down again, remove all doubt and go from there, as a worst case scenareo.

                Comment


                  #9
                  No loctite on pilot jet! this stuff has great capillary action and can easily wick into tiny holes which could easily result in plugging- remember, you're trying to ensure clean, unblocked holes.
                  As someone said, troubleshooting is a step by step process- don't get frustrated, think of it as a challenge.
                  1981 gs650L

                  "We are all born ignorant, but you have to work hard to stay stupid" Ben Franklin

                  Comment


                    #10
                    Originally posted by tom203 View Post
                    No loctite on pilot jet! this stuff has great capillary action and can easily wick into tiny holes which could easily result in plugging- remember, you're trying to ensure clean, unblocked holes.
                    As someone said, troubleshooting is a step by step process- don't get frustrated, think of it as a challenge.
                    So, in the pursuit of insuring cleanliness, I removed the carbs last night, and complete (re)disassembled them. I bought a second can of Chem-dip, and put two bodies under later yesterday. After school this afternoon, I'm going to pull them and sink the other two. Essentially, I'm working toward eliminating all doubt.

                    The thing is, I am so pumped about getting this back together soon (but carefully). I have been browsing GSR more regularly, which is something I neglected to do while my bike was giving me headaches. Now, I just want to get it all buttoned up while I can still ride it, and Fall is a great season for that in my mind, since KY has so much scenery to offer.

                    Much thanks to GSR for the careful responses, I'll keep you updated about all this and hopefully there will be pictures! (of the bike, not me )

                    Comment


                      #11
                      I have a 650g, the carbs can be picky sometimes.
                      It's almost ALWAYS just a matter of tweaking....
                      DONT give up.....it takes time to play with carbs and get used to it!

                      The great thing about these bikes is the payoff, once you GET it running good.....at that point you KNOW when the bike sounds right, and when it sounds wrong, you KNOW the mixture settings, and other adjustments.

                      It's like a close friend......but with 2 wheels,

                      TRUST ME, once you get it running perfect, you'll come out with a lot more knowledge than you may originally think!
                      You'll be able to wizz around trouble shooting/tweaking all your buddies bikes!

                      ----------
                      Honestly, I never dipped my carbs, I went thru like 4 cans of carb cleaner somehow though......
                      Then sprayed em with the air compressor a bunch.

                      Bike RODE GREAT......but wouldn't Idle worth a ****.

                      I realized that my Mixture screws weren't set right.
                      The Slightest turn to the left or right made a BIG difference!


                      I cannot describe how Stupid I felt for overlooking something that I THOUGHT i had right....even after reading on here a hundred times,
                      ---------

                      Now onto the air leaks.....

                      Make sure that air box is air tight!
                      Typically the air leaks are SUPER SMALL, you'll probably pass right over where it's leaking and not suspect That could be the problem.

                      You CANNOT just assume......dig around hard and check everything man.

                      So use some weather stripping near the inner edges of the air box, so when you clamp the Lid on it, it's locked and feels a little more snug.

                      Then confirm Carb Boot Straps are TIGHT!
                      I would just go ahead and get new straps anyways....I had to!
                      I had RPM's hanging on and off, bike was riding strange, NO TOP END and all my carb boots were pretty tight.
                      I ended up finding ONE strap that was a tad more loose than the rest....took a screwdriver and turned it maybe 2 rotations.....and the bike Instantly ran perfect!

                      --------

                      Im telling you, 99% of the time with these GS bikes, it's something small and stupid......I learned that first hand....many times.
                      Last edited by Guest; 09-09-2010, 11:16 PM.

                      Comment


                        #12
                        Thanks for the experience and tips Merc!

                        Sadly, I am having a terrible experience putting this all back together... Let me start by going back few days.

                        Sometime in the middle of last week, I pulled the carbs and tore them down to re-dip them, in order to clear up an loctite and what not. So that all went well, and I even bought a second can of Barryman's to knock out two at a time. Well all went well with cleaning them and all passages looked great. So later on that night, I started assembling the carbs, and even replaced a few of the o-rings I had already replaced, but with the ones I got with my intake boot kit (i just bought them all).

                        Well I had everything installed on each carb, save for the floats... Yes, I'm sure most of you know what I'm going to say next, and you are right. I broke the top of one of the posts off. Actually, I cracked it though the hole, but I was not about to trust it cracked.

                        So, I jb-welded it that night, supposing that i'd get a head start on letting it cure, if that was even a viable option. At the same time, I began looking for a new carb body. Well that search brought me to kparkfan's FS thread. After not so carefully looking over this site I bought the carbs off his 81 650glx thinking they would work, somehow though it went over my head that he had an 81 and the specs on the carb chart were for 82-83s.
                        Well, upon quick inspection, they look the same, aside from a shorter brass choke tube on the bottom side. Mechanically, it didn't make sense to say this difference would produce discretions in how this carb and mine would perform.

                        Fast forward to today. Even though Rob dipped the one carb I needed before I bought it (thanks!) I decided to throw it in the chem-dip while I was at school. Anyway, I got home today and while spraying out the passages, I noticed something concerning... Yet another, bigger difference.

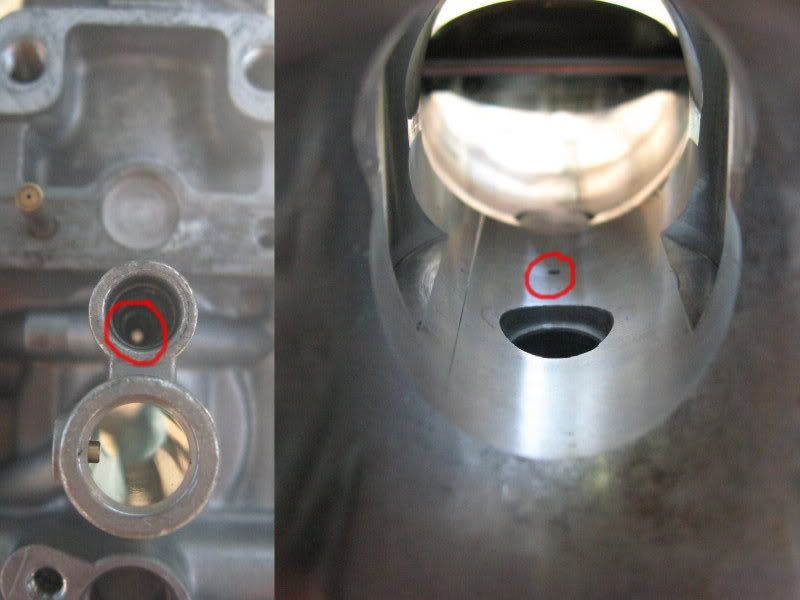
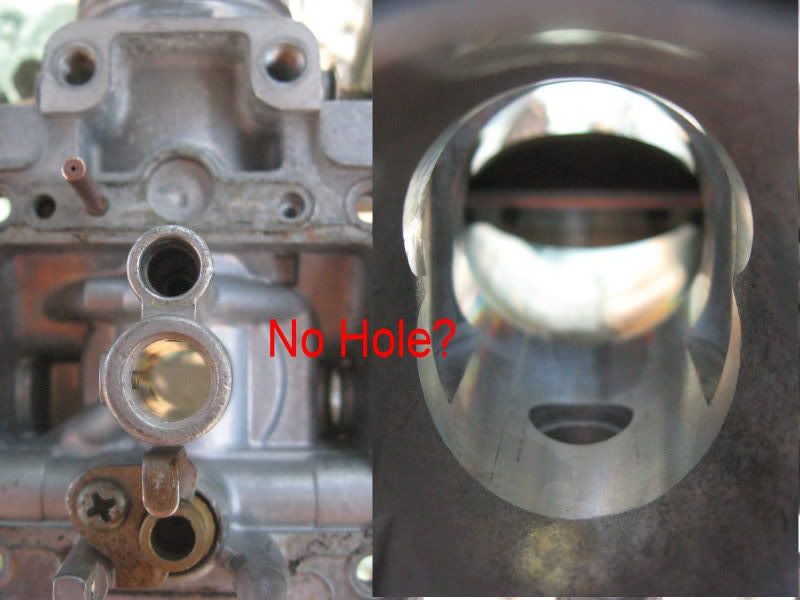
                        Just take note of the below pictures.

                        Notice how the '81 carbs' pilot jet housing has a hole that jets into the venturi. The original '82 carb does not have this... What does this mean as far as usability?


                        Comment


                          #13
                          If you could, draw an arrow pointing up.
                          There's a hole at bottom of idle/air mixture screw (the one you adjust) and there's also a hole about in line with a closed throttle plate- as you start to open throttle, this hole comes into play. Which one is missing on the 82 carb body?
                          1981 gs650L

                          "We are all born ignorant, but you have to work hard to stay stupid" Ben Franklin

                          Comment


                            #14
                            That hole is the pilot jet passage. Not sure what's up with that. You might want to look at the factory service manual since they usually include info on how the carbs passages lay out.

                            Good luck and sorry you are having such a rough time. As they say, things that don't kill us make us strong.
                            Ed

                            To measure is to know.

                            Mikuni O-ring Kits For Sale...https://www.thegsresources.com/_foru...ts#post1703182

                            Top Newbie Mistakes thread...http://www.thegsresources.com/_forum...d.php?t=171846

                            Carb rebuild tutorial...https://gsarchive.bwringer.com/mtsac...d_Tutorial.pdf

                            KZ750E Rebuild Thread...http://www.thegsresources.com/_forum...0-Resurrection

                            Comment


                              #15
                              Originally posted by tom203 View Post
                              If you could, draw an arrow pointing up.
                              There's a hole at bottom of idle/air mixture screw (the one you adjust) and there's also a hole about in line with a closed throttle plate- as you start to open throttle, this hole comes into play. Which one is missing on the 82 carb body?
                              The first picture is of the 81 carb body, and the second is of the original 82 carb. I circled the hole on the first pic that the second pic doesn't. All other holes are the same.


                              Nessim, I'll look into that.

                              The other thing that I noticed was different was the needle jet has a little rising around the needle in venturi, that rises about as high as the slider when closed. Seeing how this is directly after the extra pilot jet in the airflow... The jets are also quite a bit smaller than the respective 82 model. I'm trying to figure out if I could mix and match what I have, but I wouldn't feel right unless all carbs were the same, which means I need to find an 82 650 body or try using all the 81 bodies.

                              Comment

                              Working...
                              X