Announcement

Collapse
No announcement yet.

Jet Kit Install

Collapse
X
 
  • Filter
  • Time
  • Show
Clear All
new posts

    Jet Kit Install

    Alright.

    Got the Jet Kit yesterday!


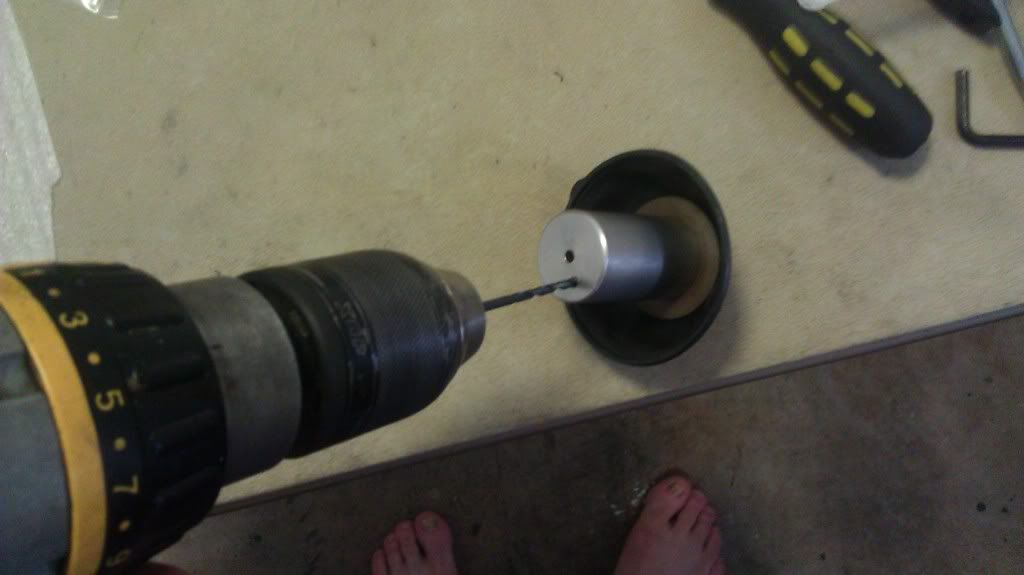
    Disassembled the carbs and did the install. Started by drilling out the slide hole with the smaller of the two bits.


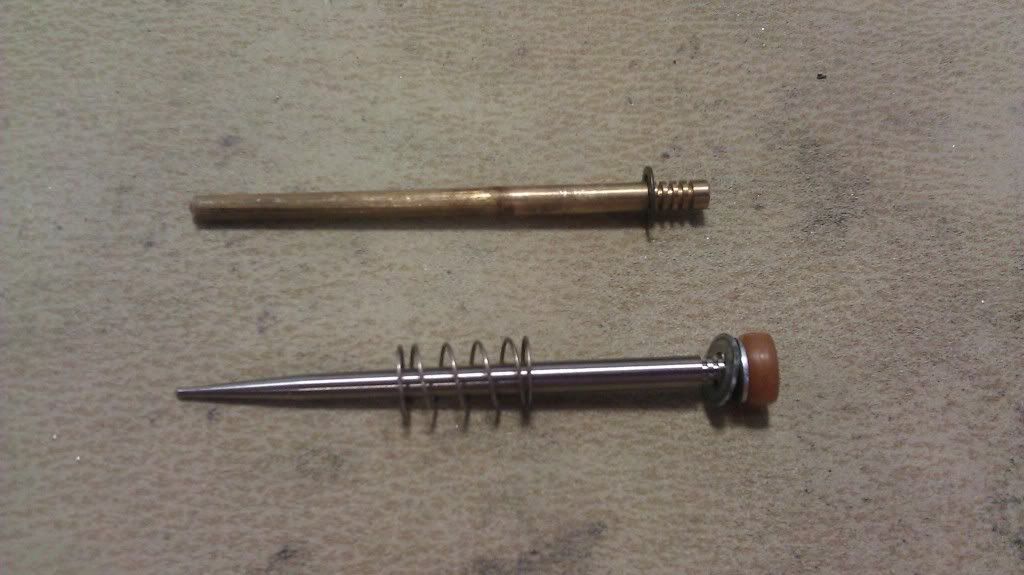
    Next was changing the needles. The dynojet is the shiny silver one. My old stock needle is adjustable but doesn't taper near as much as the dyno. Reassemble using all the stock washers and spring, and put the dynojet washer over the E clip set in the 3rd slot from the top.


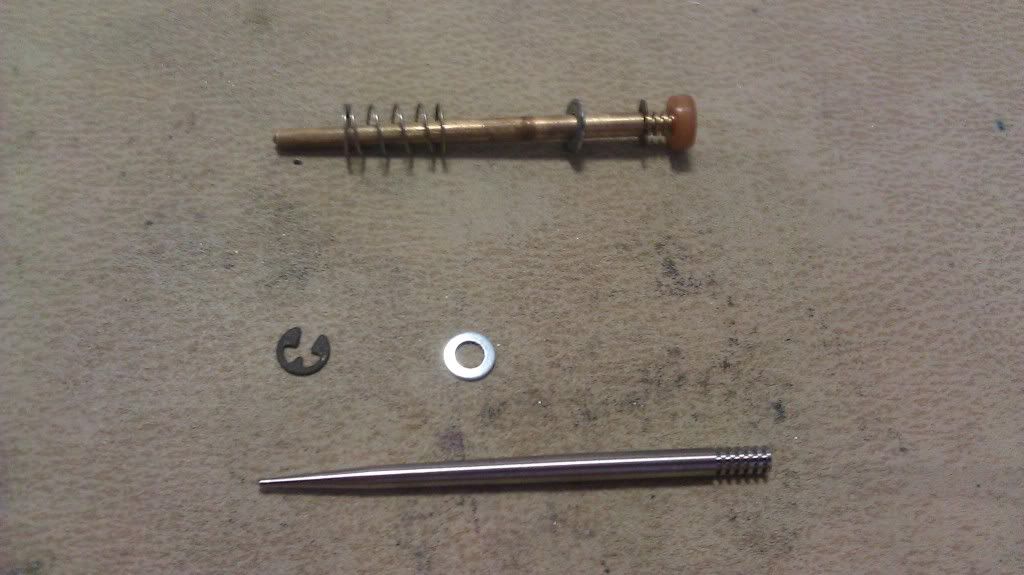
    Make sure you have a Narrow set of circlip pliers, in order to remove the clip that holds the needle in the slide. The pliers with the large lobes will not fit. However, you can grind them down to fit Hold the needle compressing the spring with one hand while you place the clip.


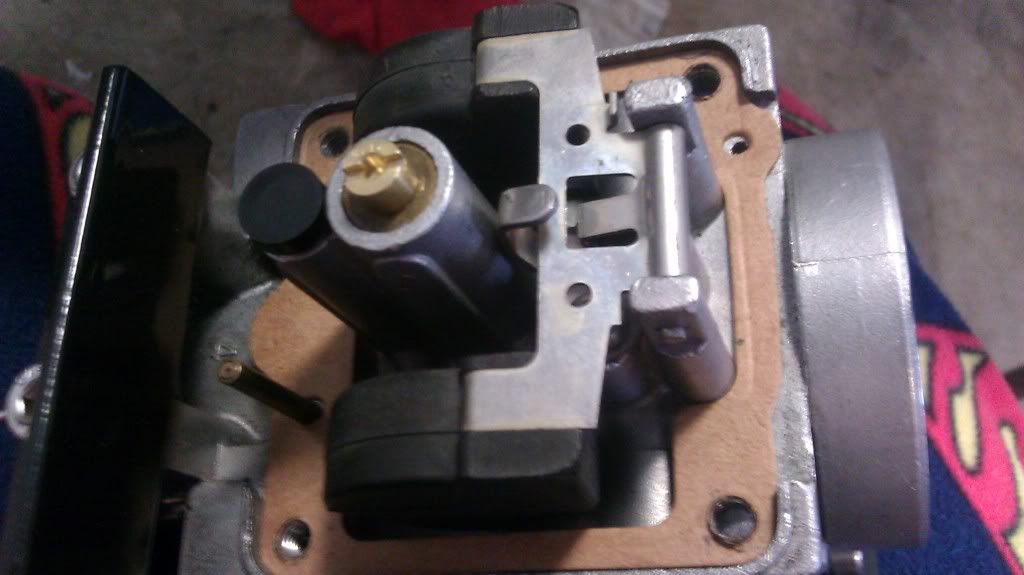
    Button the top up, then its on to the float bowls and the main jet!

    PO had Very large jets installed, and the E clips on the stock needles set to the lowest notch.

    Did I say the old jets were LARGE!? side by side with the dynojet 138's


    I'm doing a Stage 3. So I'm using the 138 jets. I have K&N pod filters and a kerker 4-1.

    Simply tighten down the new main jets. Make sure the washer is still
    there.


    Quick and painless install for all you wanting to add a couple horses to your bike!


    Nic
    83 GS1100ES rebuild:

    http://www.thegsresources.com/_forum...d.php?t=170032

    Budget GSXR Conversion:

    http://www.thegsresources.com/_forum...d.php?t=200563

    New to me bike: 2008 B-KING

    #2
    Nicely written and illustrated.

    Just for reference, the 5 1/2" needlenose pliers from Sears work well for the circlip, too.

    .
    sigpic
    mine: 2000 Honda GoldWing GL1500SE and 1980 GS850G'K' "Junior"
    hers: 1982 GS850GL - "Angel" and 1969 Suzuki T250 Scrambler
    #1 son: 1986 Yamaha Venture Royale 1300 and 1982 GS650GL "Rat Bagger"
    #2 son: 1980 GS1000G
    Family Portrait
    Siblings and Spouses
    Mom's first ride
    Want a copy of my valve adjust spreadsheet for your 2-valve per cylinder engine? Send me an e-mail request (not a PM)
    (Click on my username in the upper-left corner for e-mail info.)

    Comment


      #3
      yea, how does it run?

      Comment


        #4
        Hoping for the first fire up since the engine rebuild to be Tues.


        I'll record it and let you guys hear for yourself.
        83 GS1100ES rebuild:

        http://www.thegsresources.com/_forum...d.php?t=170032

        Budget GSXR Conversion:

        http://www.thegsresources.com/_forum...d.php?t=200563

        New to me bike: 2008 B-KING

        Comment


          #5
          Steve, do you have to grind down the ends of those Sears pliers to get them pointy enough to fit in the holes of the circlip?
          1983 GS 1100 Guided Laser
          1983 GS 1100 G
          2000 Suzuki Intruder 1500, "Piggy Sue"
          2000 GSF 1200 Bandit (totaled in deer strike)
          1986 Suzuki Cavalcade GV 1400 LX (SOLD)

          I find working on my motorcycle mildly therapeutic when I'm not cursing.

          Comment


            #6
            I don't really know for sure.

            I happen to have some circlip plier that work, but I have seen the Sears pliers bragged about on other forums.

            At the worst, you might have to take just a bit off the square edges at the tips. The size is OK, just need to make the tips more round.

            I might just get some for myself, just to be sure.

            .
            sigpic
            mine: 2000 Honda GoldWing GL1500SE and 1980 GS850G'K' "Junior"
            hers: 1982 GS850GL - "Angel" and 1969 Suzuki T250 Scrambler
            #1 son: 1986 Yamaha Venture Royale 1300 and 1982 GS650GL "Rat Bagger"
            #2 son: 1980 GS1000G
            Family Portrait
            Siblings and Spouses
            Mom's first ride
            Want a copy of my valve adjust spreadsheet for your 2-valve per cylinder engine? Send me an e-mail request (not a PM)
            (Click on my username in the upper-left corner for e-mail info.)

            Comment


              #7
              Looks pretty simple to accomplish. Thank you for sharing.
              Last edited by Guest; 02-27-2011, 05:54 PM.

              Comment


                #8
                nic,
                you very well may have had a dynojet kit already.
                the 1st series they made had more blunt needles and large mains.
                and yes they did work well.
                the newest series i guess is better all over.
                don't throw your old parts away...there worth something to somebody for sure.

                Comment


                  #9
                  Great job on the write up.

                  I'm wondering what's going to happen to those old adjustable needles.
                  I happen to know someone in Marion who would be interested in them if you're just planning on throwing them out....

                  Comment


                    #10
                    Yeah, I wasnt sure if the needles/jets were oem or not. Couldnt find any identifying marks on any of them. I had thought that stock needles were not adjustable, and were sinply nail heads.

                    When I was first looking it appeared that the slide holes had been drilled (looked like drill marks) albeit with a smaller bit.

                    Thanks for the info Terry.

                    For now the needles and jets are in with the leftovers from the kit.

                    Nic
                    83 GS1100ES rebuild:

                    http://www.thegsresources.com/_forum...d.php?t=170032

                    Budget GSXR Conversion:

                    http://www.thegsresources.com/_forum...d.php?t=200563

                    New to me bike: 2008 B-KING

                    Comment


                      #11
                      Nic,

                      Just ordered the DK Stage 3 kit this afternoon. Thanks for the write-up to encourage us to go for it. Seeing makes it all that much easier to do!

                      Comment


                        #12
                        If those aren't Canadian carbs then you have aftermarket needles.
                        Can I have them?
                        1983 GS 1100E w/ 1230 kit, .340 lift Web Cams, Ape heavy duty valve springs, 83 1100 head with 1.5mm oversized SS intake valves, 1150 crank, Vance and Hines 1150 SuperHub, Star Racing high volume oil pump gears, 36mm carebs Dynojet stage 3 jet kit, Posplayr's SSPB, Progressive rear shocks and fork springs, Dyna 2000, Dynatek green coils and Vance & Hines 4-1 exhaust.
                        1985 GS1150ES stock with 85 Red E bodywork.

                        Comment


                          #13
                          I recently picked up a set of Factory Pro needles for my 1100. Three things obviously distinguish them from the stock needles: 5 clip positions, the color/material, and they are a bit longer (1/8" or so). The taper and blunt end appear identical to the eye. I've compared the taper with my calipers and am surprised at how similar they are - only around .001" more taper depending on what points you choose for comparison.

                          I can speak from experience that the 5-1/2" needle nose pliers work just fine without having to grind them.
                          Last edited by Tom R; 02-28-2011, 02:57 AM.
                          -1980 GS1100 LT
                          -1975 Honda cb750K
                          -1972 Honda cl175
                          - Currently presiding over a 1970 T500

                          Comment

                          Working...
                          X