Announcement

Collapse
No announcement yet.

81 GS850 Mixture

Collapse
X
 
  • Filter
  • Time
  • Show
Clear All
new posts

    81 GS850 Mixture

    Hello All,
    The rebuild of the carbs went well, and it fired up right away and now that I have my bracketry sorted our, things seemed OK. However when I went to set the mixture and I am not seeing much difference.

    I started out with all screws @ 2.5 turns out, and it seemed to run OK. However I went 1-4 and didn't notice much of a difference in how it ran. On a couple of them, I was able to turn them all the way in without much if any change in idle/sound/feel. As a result, I turned them back to about 2 turns out for all. Now, the bike seems to run fine, except that when I set the idle at about 1000-1100 cold, it goes up to about 2000 when warmed up.

    I am still trying to figure out (conceptually) how this idle circuit works, but does this mean I need to screw them farther in, so that they are not sucking as much air at idle when warm?

    Thanks for any pointers or help you can provide.

    —Chris

    #2
    You are probably so close, it's not funny, but let's take a stab at it.

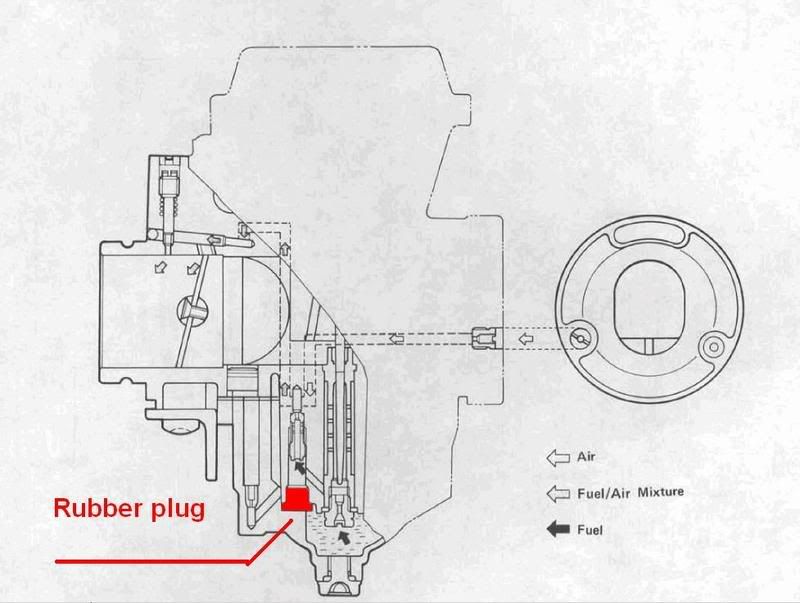
    First of all, the screws you are adjusting are MIXTURE screws. Inside the carb are the pilot air jet and pilot fuel jet, together, they provide a pre-set mixture. The passage for that mixture has three holes that feed the air stream. One is a bit inside the throttle butterfly, a second is right at (just barely outside) the butterfly, the third is always on the engine side of the butterfly. This third hole is the one that is adjustable, via the mixture screw. I have a picture from the manual for this, but do not have access to it while at work.

    When the engine is running at idle, it will pull a bit of the pilot mixture through that second hole. That is not quite enough, so some is added by adjusting the output of the third hole with the screw.

    When I get done with a set of carbs, I start with the screws out three full turns, then adjust from there. Keep in mind that these are full 360-degree turns, not 'flips' of the screwdriver. The extra mixture simply richens the overall mixture a bit, acting like a "choke" for easier starting. Once the bike is warmed up, you can turn the screws, listening for highest idle. If you start with fewer turns, you should turn them out, listening for an increase in speed, but, by starting with a mixture that is plenty rich, turn them IN, listening for a slight DEcrease in speed. When you hear that, back up about 1/8 turn and go to the next cylinder.

    If your idle speed is increasing as the bike warms up, you have an air leak somewhere. Have you checked the condition of the intake boots and their o-rings?

    .
    sigpic
    mine: 2000 Honda GoldWing GL1500SE and 1980 GS850G'K' "Junior"
    hers: 1982 GS850GL - "Angel" and 1969 Suzuki T250 Scrambler
    #1 son: 1986 Yamaha Venture Royale 1300 and 1982 GS650GL "Rat Bagger"
    #2 son: 1980 GS1000G
    Family Portrait
    Siblings and Spouses
    Mom's first ride
    Want a copy of my valve adjust spreadsheet for your 2-valve per cylinder engine? Send me an e-mail request (not a PM)
    (Click on my username in the upper-left corner for e-mail info.)

    Comment


      #3
      Out is richer, in is leaner. (It's an air circuit that controls a fuel circuit, IIRC)

      No, they don't make much difference except at and just off idle.

      If you have a rising idle (idles significantly faster when warm/hot) the idle circuit is likely lean or you have an air leak. A "hanging" idle (slow to return to idle when the throttle is "blipped") also indicates a lean idle mixture (or a leak), all else being in spec. An idle "dip", where the idle speed dips below spec or the bike dies when the throttle is blipped, indicates a too-rich mixture.


      Also, all the above assumes everything else is perfect -- your exhaust is stock and properly sealed, and the intake system is stock and properly sealed -- new intake boots, new intake boot o-rings, new airbox boots, airbox halves and lids sealed with weatherstripping, air filter in good shape and very lightly oiled, air filter properly sealed to airbox.
      Last edited by bwringer; 08-23-2011, 11:02 AM.
      1983 GS850G, Cosmos Blue.
      2005 KLR685, Aztec Pink - Turd II.3, the ReReReTurdening
      2015 Yamaha FJ-09, Magma Red Power Corrupts...
      Eat more venison.

      Please provide details. The GSR Hive Mind is nearly omniscient, but not yet clairvoyant.

      Celeriter equita, converteque saepe.

      SUPPORT THIS SITE! DONATE TODAY!

      Co-host of "The Riding Obsession" sport-touring motorcycling podcast at tro.bike!

      Comment


        #4
        Hi,

        Adjust the main idle knob when the engine is fully warmed up. Use the "choke" to maintain the idle while warming up a cold engine. Adjust the idle mixture screws when the engine is fully warmed up. See the "Plug Chops-Highest Idle Method" article on my website. Note that that method starts with the screws a little lean and adjusts out, but Mr. Steve's method is just fine too, and may be a little easier. Keep up the good work.


        Thank you for your indulgence,

        BassCliff

        Comment


          #5
          Ahhh.

          Thanks for the tips, guys. I guess I fundamentally misunderstood how that portion works. So, the passage that I am able to adjust has a supply of fuel that I am limiting/allowing by closing/opening the orifice off with the pointy end of the screw?
          And thanks for the clear separation, Cliff. I think I may have had some confusion about which adjustments would alter which outcomes.

          Well, I refreshed the airbox a few months ago, adding foam weatherstripping, etc. And with the rebuild came new intake tubes and viton intake o-rings. Maybe I will check the boots from the carbs to the airbox again. I'll also see if the filter needs re-oiled as I don't recall whether I did that one or not.

          Comment


            #6
            Filter oil makes a difference. Some that have over oiled their filters and experience a rich condition having done nothing but adding the filter oil.

            Comment


              #7
              Hmmm...

              Good to know. I'll try that tomorrow, and maybe it will put me right where I need to be. I'm due for an easy fix one of these days...

              Comment


                #8
                OK, finally have access to my pictures.

                Ignore the red rubber pilot jet plug, it was highlighted for another illustration, but the rest of the picture is perfect for this one.


                From this picture, you can clearly see how the gas gets through the main jet, through the little transfer passage, then through the pilot fuel jet.
                You can also see how air comes through the pilot air jet and mixes with the gas after the pilot fuel jet to create a mixture.
                You can also see how the mixture then travels to a passage above the carb throat, to the three holes I mentioned earlier.

                Hope this helps.

                .
                sigpic
                mine: 2000 Honda GoldWing GL1500SE and 1980 GS850G'K' "Junior"
                hers: 1982 GS850GL - "Angel" and 1969 Suzuki T250 Scrambler
                #1 son: 1986 Yamaha Venture Royale 1300 and 1982 GS650GL "Rat Bagger"
                #2 son: 1980 GS1000G
                Family Portrait
                Siblings and Spouses
                Mom's first ride
                Want a copy of my valve adjust spreadsheet for your 2-valve per cylinder engine? Send me an e-mail request (not a PM)
                (Click on my username in the upper-left corner for e-mail info.)

                Comment


                  #9
                  I noticed he said that when he turned the mixture screw it didn't change the idle and some he could take all the way in closed without change.

                  This makes me think the float levels may be too low. I'm comparing my VM's to his CV's but I think it still plays out. I've seen such condition where the fuel level in the bowls was slightly too low (didn't seem to take much).

                  Or, those idle passages shown in the diagram aren't all open. Many people miss blasting carb cleaner through those small passages when cleaning carbs. (Many times just dipping isn't enough by itselft). With the mixture screw out the red tip of a carb cleaner can will blow right through from where the mixture screw was and you can see it blast out the passage in the throat of the carb. But, the next step is the hold your finger, or your assistant's finger, over that main opening you just blasted through and blast again to get the passages under the butterfly valve clean as well.

                  Just something to check. Even on the CV's closing those mixture screws should give a quite noticeable effect. So, there is something going on there.

                  Chris

                  Comment


                    #10
                    Thanks, Steve, that's just what I was looking for! I just need to stare at it a bit more to understand it fully, I think.

                    And, Chris, Thanks for the suggestions. I checked the float height with the butt-end of the calipers, but I didn't use the "drilled plug and tube" method to check actual height. Also, I didn't know/think to spray cleaner through those passages. Perhaps I should pull it apart and try that as well. Thanks for the tip on "forcing" it back through the other passages.

                    —Chris

                    Comment

                    Working...
                    X