Announcement

Collapse
No announcement yet.

frustrated...struggling to get the diaphram to fit

Collapse
X
 
  • Filter
  • Time
  • Show
Clear All
new posts

    frustrated...struggling to get the diaphram to fit

    After cleaning the carbs I am not putting them back together. Everything is going fine except for one diaphragm. For some reason I cannot the ring around the diaphragm to fit into the casing! It just seems too big and is getting very frustrating!!!

    Note- I did spray some gunk carb cleaner (aerosol not dip) in the carbs without removing. It may have been a newbie mistake and swelled the rubber, but the can says nothing about removing rubber parts, plus all the other diaphragms seemed just fine.


    Any advice would be GREAT!

    #2
    Rubber cement applied sparingly around the groove the diaphragm sits in works a treat.

    Comment


      #3
      I'll give that a shot. I was hesitant to use any adhesive simply because it is a rubber part. But rubber cement won't hurt it, right? Thanks, i'll look into it

      Comment


        #4
        Originally posted by samp615 View Post
        After cleaning the carbs I am not putting them back together. Everything is going fine except for one diaphragm. For some reason I cannot the ring around the diaphragm to fit into the casing! It just seems too big and is getting very frustrating!!!

        Note- I did spray some gunk carb cleaner (aerosol not dip) in the carbs without removing. It may have been a newbie mistake and swelled the rubber, but the can says nothing about removing rubber parts, plus all the other diaphragms seemed just fine.


        Any advice would be GREAT!
        If you are not already doing so, inverting the diaphragm so it looks like a mushroom cap will help it sit better in the groove.
        '83 GS650G
        '83 GS550es (didn't like the colours in the 80's, but they've grown on me)

        Comment


          #5
          Is the tab lined up ? And are you pushing up the slide with your finger, as per Nessism's guide, page 58 ?
          Old age and treachery will beat youth and skill every time
          Originally Posted by Schweisshund I mean, sure, guns were used in some of these mass shootings, but not all of them
          1983 GS 750

          Comment


            #6
            Referencing the two posts above, that is the way to do it.

            I push the diaphragm down, so the edge sits in the groove, while holding the slide up with my finger in the intake side of the carb. Make sure the point of the needle is in the needle jet. Hold the slide/diaphragm in that position, place the spring on top of it, put the cap on top of the spring. compress it all into place, but keep holding the slide up. Get at least two of the screws in place and moderately snug before letting the slide down.

            It takes longer to write or read the procedure than it does to do it. It works well, and has worked every time for me.

            .
            sigpic
            mine: 2000 Honda GoldWing GL1500SE and 1980 GS850G'K' "Junior"
            hers: 1982 GS850GL - "Angel" and 1969 Suzuki T250 Scrambler
            #1 son: 1986 Yamaha Venture Royale 1300 and 1982 GS650GL "Rat Bagger"
            #2 son: 1980 GS1000G
            Family Portrait
            Siblings and Spouses
            Mom's first ride
            Want a copy of my valve adjust spreadsheet for your 2-valve per cylinder engine? Send me an e-mail request (not a PM)
            (Click on my username in the upper-left corner for e-mail info.)

            Comment


              #7
              Thanks for the help all.

              Three of the carbs were so easy, just this one that is so odd. I got it in there, but it unfortunately may have been more forceful than graceful.

              Can someone explain to me what the purpose of this little boot is and does it have to be 100 percent sealed?

              Comment


                #8
                Originally posted by samp615 View Post
                Thanks for the help all.

                Three of the carbs were so easy, just this one that is so odd. I got it in there, but it unfortunately may have been more forceful than graceful.

                Can someone explain to me what the purpose of this little boot is and does it have to be 100 percent sealed?
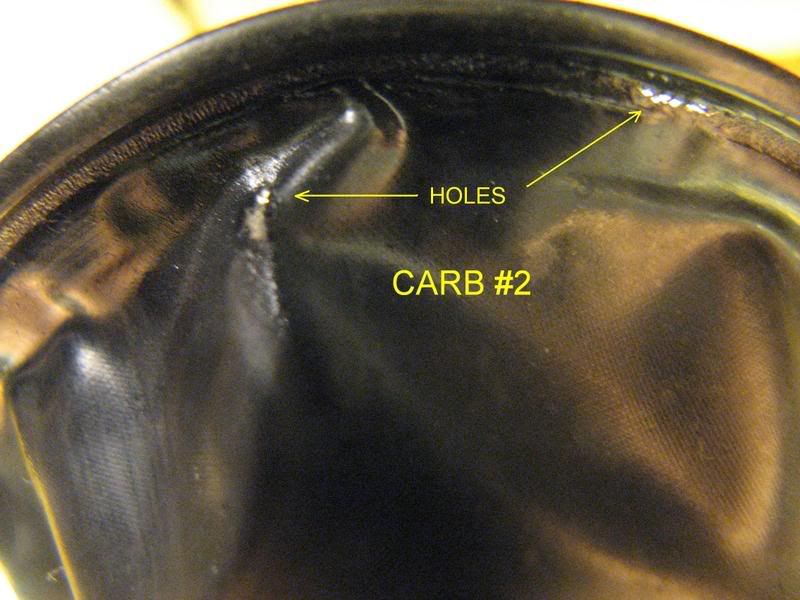
                Yes it needs to be sealed, no you don't want it pinched, and you did check them with a back-light source for pin holes or tears right? The diaphragm is what seals to create vacuum to lift the slide.

                Ed and steves method are spot on, and all things being equal generally you shouldn't have much trouble getting it to stay in it's groove. However I have found later model carbs, and some poorly kept GS carbs to have some shrinkage of the rubber diaphragm causing it to not want to stay put long enough to trap it with the cap. Hence the rubber cement. No it won't do any damage. The rubber bit is exposes to gas vapor, and rubber cement, while smelly, is not nearly as caustic.

                Comment


                  #9
                  Rubber cement
                  I use vaseline.
                  1983 GS 1100E w/ 1230 kit, .340 lift Web Cams, Ape heavy duty valve springs, 83 1100 head with 1.5mm oversized SS intake valves, 1150 crank, Vance and Hines 1150 SuperHub, Star Racing high volume oil pump gears, 36mm carebs Dynojet stage 3 jet kit, Posplayr's SSPB, Progressive rear shocks and fork springs, Dyna 2000, Dynatek green coils and Vance & Hines 4-1 exhaust.
                  1985 GS1150ES stock with 85 Red E bodywork.

                  Comment


                    #10
                    Originally posted by chef1366 View Post
                    Rubber cement
                    I use vaseline.
                    I use vaseline to store em... Rubber cement to hold em in place.. just a touch people. Im not covering the damn thing with it. A tip a got from a ZRX guy cause those NEVER stay where they're supposed to...

                    Comment


                      #11
                      Get a bigger girl
                      MY BIKES..1977 GS 750 B, 1978 GS 1000 C (X2)
                      1978 GS 1000 E, 1979 GS 1000 S, 1973 Yamaha TX 750, 1977 Kawasaki KZ 650B1, 1975 Honda GL1000 Goldwing, 1983 CB 650SC Nighthawk, 1972 Honda CB 350K4, 74 Honda CB550

                      NEVER SNEAK UP ON A SLEEPING DOG..NOT EVEN YOUR OWN.


                      I would rather trust my bike to a "QUACK" that KNOWS how to fix it rather than a book worm that THINKS HE KNOWS how to fix it.

                      Comment


                        #12
                        Originally posted by TheCafeKid View Post
                        ..., and you did check them with a back-light source for pin holes or tears right? ...
                        Here is what you are hoping you don't find:


                        This was actually out of a Yamaha, but the principle is the same.

                        .
                        sigpic
                        mine: 2000 Honda GoldWing GL1500SE and 1980 GS850G'K' "Junior"
                        hers: 1982 GS850GL - "Angel" and 1969 Suzuki T250 Scrambler
                        #1 son: 1986 Yamaha Venture Royale 1300 and 1982 GS650GL "Rat Bagger"
                        #2 son: 1980 GS1000G
                        Family Portrait
                        Siblings and Spouses
                        Mom's first ride
                        Want a copy of my valve adjust spreadsheet for your 2-valve per cylinder engine? Send me an e-mail request (not a PM)
                        (Click on my username in the upper-left corner for e-mail info.)

                        Comment


                          #13
                          I have used a thin strip of Ultra Black Permatex in the groove to hold a stubborn one in place.

                          Daniel

                          Comment

                          Working...
                          X