Announcement

Collapse
No announcement yet.

First time carb teardown

Collapse
X
 
  • Filter
  • Time
  • Show
Clear All
new posts

    First time carb teardown

    First time ever doing this, I got the carbs off the bike a little bit ago and picked up some berryman's and a can of aerosol carb cleaner for spraying out the little gaps. Noticed a few things as I was starting to take things apart.

    First off, there is a lot of gunk and grime on the outside of the carbs, airbox, and on top of the engine. I don't think it's just road grime. Also - the gas tank felt about half empty after being on a full tank previously. I only rode it for 10 miles and did a fair amount of idling in the garage / driveway while working on it. Seems like it's going through gasoline WAY too fast.

    The airbox definitely was getting gas in it. Once or twice there was gasoline dripping from the drain hose. So I'm going to give it a good cleaning while I have everything apart.

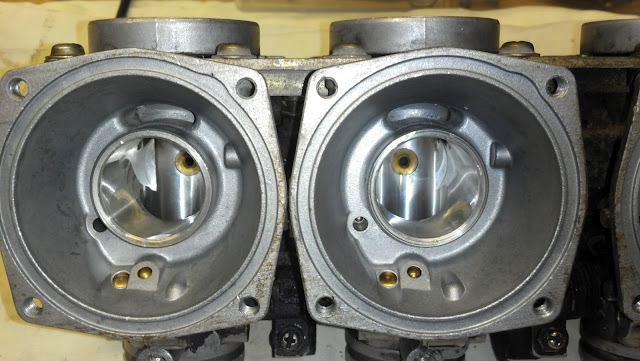
    The carbs themselves look decent inside and I'm wondering if maybe they were just not adjusted right. The valves had NO clearance when closed; there is supposed to be a little space under them right? Anyways - I've only taken off the bowls so far and drained them of fuel. Letting them air out in the garage so I can take them apart inside later tonight or maybe tomorrow.

    Here are some pictures of what the valves looked like, you can see the exterior grime too:


    #2
    Some questions I have -

    1) There are gaskets on the bowls. Do I need new ones? Won't the carb dip ruin these, and will I be able to get them off without breaking them? If so, where do I get them?

    2) Handling the carb cleaner - I am assuming I should wear gloves?

    3) How to mark the carb bodies so I remember how they go back together? Assuming a sharpie will not last through the dip.

    4) What should I clean the grime with before dipping? I have some citrus degreaser, will that work?

    Thanks!

    Comment


      #3
      Originally posted by exzachtly1 View Post
      Some questions I have -

      1) There are gaskets on the bowls. Do I need new ones? Won't the carb dip ruin these, and will I be able to get them off without breaking them? If so, where do I get them?

      2) Handling the carb cleaner - I am assuming I should wear gloves?

      3) How to mark the carb bodies so I remember how they go back together? Assuming a sharpie will not last through the dip.

      4) What should I clean the grime with before dipping? I have some citrus degreaser, will that work?

      Thanks!
      use a razor blade and you should be able to get the gaskets off...or a very thin screwdriver if the gaskets are stuck down in the channel of the carb body. be careful and you can re use them.
      I scratch 1 2 3 4 in the bodies bowls and tops inside them somewhere for permanent marking.
      and yes, most any cleaner and a brush should be used to knock off the heavy stuff before dipping

      Comment


        #4
        Carb rebuild tutorial in my signature...
        Ed

        To measure is to know.

        Mikuni O-ring Kits For Sale...https://www.thegsresources.com/_foru...ts#post1703182

        Top Newbie Mistakes thread...http://www.thegsresources.com/_forum...d.php?t=171846

        Carb rebuild tutorial...https://gsarchive.bwringer.com/mtsac...d_Tutorial.pdf

        KZ750E Rebuild Thread...http://www.thegsresources.com/_forum...0-Resurrection

        Comment


          #5
          Originally posted by exzachtly1 View Post
          Some questions I have -

          1) There are gaskets on the bowls. Do I need new ones? Won't the carb dip ruin these, and will I be able to get them off without breaking them? If so, where do I get them?

          2) Handling the carb cleaner - I am assuming I should wear gloves?

          3) How to mark the carb bodies so I remember how they go back together? Assuming a sharpie will not last through the dip.

          4) What should I clean the grime with before dipping? I have some citrus degreaser, will that work?

          Thanks!
          1. Yes, new gaskets, get new o-rings as well from cycleorings.com

          2. Yes, carb cleaner is costic it can burn your skin in cases. Berrymans is used quite often.

          3. Yes, just etch the top, body and bowl their respective number, 1,2, etc, also, get some containers and put the parts from each carb in its respective container. Don't mix them up.

          4. Cleaning the grime off first will extend the life of your cleaner, so have at it,

          5. Go to Basscliff's website (http://members.dslextreme.com/users/bikecliff/) and download the papers for carb cleaning, it will come in handy. Oh and those instructions for carb syncing.

          6. Inspect all the rubber boots and such, anything hard or cracked, replace now.

          7. Buy a couple cans of Berrymans carb spray to spray the carb bodies once dipped and washed off. And use to clean the small brass parts.

          8. Check float needles and floats as well.

          The instructions that I mention are very good, just follow them religiously.
          sigpicMrBill Been a GSR member on and off since April 2002
          1980 GS 750E Bought new in Feb of 1980
          2015 CAN AM RTS


          Stuff I've done to my bike 1100E front end with new Sonic springs, 1100E swing arm conversion with new Progressive shocks installed, 530 sprockets/chain conversion, new SS brake lines, new brake pads. New SS fasteners through out. Rebuilt carbs, new EBC clutch springs and horn installed. New paint. Motor runs strong.

          Comment


            #6
            Wow we all posted the same time!
            sigpicMrBill Been a GSR member on and off since April 2002
            1980 GS 750E Bought new in Feb of 1980
            2015 CAN AM RTS


            Stuff I've done to my bike 1100E front end with new Sonic springs, 1100E swing arm conversion with new Progressive shocks installed, 530 sprockets/chain conversion, new SS brake lines, new brake pads. New SS fasteners through out. Rebuilt carbs, new EBC clutch springs and horn installed. New paint. Motor runs strong.

            Comment


              #7
              Originally posted by Nessism View Post
              Carb rebuild tutorial in my signature...
              That's the one I plan to use! I have carb spray too, got the orings on the way already from cycleorings.com along with intake o-rings and new SS fasteners for the intake boots.

              Where can I buy a gasket if I need them? Stock ones still available or is there somewhere I can get them faster?

              I'll have the computer with me later when I take them apart, and plan to take tons of pics. will post with any more concerns.

              Comment


                #8
                I believe Z1 Enterprises have the bowel gaskets. Fast shipping too. Oh you might want to look into changing out all those phillip head screws with SS allen head bolts for the fuel bowels, the top and the carb racks. I did mine, looks better for one. Fastenal is good place for those.

                Originally posted by exzachtly1 View Post
                That's the one I plan to use! I have carb spray too, got the orings on the way already from cycleorings.com along with intake o-rings and new SS fasteners for the intake boots.

                Where can I buy a gasket if I need them? Stock ones still available or is there somewhere I can get them faster?

                I'll have the computer with me later when I take them apart, and plan to take tons of pics. will post with any more concerns.
                sigpicMrBill Been a GSR member on and off since April 2002
                1980 GS 750E Bought new in Feb of 1980
                2015 CAN AM RTS


                Stuff I've done to my bike 1100E front end with new Sonic springs, 1100E swing arm conversion with new Progressive shocks installed, 530 sprockets/chain conversion, new SS brake lines, new brake pads. New SS fasteners through out. Rebuilt carbs, new EBC clutch springs and horn installed. New paint. Motor runs strong.

                Comment


                  #9
                  Originally posted by mrbill5491 View Post
                  I believe Z1 Enterprises have the bowel gaskets. Fast shipping too. Oh you might want to look into changing out all those phillip head screws with SS allen head bolts for the fuel bowels, the top and the carb racks. I did mine, looks better for one. Fastenal is good place for those.
                  Thanks, I guess I'll see if I can get the old gaskets off and go from there. I might check the local hardware store for the allen bolts. Do you know what size they are off hand?

                  Unfortunately I won't be getting to them tonight... thinking I will do the dis-assembly and carb dip first thing tomorrow morning. Excited to (hopefully) get this bike running right.

                  Comment


                    #10
                    Originally posted by exzachtly1 View Post
                    Thanks, I guess I'll see if I can get the old gaskets off and go from there. I might check the local hardware store for the allen bolts. Do you know what size they are off hand?
                    .
                    Take the ones you have into the store with you and check it since most places have a sizing chart there. Or, use the part number for the screw in the fiche; the second half of the number tells you the size and length (#####-03060 is a M3 at 6mm long)
                    Cowboy Up or Quit. - Run Free Lou and Rest in Peace

                    1981 GS550T - My First
                    1981 GS550L - My Eldest Daughter's - Now Sold
                    2007 GSF1250SA Bandit - My touring bike

                    Sit tall in the saddle Hold your head up high
                    Keep your eyes fixed where the trail meets the sky and live like you ain't afraid to die
                    and don't be scared, just enjoy your ride - Chris Ledoux, "The Ride"

                    Comment


                      #11
                      Originally posted by cowboyup3371 View Post
                      Take the ones you have into the store with you and check it since most places have a sizing chart there. Or, use the part number for the screw in the fiche; the second half of the number tells you the size and length (#####-03060 is a M3 at 6mm long)
                      Nice! I didn't know that about the part number, thank you so much for that tip! I'll be going to sears hardware tomorrow to hopefully pick some up.

                      Comment


                        #12
                        Originally posted by exzachtly1 View Post
                        Some questions I have -

                        1) There are gaskets on the bowls. Do I need new ones? Won't the carb dip ruin these, and will I be able to get them off without breaking them? If so, where do I get them?

                        2) Handling the carb cleaner - I am assuming I should wear gloves?

                        3) How to mark the carb bodies so I remember how they go back together? Assuming a sharpie will not last through the dip.

                        4) What should I clean the grime with before dipping? I have some citrus degreaser, will that work?

                        Thanks!
                        Everyone else has tossed in their two cents while I was busy getting my fingernails dirty today , so I'm a bit late to the party.

                        1. If you are careful, you might get them off, but new ones area available at a decent price (and quick) from Z1.

                        2. Some people are more sensitive to chemicals (or their smells), so gloves would be up to you. Personally, I don't use them.

                        3. You can mark the bodies if you want, or you can simply learn the differences and put them in order with your eyes closed.
                        #1 has nothing on the left side of the throttle shaft
                        #2 has parts on both ends of the throttle shaft
                        #3 has the pulley for the throttle cable
                        #4 has nothing on the right side of the throttle shaft

                        There are also differences with the fuel inlet and vent ports, but the throttle shaft details are quicker.

                        4. Just about any cleaner will do OK to clean of any grime.

                        Someone suggested getting a couple cans of carb spray. Done properly ONE can of carb spray is good for three or four carb rebuilds.
                        Yep, I see some guys posting about how clean their carbs are, they have just used three (or more) cans of spray on them. I use one can for at least three sets of carbs (yeah, that's 12 individual carbs) with no problems. Let the Berryman's do the work, not the carb spray.

                        .
                        sigpic
                        mine: 2000 Honda GoldWing GL1500SE and 1980 GS850G'K' "Junior"
                        hers: 1982 GS850GL - "Angel" and 1969 Suzuki T250 Scrambler
                        #1 son: 1986 Yamaha Venture Royale 1300 and 1982 GS650GL "Rat Bagger"
                        #2 son: 1980 GS1000G
                        Family Portrait
                        Siblings and Spouses
                        Mom's first ride
                        Want a copy of my valve adjust spreadsheet for your 2-valve per cylinder engine? Send me an e-mail request (not a PM)
                        (Click on my username in the upper-left corner for e-mail info.)

                        Comment


                          #13
                          Well I've started tearing these apart, and I have to say that things are looking pretty clean inside. The sliders / diaphragms are in good shape and the inside of the carb bodies look good. The caps for the pilot screws had never been removed, those were a bit of a pain to get loose

                          Continuing on...


                          Comment


                            #14
                            The pilot screws in carbs 1 and 3 are stuck, they don't want to budge without a bunch of force; afraid I'm going to strip them. Any tips?

                            Comment


                              #15
                              Steve is the majic man with stripped pilot screws. First try some penetrating oil on them. After letting them soak give thm a try.

                              Check out stainlesscycle.com for your SS allen screws if you can't find them locally. They sell kits.

                              Comment

                              Working...
                              X