Announcement
Collapse
No announcement yet.
Wrong Kind of Stripping
Collapse
X
-
Wrong Kind of Stripping
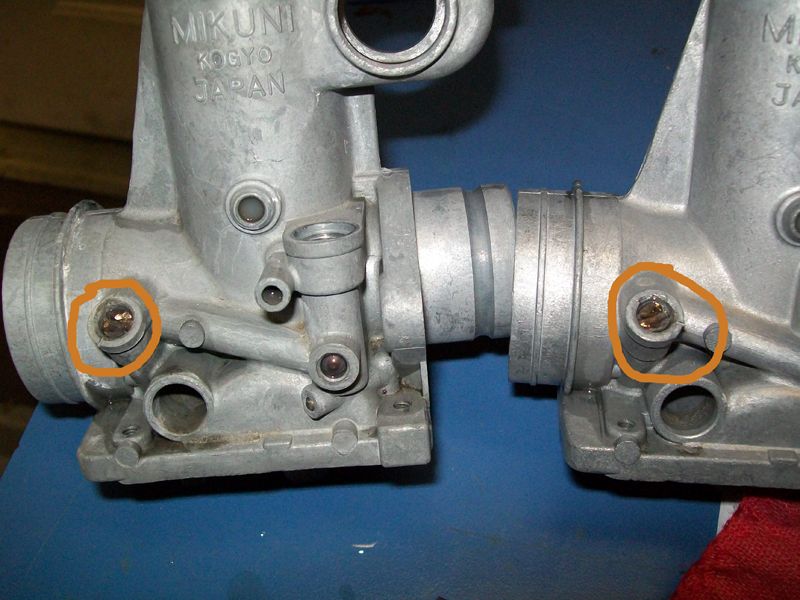
The air mixture screws on my carbs are about ready to strip completely. Does anyone have a suggestion of how to get these out? Are they going to have to be drilled?
 Tags: None
-
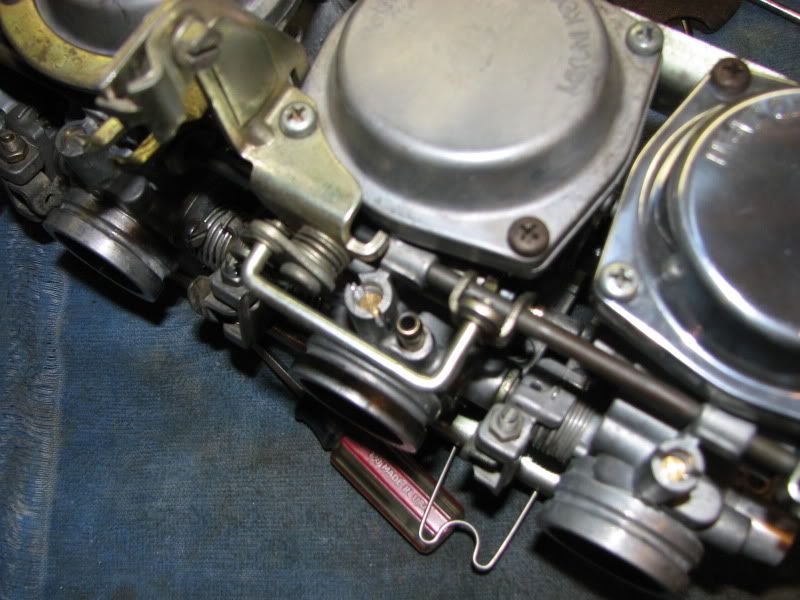
Not all that much different than what we encounter on the BS-series carbs mixture screws.
Just use a Dremel tool with a large cut-off wheel to cut a new slot in the top of the screw. You will cut into the carb body a bit, but it won't matter if you just go deep enough to enhance the slot in the screw.
We have to cut much deeper slots in the BS carbs to do this:

.sigpic
mine: 2000 Honda GoldWing GL1500SE and 1980 GS850G'K' "Junior"
hers: 1982 GS850GL - "Angel" and 1969 Suzuki T250 Scrambler
#1 son: 1986 Yamaha Venture Royale 1300 and 1982 GS650GL "Rat Bagger"
#2 son: 1980 GS1000G
Family Portrait
Siblings and Spouses
Mom's first ride
Want a copy of my valve adjust spreadsheet for your 2-valve per cylinder engine? Send me an e-mail request (not a PM)
(Click on my username in the upper-left corner for e-mail info.)
-
Heat the bodies up with a propane torch and get the orings softened up from the heat and the immediately hit them with some WD40. I WOULD NOT cut into the bodies like the one pic showed..I would put a thin tip on a dremel and just cut the slot in the screw. Once you have the screws out, you will see theres PLENTY of meat at the top, so just file or grind them smooth and take your dremel or a hacksaw blade and recut nice new fresh slots.MY BIKES..1977 GS 750 B, 1978 GS 1000 C (X2)
1978 GS 1000 E, 1979 GS 1000 S, 1973 Yamaha TX 750, 1977 Kawasaki KZ 650B1, 1975 Honda GL1000 Goldwing, 1983 CB 650SC Nighthawk, 1972 Honda CB 350K4, 74 Honda CB550
NEVER SNEAK UP ON A SLEEPING DOG..NOT EVEN YOUR OWN.
I would rather trust my bike to a "QUACK" that KNOWS how to fix it rather than a book worm that THINKS HE KNOWS how to fix it.
Comment
-
Sorry to step on your toes Steve with my comment about cutting into the bodies, but there are tiny dremel bits that will allow JUST the screw to be cut well enough to get the screws out. That, coupled with softening the orings with the heat and some lube and they come out effortlessly and leave the bodies looking right. Last thingI would want on VMs is that ugly slot staring back at me everytime I look at the carbs.
And to the original poster...when you reinstall the new orings, be sure to run a Qtip well in the hole to clean that up and apply a little smear of grease to the orings so they slide down the holes and dont grab on the sides of the hole and roll themselves out of the groove on the needles. If they hang up and roll out of the grooves, the threads will then cut and chew them up..which requires another new oring at that point.MY BIKES..1977 GS 750 B, 1978 GS 1000 C (X2)
1978 GS 1000 E, 1979 GS 1000 S, 1973 Yamaha TX 750, 1977 Kawasaki KZ 650B1, 1975 Honda GL1000 Goldwing, 1983 CB 650SC Nighthawk, 1972 Honda CB 350K4, 74 Honda CB550
NEVER SNEAK UP ON A SLEEPING DOG..NOT EVEN YOUR OWN.
I would rather trust my bike to a "QUACK" that KNOWS how to fix it rather than a book worm that THINKS HE KNOWS how to fix it.
Comment
-
 wedoo2
I was able to get one of the screws out with the dremel method, although it did kind of end up like Steve's picture. I don't think I'll be able to do it the same way pn the other one. I have a groove cut into it now, heated it up, lots of PB and WD, but it won't budge. I see why they were stripped in the first place. I may have to tap it out somehow. I have it soaked with PB and will try again tomorrow. May need another carb body before this is over. That ought to be easy?????
Comment
-
Just drill it carefully with a reverse twist drill, it's brass and the bit will go right thru it
Use another needle to make a depth gauge for the head. Drill out the head and the rest should fall out, no damage to the carb body1978 GS 1000 (since new)
1979 GS 1000 (The Fridge, superbike replica project)
1978 GS 1000 (parts)
1981 GS 850 (anyone want a project?)
1981 GPZ 550 (backroad screamer)
1970 450 Mk IIID (THUMP!)
2007 DRz 400S
1999 ATK 490ES
1994 DR 350SES
Comment
-
 wedoo2
There are threads near the top of the hole that I am afraid of stripping as well. Will get a left handed bit later today and try that.
Comment
-
 wedoo2
Got both of those screws out.
Put in all of the new parts and now all I have to do is set the screws and floats. I plan on using the stock set up unless there is conventional wisdom against that. I have not read it here, but I do not catch everything.
They look great, I'll post pics on my build thread after they are completely back together. Thanks for the help guys.
Comment
-
-
 wedoo2
I cut a groove into each screw after filing the lip down some with the dremel. Heated things up after soaking in PB Blaster, then a shot of WD. I was afraid at first that I cut too much but there is plenty of metal still there. It's funny, on the second one I was working it pretty hard and thought that I had stripped it more, and I looked down and it had moved.
It was quite a moment.
Is 1 1/4 turns on the fuel mixture screw enough?
Comment
-
Pilots ( bottom) at 3/4 to 1 out and mixture ( side ) at double the pilot..or about 1 3/4 to 2 out is about the stock default settings. But remember this just a starting point...youll do the fine tuning later. This will get it running and be real close though.
Before you waste a lot of time and have to back track, get it to run and drive. Once that accomplished, do the valve adjustments, sync the carbs again so they now match the properly adjusted valves, and then do the fine tuning to get it set up to the best requirements of your particular engine.MY BIKES..1977 GS 750 B, 1978 GS 1000 C (X2)
1978 GS 1000 E, 1979 GS 1000 S, 1973 Yamaha TX 750, 1977 Kawasaki KZ 650B1, 1975 Honda GL1000 Goldwing, 1983 CB 650SC Nighthawk, 1972 Honda CB 350K4, 74 Honda CB550
NEVER SNEAK UP ON A SLEEPING DOG..NOT EVEN YOUR OWN.
I would rather trust my bike to a "QUACK" that KNOWS how to fix it rather than a book worm that THINKS HE KNOWS how to fix it.
Comment
-
 wedoo2
That has been the plan. It's interesting about these settings as I went through the service manual and could not find the fuel mixture settings, but did see the air pilot. It said 1 1/4. Of course that is just a start but I'll go a little more. The article by Paul Musser suggested the fuel pilot to start at the same point as what you suggested.Originally posted by chuck hahn View PostBefore you waste a lot of time and have to back track, get it to run and drive. Once that accomplished, do the valve adjustments, sync the carbs again so they now match the properly adjusted valves, and then do the fine tuning to get it set up to the best requirements of your particular engine.
You do good work here Chuck. I've read a good number of your posts and you are usually spot on.
When it is running again I will sync them and get the valve clearance looked at. I don't do that. It's not that the procedure is that hard, I just don't trust my touch with the feeler gauge. The last two bikes I did I had taken to a guy that does it all the time and he let me help. I just never felt comfortable with my measurements and he kept changing what I did. Good skill to have but as infrequently as I need the skill it is worth it to me to have it done.
Oh, do you agree with 25-27 mm float setting? I can measure.
Comment
-
The engines like yours with shims, it takes no skill with the feelers. It's more of a go - no go thing. Very very easy to tell the difference between smaller than .03mm and larger than .08mm. If the clearance is smaller than .03mm ( or maybe .05mm or so) you put in a smaller shim. If it's bigger than .08 you put in a bigger one. (this doesn't happen often) Easy stuff.Originally posted by wedoo2 View PostI don't do that. It's not that the procedure is that hard, I just don't trust my touch with the feeler gauge. The last two bikes I did I had taken to a guy that does it all the time and he let me help. I just never felt comfortable with my measurements and he kept changing what I did. Good skill to have but as infrequently as I need the skill it is worth it to me to have it done.
Comment
.png)
Comment