Announcement

Collapse
No announcement yet.

Butterfly Valve Removal Capers

Collapse
X
 
  • Filter
  • Time
  • Show
Clear All
new posts

    Butterfly Valve Removal Capers

    There is quite a debate on this forum about the necessity and difficulty of removing butterfly valves. I don't want to say you should or shouldn't do it but if you find yourself having a go this might help.

    In the end I was glad I did do it as I discovered that one of the seals from the stainless throttle rod was missing completely. I wonder if my set of carbs was swapped out at some time as the damage inside them has been quite bad and we have owned this bike since new. It could only have been done at the shop where it was serviced.

    See My GS1100G Blog Butterfly Capers for extra details.

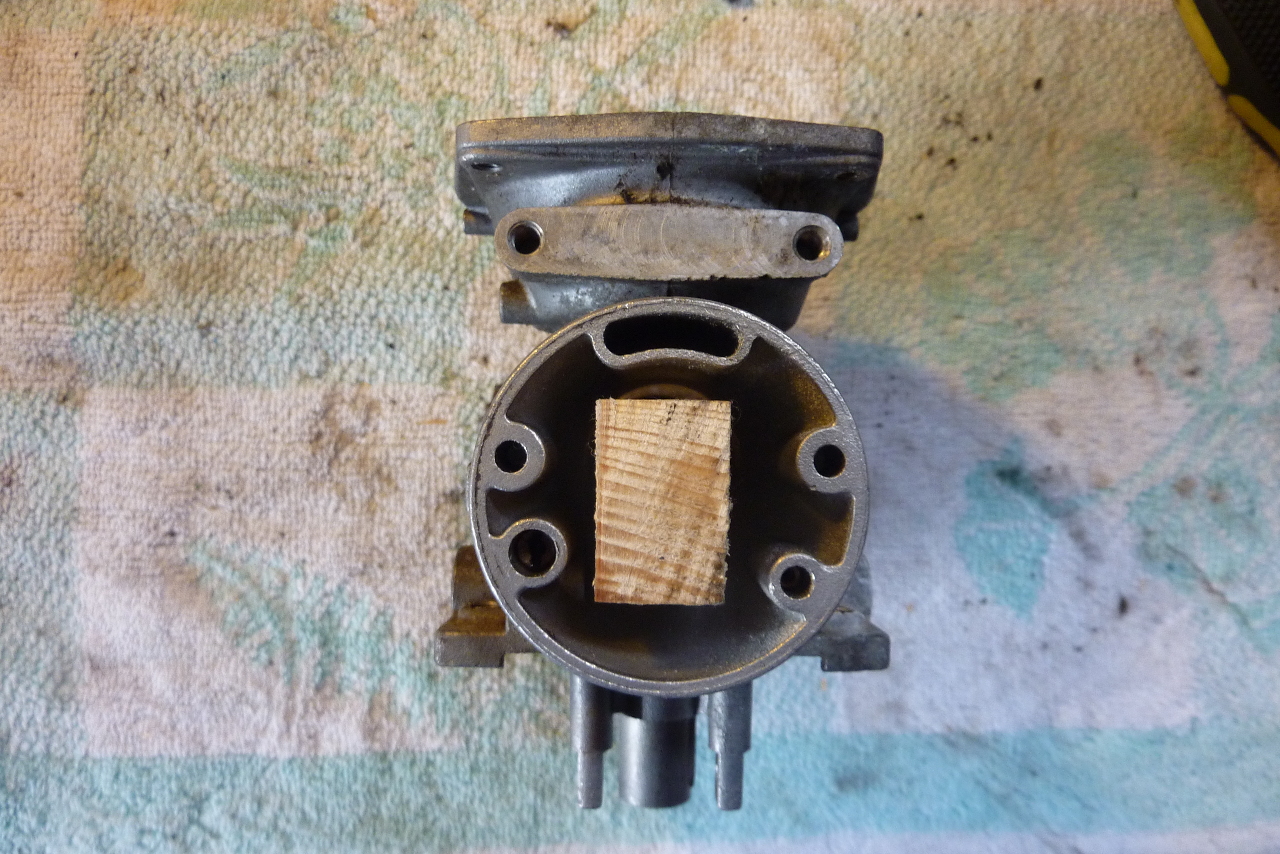
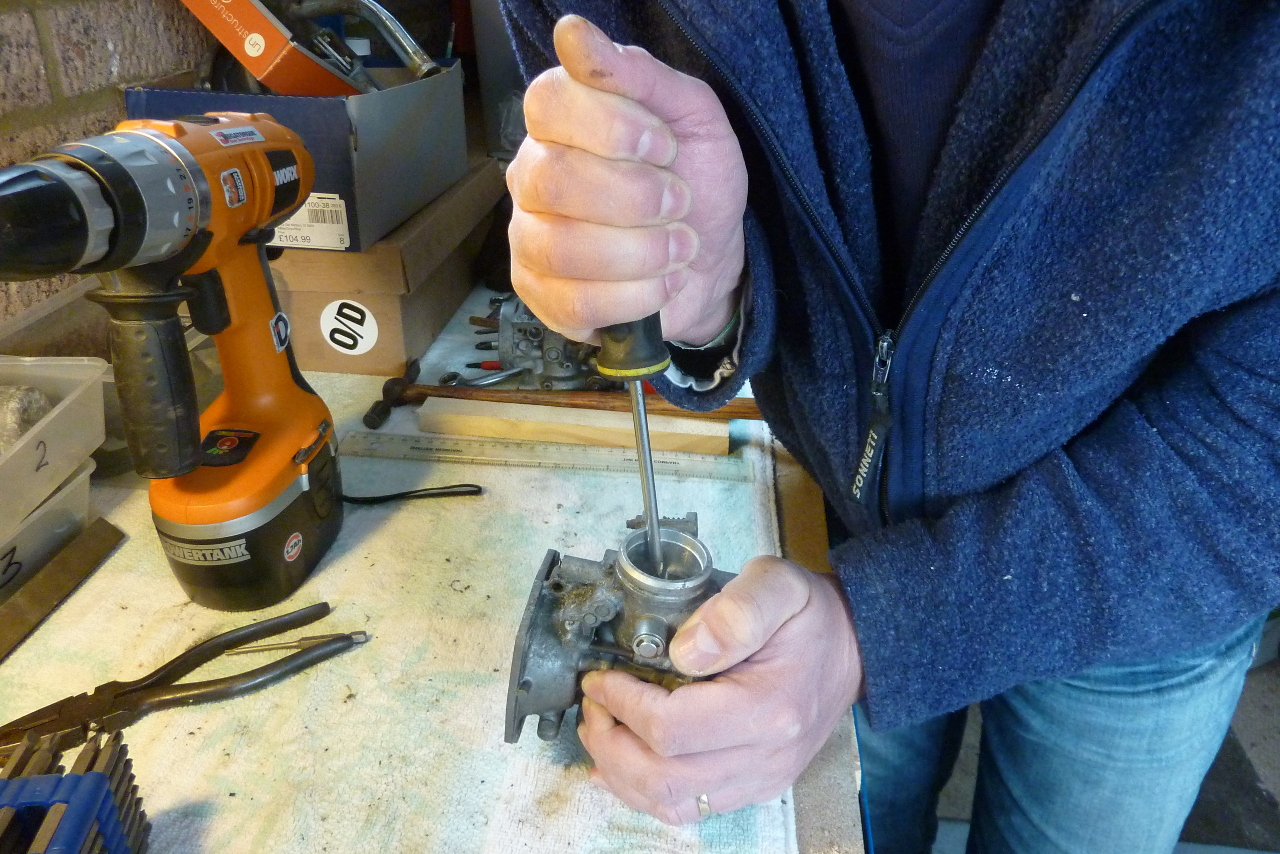
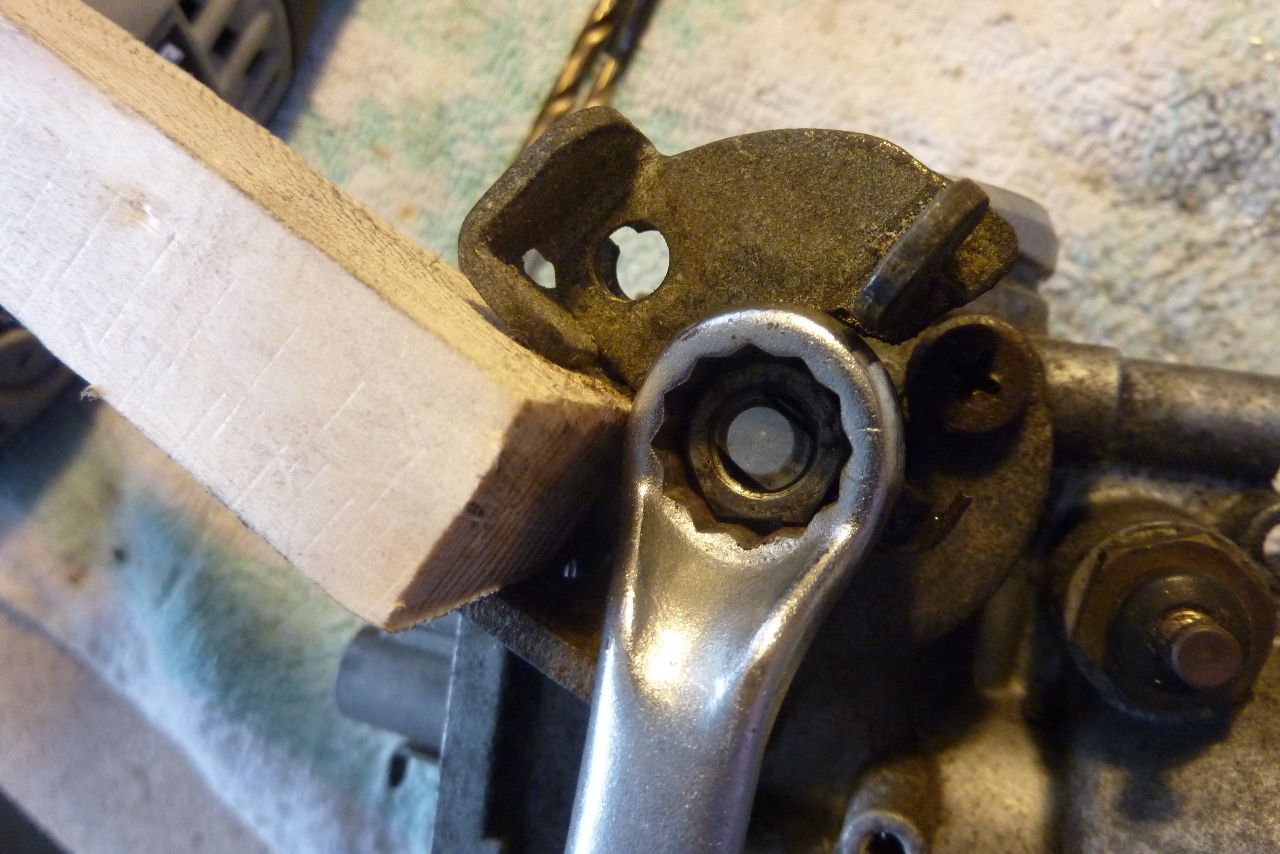
    Set up a wood throttle rod support


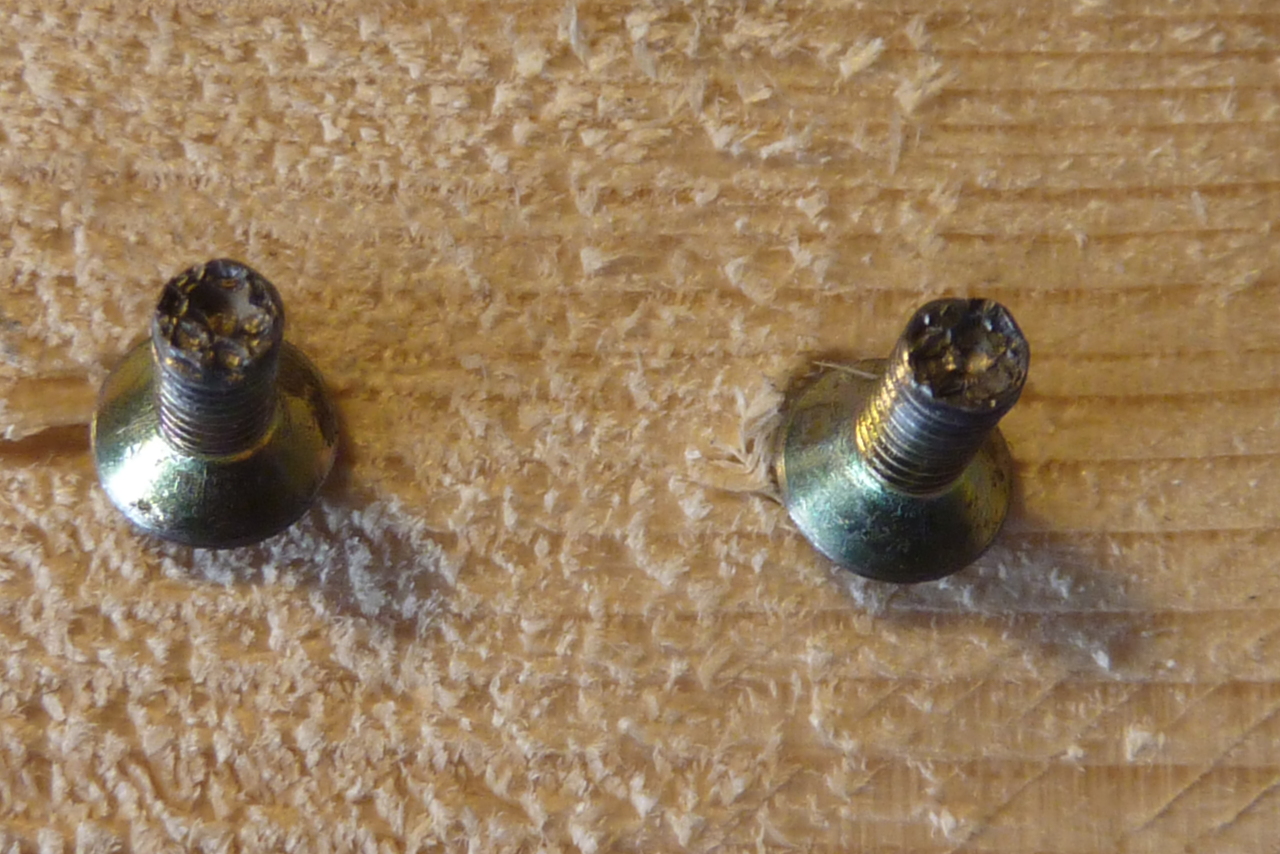
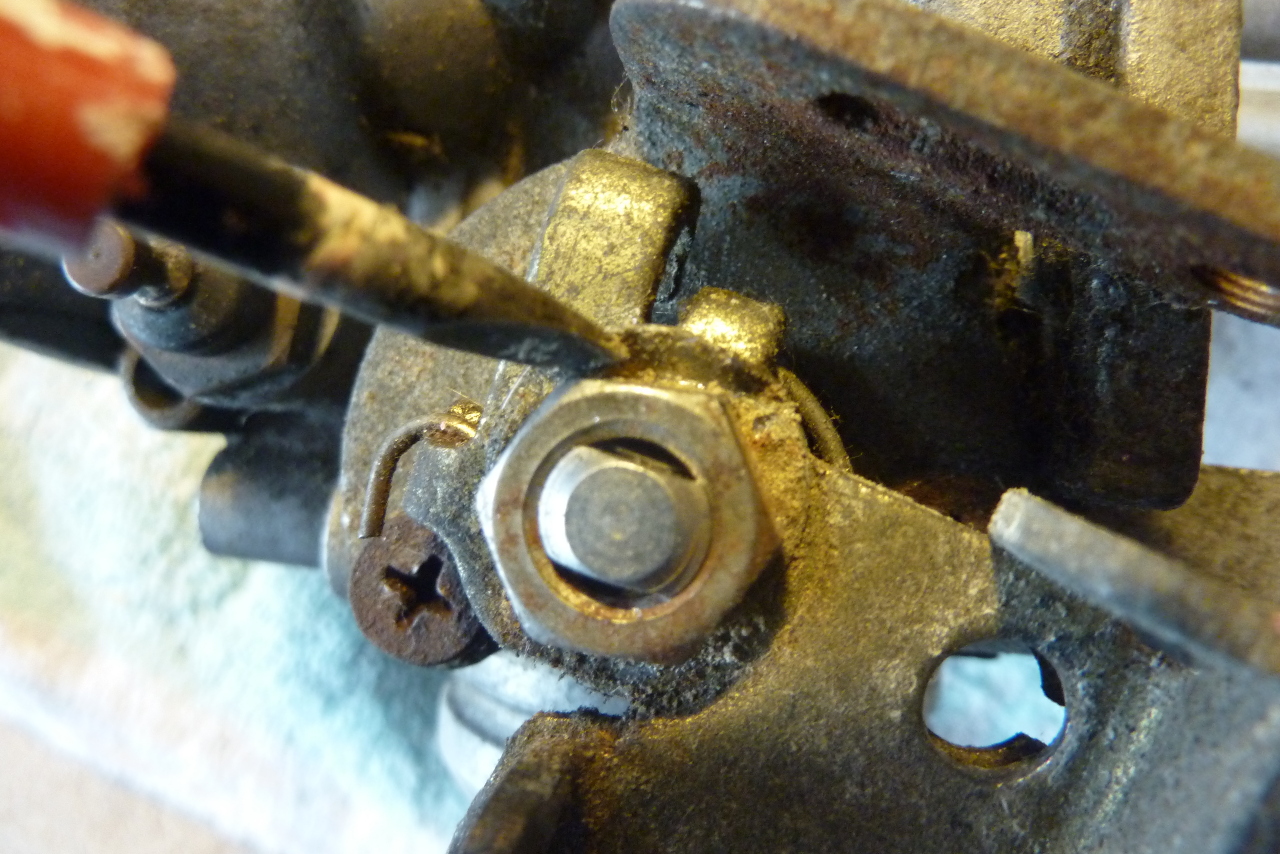
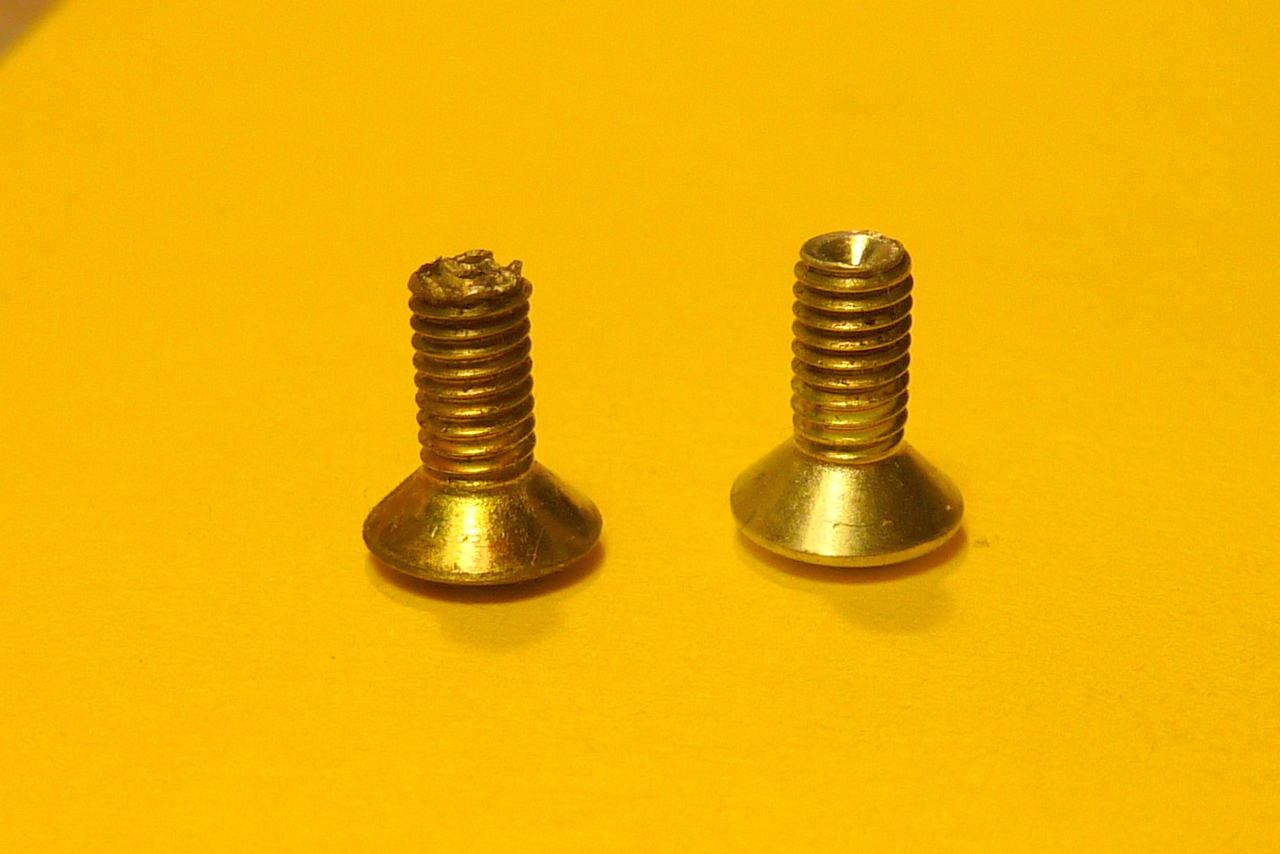
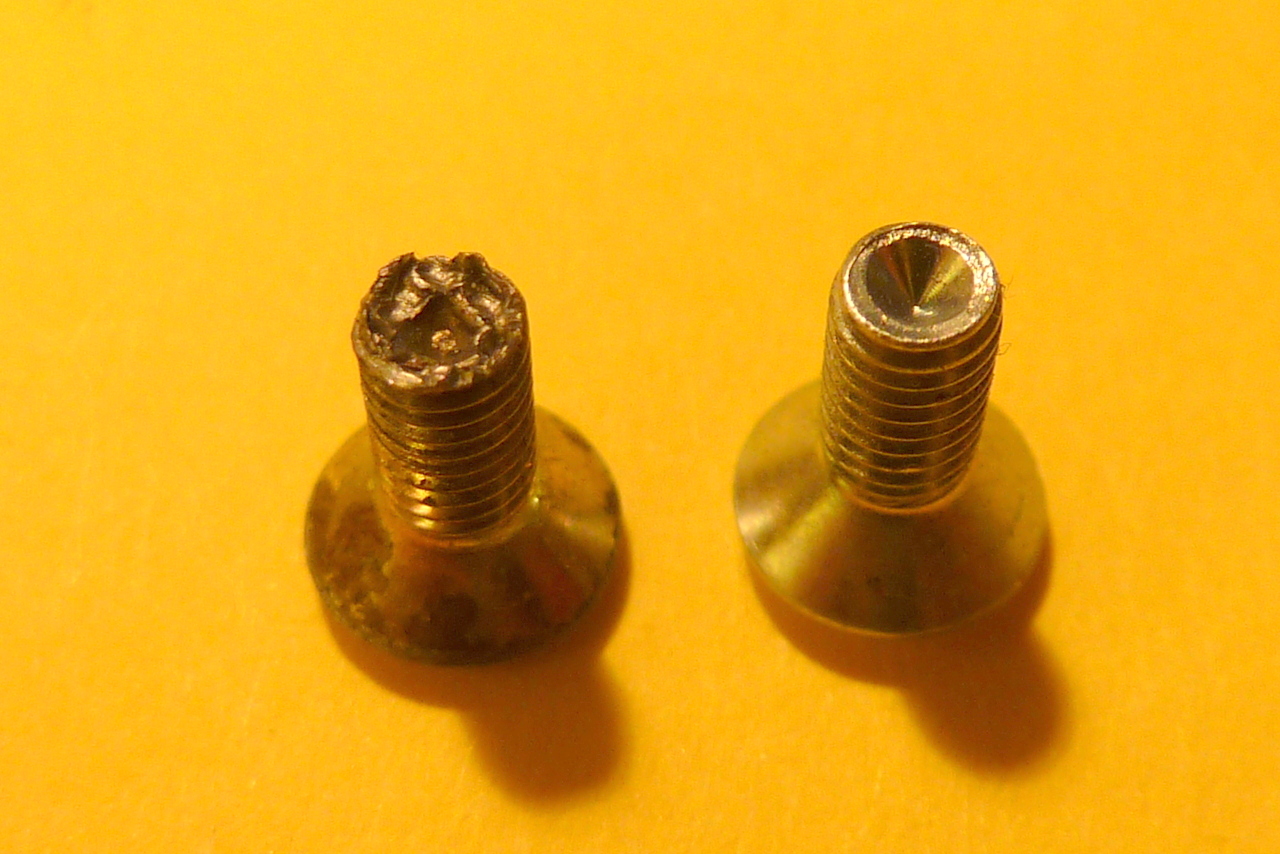
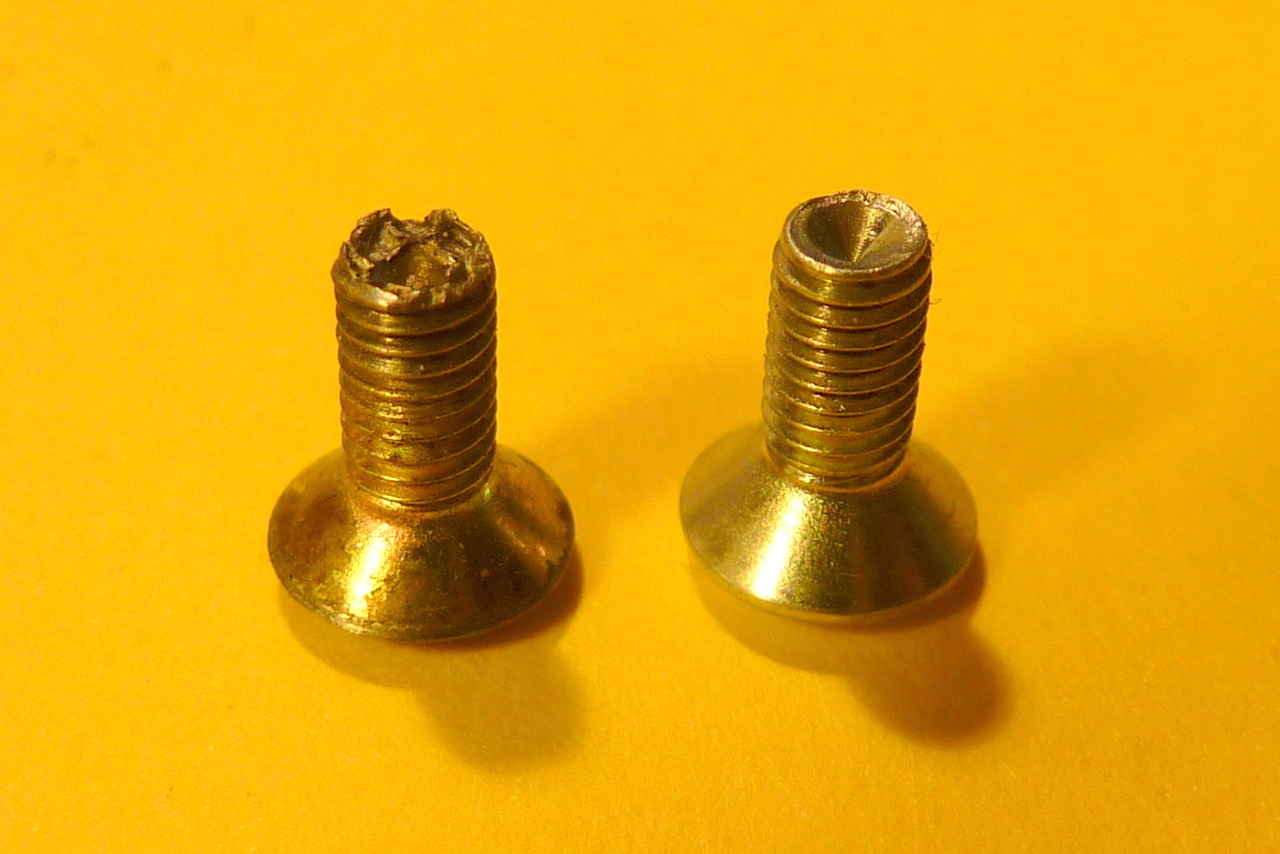
    The burring (or preening) on the backs of the screws shouldn't pose a problem.


    For carbs 1 and 4


    For no. 3


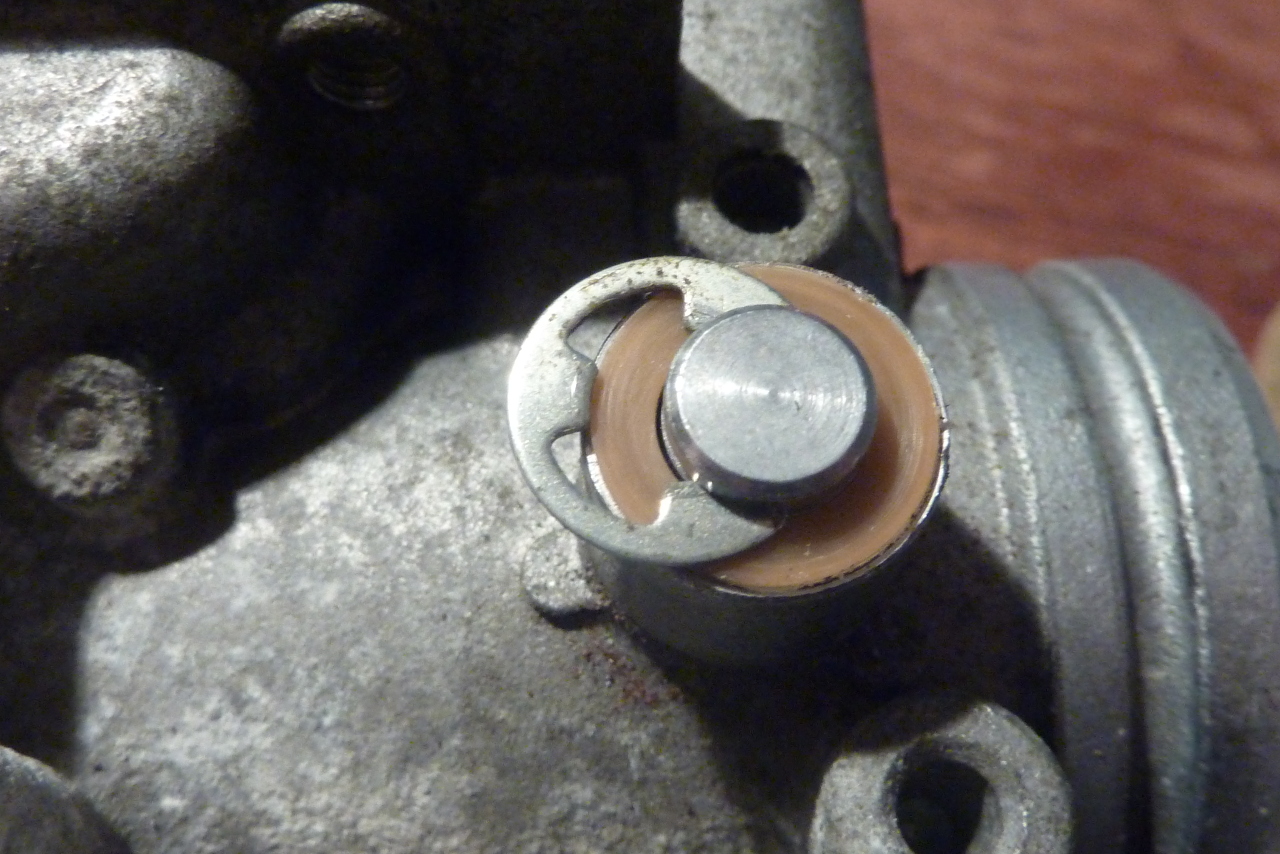
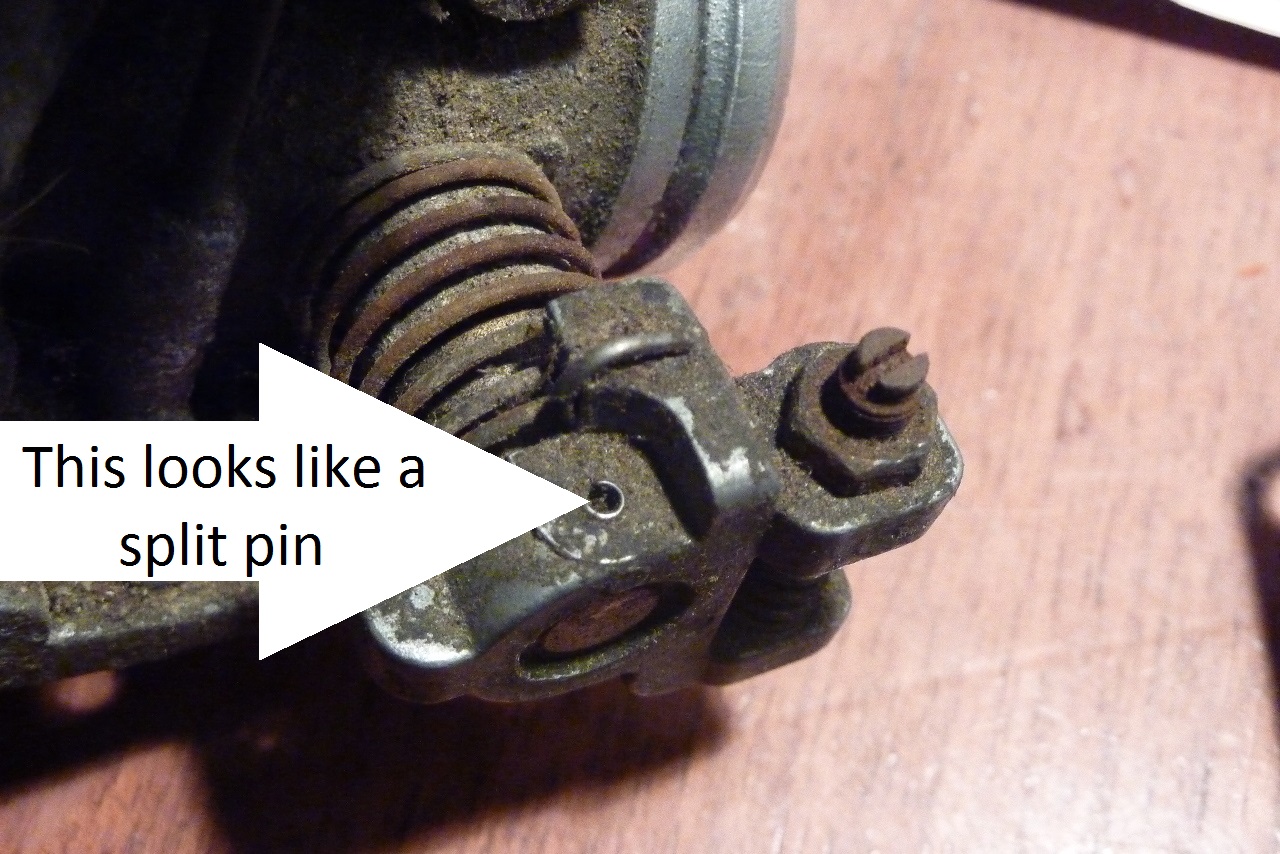
    and for no.2 remove this pin with a suitable punch


    There is a more detailed explanation and further pictures on the blog

    Greetings
    Richard
    sigpic
    GS1150 EF bought Jun 2015
    GS1150 ES bought Mar 2014: ES Makeover Thread AND blog: Go to the Blog
    GS1100 G (2) bought Aug 2013: Road Runner Project Thread AND blog: Go to the Blog
    GS1100 G (1) Dad bought new 1985 (in rebuild) see: Dad's GS1100 G Rebuild AND blog: Go to the Blog
    Previously owned: Suzuki GS750 EF (Canada), Suzuki GS750 (UK)(Avatar circa 1977), Yamaha XT500, Suzuki T500, Honda XL125, Garelli 50
    Join the United Kingdom (UK) Suzuki GS Facebook Group here

    #2
    Hi,

    Good work with nice documentation. Thanks for sharing!

    May I put a link to your blog on my little website?

    Thank you for your indulgence,

    BassCliff
    Last edited by Guest; 02-16-2013, 06:37 PM.

    Comment


      #3
      Best pics I ever saw, man.
      NO PIC THANKS TO FOTO BUCKET FOR BEING RIDICULOUS

      Current Rides: 1980 Suzuki GS1000ET, 2009 Yamaha FZ1, 1983 Honda CB1100F, 2006 H-D Fatboy
      Previous Rides: 1972 Yamaha DS7, 1977 Yamaha RD400D, '79 RD400F Daytona Special, '82 RD350LC, 1980 Suzuki GS1000E (sold that one), 1982 Honda CB900F, 1984 Kawasaki GPZ900R

      Comment


        #4
        Originally posted by BassCliff View Post
        Hi,

        Good work with nice documentation. Thanks for sharing!

        May I put a link to your blog on my little website?

        Thank you for your indulgence,

        BassCliff
        Only if you think it is worthy. I am no expert. I am simply blogging what happens during the rebuild.

        I would be honored.

        Greetings
        Richard
        sigpic
        GS1150 EF bought Jun 2015
        GS1150 ES bought Mar 2014: ES Makeover Thread AND blog: Go to the Blog
        GS1100 G (2) bought Aug 2013: Road Runner Project Thread AND blog: Go to the Blog
        GS1100 G (1) Dad bought new 1985 (in rebuild) see: Dad's GS1100 G Rebuild AND blog: Go to the Blog
        Previously owned: Suzuki GS750 EF (Canada), Suzuki GS750 (UK)(Avatar circa 1977), Yamaha XT500, Suzuki T500, Honda XL125, Garelli 50
        Join the United Kingdom (UK) Suzuki GS Facebook Group here

        Comment


          #5
          Very good documentation.

          I would like to add one thing to this, though.

          Especially with these small screws, be SURE to use JIS screwdrivers, NOT a regular Phillips screwdriver.

          Those of you who have never experienced the difference will be saying "so what, it's just another driver", but you are WRONG.

          Motorcycle Consumer News even thought it was worthy of an article, and put it on the back cover of the March, 2013 issue. Here is a scan of it.


          .
          sigpic
          mine: 2000 Honda GoldWing GL1500SE and 1980 GS850G'K' "Junior"
          hers: 1982 GS850GL - "Angel" and 1969 Suzuki T250 Scrambler
          #1 son: 1986 Yamaha Venture Royale 1300 and 1982 GS650GL "Rat Bagger"
          #2 son: 1980 GS1000G
          Family Portrait
          Siblings and Spouses
          Mom's first ride
          Want a copy of my valve adjust spreadsheet for your 2-valve per cylinder engine? Send me an e-mail request (not a PM)
          (Click on my username in the upper-left corner for e-mail info.)

          Comment


            #6
            I have found that for #2 and higher at least, good quality impact bits fit very well into the screw heads. I have used those bits in tip-interchangeable screwdrivers with success. The JIS screws seem to unscrew without any wear and can be reused several times. The impact bit tips look exactly like the photo in the article posted depicting the JIS tip.
            NO PIC THANKS TO FOTO BUCKET FOR BEING RIDICULOUS

            Current Rides: 1980 Suzuki GS1000ET, 2009 Yamaha FZ1, 1983 Honda CB1100F, 2006 H-D Fatboy
            Previous Rides: 1972 Yamaha DS7, 1977 Yamaha RD400D, '79 RD400F Daytona Special, '82 RD350LC, 1980 Suzuki GS1000E (sold that one), 1982 Honda CB900F, 1984 Kawasaki GPZ900R

            Comment


              #7
              I have a weird little hesitation in my 83' GS750ES as my engine speed hits around 2500-3000 rpms. The engine begins smoothly and then once it gets to those rpms it simply jumps a little and after that zone it runs smoothly all the way to redline. So in an effort to fix it I have completely disassembled my carbs and as I unscrewed the butterfly valve screws I learned that they were boogered on the end to prevent from being unscrewed. I powered through the first screw not realizing what I was doing and it "screwed" up the threads of the rod that goes through the venturi.

              Is there any way to unscrew the butterfly valve screws without damaging the female side threads? If so how can I do this?

              Comment


                #8
                nice to see someone can take a close up photo and hold the camera steady! nice pics!
                1983 GS 1100 ESD

                Comment


                  #9
                  Now you say that I am hoping I have not screwed up mine!

                  Can't see why it would have damaged the thread on the rods. The screw material is only burred over slightly to stop it shaking out. In my case the burring got stripped off when it started to come through the rod when they were being unscrewed. I have bought new screws to rebuild this set of carbs and I am now hoping that they will go straight in. If they don't I will try to ream the thread with the appropriate tool.

                  I am not an engineer nor a metals expert but it seems to me that the rods are made of much sterner material (stainless steel ?) than the screws. It might have felt like you were mashing the threads but in actual fact if was simply the burred part being pulled off.

                  May be you should just try new screws and hope you can retrieve the threads.

                  Greetings

                  P.S. The new screws I have a hollowed out on their tips. This is (I am guessing) to help you burr them over when installed. I wouldn't reuse the old ones which would now necessarily be weakened.
                  Last edited by londonboards; 03-25-2013, 05:21 PM.
                  Richard
                  sigpic
                  GS1150 EF bought Jun 2015
                  GS1150 ES bought Mar 2014: ES Makeover Thread AND blog: Go to the Blog
                  GS1100 G (2) bought Aug 2013: Road Runner Project Thread AND blog: Go to the Blog
                  GS1100 G (1) Dad bought new 1985 (in rebuild) see: Dad's GS1100 G Rebuild AND blog: Go to the Blog
                  Previously owned: Suzuki GS750 EF (Canada), Suzuki GS750 (UK)(Avatar circa 1977), Yamaha XT500, Suzuki T500, Honda XL125, Garelli 50
                  Join the United Kingdom (UK) Suzuki GS Facebook Group here

                  Comment


                    #10
                    Here are some photos of the old and new screws. I would say they are self explanatory; new screws are essential. Try burring those old ones over again and bits are going to fall off:


                    Greetings

                    P.S. I will be showing the re-assembly process later on but the rebuild can't progress at the moment until I have all the small parts plated and cleaned.
                    Richard
                    sigpic
                    GS1150 EF bought Jun 2015
                    GS1150 ES bought Mar 2014: ES Makeover Thread AND blog: Go to the Blog
                    GS1100 G (2) bought Aug 2013: Road Runner Project Thread AND blog: Go to the Blog
                    GS1100 G (1) Dad bought new 1985 (in rebuild) see: Dad's GS1100 G Rebuild AND blog: Go to the Blog
                    Previously owned: Suzuki GS750 EF (Canada), Suzuki GS750 (UK)(Avatar circa 1977), Yamaha XT500, Suzuki T500, Honda XL125, Garelli 50
                    Join the United Kingdom (UK) Suzuki GS Facebook Group here

                    Comment


                      #11
                      Well done for getting new screws Richard - it will be a lot easier to peen them over.

                      I'm too tight and have used the old ones many times before - especially on some Keihins where you have to take the choke plates out if you want to split the carb bank. I've never lost a screw in to the engine but I am extra careful putting those screws in.

                      You are correct that you won't have boogered the rods - the screws are softer.
                      79 GS1000S
                      79 GS1000S (another one)
                      80 GSX750
                      80 GS550
                      80 CB650 cafe racer
                      75 PC50 - the one with OHV and pedals...
                      75 TS100 - being ridden (suicidally) by my father

                      Comment

                      Working...
                      X