Announcement

Collapse
No announcement yet.

1981 GS550e Mikuni Carb tuning progress.

Collapse
X
 
  • Filter
  • Time
  • Show
Clear All
new posts

    1981 GS550e Mikuni Carb tuning progress.

    Hi, I'm starting this thread to talk about the process of tuning the carbs on my project.

    First, I'm not using stock configuration, and I know this is going to make what I am doing harder. That is a given. However, I want to make this bike run as well as I can with what I have.

    I'm using the stock Mikuni carbs, with the dual-intake K&N pod filters (pictured). I'm using the stock 4-2 headers with Emgo reverse megaphone exhausts.


    The changes I have made to the carbs so far:
    - Increasing the main jet size (I don't remember the size of the jet, I'll report back).
    - Raising the needle height. I did this by moving the plastic donut from above the clip to below the clip.

    What the bike is doing now:

    - Idles a little high, but not bad.
    - Good throttle response off the line. I can whack it open in 1st and get good acceleration.
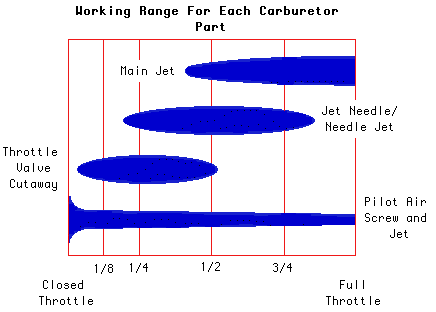
    - The bike begins to bog at 1/2 to 3/4 throttle. The engine stumbles and surges, and there's no more power.
    - If I baby the throttle and open it slow and gradually, the revs will sustain higher, but it eventually bogs around 3/4.

    From what I know, this is a symptom of running rich, which I'm assuming is the result of a main jet that is too large. I'll get the measurement next time I take the carbs off.

    #2
    From your listed symptoms, your bogging is happening before the mains.

    You moved the plastic spacer to the other side of the clip, you may have raised the needle too much. Try adding a couple of washers above the clip.

    Stock mains for your bike are 92.5. With your setup, you will probably end up in the neighborhood of 105, +/- a size or two.

    Have you fine-tuned the mixture screws for your idle circuit?

    .
    sigpic
    mine: 2000 Honda GoldWing GL1500SE and 1980 GS850G'K' "Junior"
    hers: 1982 GS850GL - "Angel" and 1969 Suzuki T250 Scrambler
    #1 son: 1986 Yamaha Venture Royale 1300 and 1982 GS650GL "Rat Bagger"
    #2 son: 1980 GS1000G
    Family Portrait
    Siblings and Spouses
    Mom's first ride
    Want a copy of my valve adjust spreadsheet for your 2-valve per cylinder engine? Send me an e-mail request (not a PM)
    (Click on my username in the upper-left corner for e-mail info.)

    Comment


      #3
      Originally posted by Steve View Post
      From your listed symptoms, your bogging is happening before the mains.

      You moved the plastic spacer to the other side of the clip, you may have raised the needle too much. Try adding a couple of washers above the clip.

      Stock mains for your bike are 92.5. With your setup, you will probably end up in the neighborhood of 105, +/- a size or two.

      Have you fine-tuned the mixture screws for your idle circuit?

      .
      You're saying leave the plastic spacer where I put it, but add washers above the clip?

      I removed the plugs over the mixture screws, but I haven't touched them yet.

      Comment


        #4
        Originally posted by Ira View Post
        You're saying leave the plastic spacer where I put it, but add washers above the clip?
        Correct. The position of the needle is determined by the stack of whatever above the clip. Removing the nylon spacer allowed the needle to be raised two or three clip positions, adding a few washers (two or three, depending on how thick they are) will be about half the thickness of the nylon spacer, making the total difference about 1 or 1 1/2 clip positions.

        Personally, I would also suggest that you do some fine-tuning on the mixture screws. They won't help much above half-throttle, but they might ease the transition into it.

        Start by gently turning the screws IN until they seat lightly, counting the turns on the way. Let us know what you find, so we can make some better suggestions based on proper information.

        .
        sigpic
        mine: 2000 Honda GoldWing GL1500SE and 1980 GS850G'K' "Junior"
        hers: 1982 GS850GL - "Angel" and 1969 Suzuki T250 Scrambler
        #1 son: 1986 Yamaha Venture Royale 1300 and 1982 GS650GL "Rat Bagger"
        #2 son: 1980 GS1000G
        Family Portrait
        Siblings and Spouses
        Mom's first ride
        Want a copy of my valve adjust spreadsheet for your 2-valve per cylinder engine? Send me an e-mail request (not a PM)
        (Click on my username in the upper-left corner for e-mail info.)

        Comment


          #5
          Hey Ira, I think Steve is right about the mixture screws. Did you get a chance to set up your idle mixture screws properly? If not I'd start here, it's a really great guide:

          Comment


            #6
            Since you guys both mentioned the mixture screws, I need to ask: it's always been my understanding that the mixture screws control the idle circuit, but don't have much effect once the throttle is open. Am I missing something here?

            My idle is a little high, which needs to be fixed, of course, but the symptoms I'm seeing are at half to 3/4 throttle. Wouldn't this be related to needle height or main jet size?

            Unrelated to that question, I noticed a few threads suggesting the '82 katana 550 dynojet kit is a direct fit for this engine/carb combination.

            Comment


              #7
              Originally posted by Ira View Post

              Unrelated to that question, I noticed a few threads suggesting the '82 katana 550 dynojet kit is a direct fit for this engine/carb combination.
              It fits your bike - same carbs.
              79 GS1000S
              79 GS1000S (another one)
              80 GSX750
              80 GS550
              80 CB650 cafe racer
              75 PC50 - the one with OHV and pedals...
              75 TS100 - being ridden (suicidally) by my father

              Comment


                #8
                Jetting is an additive process. Idle mixture screws still supplies fuel and air through the entire throttle position, albeit a very small % at 3/4 throttle, it's still there.

                This seems to be a popular image for jetting overlap, although I've seen it drawn different for direct lift carbs, I think this is close to accurate for CV

                Comment


                  #9
                  Crappy news - one of my air screws was completely frozen and I broke the carb body trying to free it. Actually, my #2 and #3 carb bodies are cracked by the air screws.

                  So does anyone have a rack of Mikuni BS32 carbs they want to sell, or at least those two carb bodies?

                  I'm bummed
                  Last edited by Guest; 04-06-2013, 11:10 PM.

                  Comment


                    #10
                    Originally posted by Ira View Post
                    Crappy news - one of my air screws was completely frozen and I broke the carb body trying to free it. Actually, my #2 and #3 carb bodies are cracked by the air screws.

                    So does anyone have a rack of Mikuni BS32 carbs they want to sell, or at least those two carb bodies?

                    I'm bummed
                    I had same issue an had to "borrow" a body from a set. I just happen to have 2 & 3 available. They were off an 80' 550E and they are the same as yours I do believe

                    Comment


                      #11
                      thanks, pm sent.

                      Comment


                        #12
                        I got the replacement carb bodies in the mail, and my dynojet kit arrived as well. Hoping to put it all together this weekend.

                        Comment


                          #13
                          Removing these bolts has been brutal. This is as far as I got yesterday.


                          Tried heat, impact driver, pb blaster. I'm using JIS drivers.

                          Comment


                            #14
                            By the way, the replacement carb bodies are nice and clean! Looking forward to installing them.

                            Comment


                              #15
                              A bunch of updates:

                              The rack came apart and I replaced bodies #2 and #3.

                              - Removing the bolts for the rails was awful. They were frozen to the carb bodies and required maximum ugliness to remove. All but one eventually broke free, and that one I drilled and retapped. I replaced all of the mounting hardware.


                              - I regret not replacing the o-rings on the pipes between each carb body. I'm going to do that next time I pull them off.

                              - I really should have taken before and after pictures. I momentarily confused myself by putting the throttle and choke cable stops on the wrong carbs. (Edit - after looking at the fiche, I realized my fuel line T is in the wrong place too! I have it between 2 and 3. I don't understand why there are two plastic Ts in the first place - can the line be attached to either, or do I need to tack the rack apart again to switch their positions?)

                              - Next, I installed the stage 3 dynojet kit (550 katana). It was easy to do, but mine had no instruction sheet at all! I tried to find the correct pdf on their website, but it doesn't seem to exist.

                              - Drilling the slides was obvious because there's one drill bit and one hole.
                              - Clip height was a guess. I picked 4 down from the top, because it's close to the middle. Used the original washer and plastic donut in stock positions.
                              - Used the smaller of the two main jets (dynojet 150) rather than 155.
                              - Did not add the mixture jet adapters. I don't know what they do, could someone explain?

                              - I set my mixture screws at about 3 turns out. this was hard because one of them is sticky(not stuck, just turns hard/loose depending on the position) and i'm getting bad feedback as to the "seated position". Any tips on how to chase those threads or unstick the screw?

                              - When reassembled, my idle is complete crap. bike will not idle at all without a bit of throttle.

                              - Once i'm on the throttle, it pulls well through all positions, which is fantastic. I didn't check the plugs for rich/lean, but it feels good.

                              - One of the carbs (at least) leaks. I need to take them off and see what's going on. Hard to tell at night with them on the bike.
                              Last edited by Guest; 04-17-2013, 12:24 PM.

                              Comment

                              Working...
                              X