Announcement

Collapse
No announcement yet.

Pilot air/fuel screws?

Collapse
X
 
  • Filter
  • Time
  • Show
Clear All
new posts

    Pilot air/fuel screws?

    I've done some searching and reading about this topic. I have a '79 GS750 with VM carbs, did a complete disassembly, dip, new o rings from Robert Barr, new intake boot o rings, valve adjustment, lubed all cables, etc. The bike finally got road tested yesterday and seemed to run pretty good. I have no baseline as to how it should run because it was a non-runner when bought a couple weeks ago.

    I recorded all air and fuel mix screw settings before the carbs were taken apart. The air screws were uniform at 1 turn out. Fuel was 1 turn out on two of the carbs, and 3.5 turn out of the other two. The plugs that were in the bike indicated 2 very carbon rich cylinders, 1 was perfect, and 1 was lean. This was probably also due to the air intake box seals that were broken (fixed with weather stripping), broken intake boot o rings, and valves out of spec. I didn't go back to those settings for initial carb tuning because there were so many variables that were out of whack originally. I started with needle clip in the same place (2nd notch from the top), the fuel screw I set at 3/4 turns out from light seat, and the air screw 1.5 turns out.

    My question is when setting the air screw for highest idle when the engine is warm, it seemed I didn't get engine rev increase until I screwed the air in, to about 3/4 turns from light seat. After checking my plugs, all four were nearly white on the strap, but carbon build up down near the threads. Porcelain is still white.

    I've never dealt with carbs before, so this is all a learning experience to me. By the way, this bike is pretty fun. It needs some new rubber as the rear is worn down to the cord in one spot, and the general profile is square. The previous owner must have loved going in a straight line.

    #2
    The screw settings will depend on the intake and exhaust systems.

    If you have stock airbox and exhaust installed, the fuel screws (the ones on the bottom) should be 3/4 to 7/8 turn out from lightly-seated. As a rule, you start with the air screws (the ones on the side) double the fuel screw setting.

    Of course, this assumes that you have done the full "strip-and-dip" refurb and set the floats and needles to the proper heights.

    .
    sigpic
    mine: 2000 Honda GoldWing GL1500SE and 1980 GS850G'K' "Junior"
    hers: 1982 GS850GL - "Angel" and 1969 Suzuki T250 Scrambler
    #1 son: 1986 Yamaha Venture Royale 1300 and 1982 GS650GL "Rat Bagger"
    #2 son: 1980 GS1000G
    Family Portrait
    Siblings and Spouses
    Mom's first ride
    Want a copy of my valve adjust spreadsheet for your 2-valve per cylinder engine? Send me an e-mail request (not a PM)
    (Click on my username in the upper-left corner for e-mail info.)

    Comment


      #3
      Thanks Steve. I did set floats to 25.5mm. Needles are 2nd from the top which is where they were when I disassembled them. I should note that it has a Kerker 4 into 1 system with stock airbox.

      Comment


        #4
        Specs for your float height should be 23.0 +/- 1.0mm, so you are running lean with your 25.5 setting.

        Needles 2nd from the top will be leaner than stock.

        Adding a 4-into-1 will lean it a bit at the upper end, what main jets do you have? Stock is 100, with your Kerker, you might need 110s.

        For your pipe, increase the pilot screws a bit, maybe to 1 turn on the fuel and 2 turns on the air.

        .
        sigpic
        mine: 2000 Honda GoldWing GL1500SE and 1980 GS850G'K' "Junior"
        hers: 1982 GS850GL - "Angel" and 1969 Suzuki T250 Scrambler
        #1 son: 1986 Yamaha Venture Royale 1300 and 1982 GS650GL "Rat Bagger"
        #2 son: 1980 GS1000G
        Family Portrait
        Siblings and Spouses
        Mom's first ride
        Want a copy of my valve adjust spreadsheet for your 2-valve per cylinder engine? Send me an e-mail request (not a PM)
        (Click on my username in the upper-left corner for e-mail info.)

        Comment


          #5
          The mains are 102.5, pilots are 15. Where did you get that float height? In the Clymer it specs my carbs from 25-27mm float height. I did notice a few drops coming out of the overflow from carbs 1 and 4 this morning.

          Comment


            #6
            Sounds like someone didn't want to buy jets for the pipe, didn't want to learn how he carburetors work, and just turned the fuel screw out so he could say he adjusted something. All of those settings are all screwed up. 102.5 is probably the stock main jet for the '79 750. For that pipe try 112.5 for a first guess.. Use the 15 pilot jets, use 3/4 for the fuel screws and 1 1/2 for the air screws. You MAY want to raise the jet needles a little, by putting the clips in the second position from the bottom, not from the top.
            This should get you close enough to start test riding if the floats are set right, if the fuel screw tips are not broken off in the port, and if the internal passages in all of the carburetors are clean.
            You will of course need to test and fine tune everything.

            As for the riding baseline, it should pull OK from idle, with gradually increasing torque all the way up to about 7,000RPM and then take off like a shot.
            http://img.photobucket.com/albums/v5...tatesMap-1.jpg

            Life is too short to ride an L.

            Comment


              #7
              Originally posted by Drewbis1 View Post
              Where did you get that float height? In the Clymer it specs my carbs from 25-27mm float height.
              Sorry about that, you are correct.

              My handy-dandy chart shows specs for a '78, but not a '79. I foolishly assumed they might be the same,
              but forgot that they made some drastic changes every year for the first few years.

              The factory manual (available on BassCliff's site) also specifies 25-27mm.

              .
              sigpic
              mine: 2000 Honda GoldWing GL1500SE and 1980 GS850G'K' "Junior"
              hers: 1982 GS850GL - "Angel" and 1969 Suzuki T250 Scrambler
              #1 son: 1986 Yamaha Venture Royale 1300 and 1982 GS650GL "Rat Bagger"
              #2 son: 1980 GS1000G
              Family Portrait
              Siblings and Spouses
              Mom's first ride
              Want a copy of my valve adjust spreadsheet for your 2-valve per cylinder engine? Send me an e-mail request (not a PM)
              (Click on my username in the upper-left corner for e-mail info.)

              Comment


                #8
                So let me see if I understand carbs... here is my take on carbs 101...

                So the pilot system (the combination of pilot jet, fuel mix screw, and air mix screw) are responsible for everything from idle to low rpm ranges, or slight throttle twist.

                Then in the midrange (I'm guessing somewhere around 1/4 throttle or 3k rpms) is where the slide needle comes into play.

                And the main jets are more in the upper throttle twist and higher rpm ranges.

                So in order to test one of those areas, I'd have to read the plugs by doing a throttle chop in each of those throttle ranges?
                I will tear into them again and move that clip on the slide to the 2nd from the bottom to richen it up a bit in the midrange. That is where I spend most of the time. I usually find myself cruising around 3-4K. But I did rev it up on an industrial road this morning and that Kerker sounds ridiculous when you get past 6K rpms.

                In the meantime, I really need some new shoes, I'm avoiding riding it anymore until I can at least get the rear replaced.

                Comment


                  #9
                  Your supposition is close

                  The cutaway angle on the slide is step 2 in air/fuel/mix

                  Where that VM chart with the overlapping systems on it?

                  So, yeah, raise the needles and bigger main jet, fuel screw to 1 is a good start

                  For new tires, get some Avons in the stock 3.25/4.000 combo, you'll be glad you did. Try Motorcycle Tire and Wheel on NE Alberta

                  All of your shims got proper clearance now?
                  1978 GS 1000 (since new)
                  1979 GS 1000 (The Fridge, superbike replica project)
                  1978 GS 1000 (parts)
                  1981 GS 850 (anyone want a project?)
                  1981 GPZ 550 (backroad screamer)
                  1970 450 Mk IIID (THUMP!)
                  2007 DRz 400S
                  1999 ATK 490ES
                  1994 DR 350SES

                  Comment


                    #10
                    Thanks Big T. I actually used to live right near the tire shop on Alberta and I've never been in there. At the time I had a new Triumph Bonneville and didn't really need tires. I've had my eye on the Avon AM26 tires.

                    Yes, the shims are all sorted, everything is in spec. Here's the rundown....
                    cleaned/oiled air filter, cleaned/sealed airbox, cleaned carbs new o rings, new intake boot o rings, valve clearances in spec, new spark plugs, new oil, fresh ethanol free fuel, cleaned lubed all cables, cleaned/oiled tach and speedo, new vacuum/vent/fuel lines. And for several hours in there I was trying to extract a broken exhaust bolt in the heads that was in the absolute worst area possible. My drill chuck was hitting the frame, knocking the drill bit sideways. Got it.

                    This bike is pretty fun to ride. I'm surprised with very little carb tuning, it is smooth throughout the rev range and has no hesitation or hickups at all, aside from a small flat spot around 3K

                    Comment


                      #11
                      Originally posted by Drewbis1 View Post
                      So let me see if I understand carbs... here is my take on carbs 101...

                      So the pilot system (the combination of pilot jet, fuel mix screw, and air mix screw) are responsible for everything from idle to low rpm ranges, or slight throttle twist.

                      Then in the midrange (I'm guessing somewhere around 1/4 throttle or 3k rpms) is where the slide needle comes into play.

                      And the main jets are more in the upper throttle twist and higher rpm ranges.

                      So in order to test one of those areas, I'd have to read the plugs by doing a throttle chop in each of those throttle ranges?
                      As BigT said, you are very close.

                      The part that I highlighted is where you veered just a bit off-course.

                      Plug chops are meant to check jetting at throttle openings, not engine speeds.
                      In fact, to test the main jetting, you will need to hold full throttle.
                      You might find this rather incredible, but the engine speed will change while doing this.

                      .
                      sigpic
                      mine: 2000 Honda GoldWing GL1500SE and 1980 GS850G'K' "Junior"
                      hers: 1982 GS850GL - "Angel" and 1969 Suzuki T250 Scrambler
                      #1 son: 1986 Yamaha Venture Royale 1300 and 1982 GS650GL "Rat Bagger"
                      #2 son: 1980 GS1000G
                      Family Portrait
                      Siblings and Spouses
                      Mom's first ride
                      Want a copy of my valve adjust spreadsheet for your 2-valve per cylinder engine? Send me an e-mail request (not a PM)
                      (Click on my username in the upper-left corner for e-mail info.)

                      Comment


                        #12
                        So how long should I hold these throttle positions before cutting the engine and coasting to a stop? A few seconds, minutes? AN HOUR? I tried this earlier on the Aprilia, and I couldn't get the front wheel to stay on the ground. Damn Italians.

                        Comment


                          #13
                          For the pilot circuit, you might need a minute or two, but that's the easiest one to do. Third or fourth gear, idling through town, or wherever you can hold 1/8 throttle.

                          For the needle, you might need to find a modest uphill road where you can hold 1/2 throttle in fourth or fifth gear, to prevent running away. Try to get in 30 to 60 seconds, if possible.

                          For the mains, it's easy, but can get scary. Obviously, you will have to be at full throttle, but that will get you going rather quickly. You might get a long enough run by starting at 20 mph in fifth gear and running it as fast as you dare. One good long run won't take long, but should be good enough.


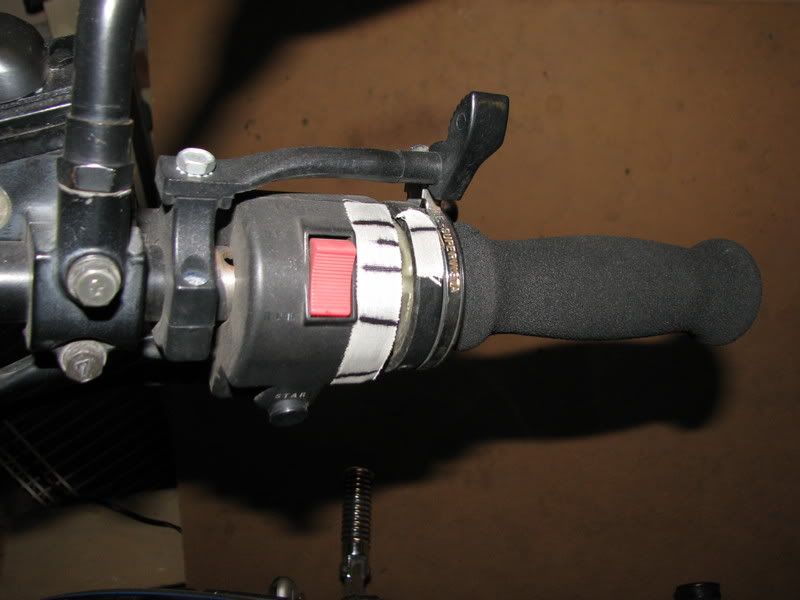
                          HINT: make marks on the the grip and the housing so you can SEE your throttle setting. Here is how I marked my wife's bike for testing:


                          .
                          sigpic
                          mine: 2000 Honda GoldWing GL1500SE and 1980 GS850G'K' "Junior"
                          hers: 1982 GS850GL - "Angel" and 1969 Suzuki T250 Scrambler
                          #1 son: 1986 Yamaha Venture Royale 1300 and 1982 GS650GL "Rat Bagger"
                          #2 son: 1980 GS1000G
                          Family Portrait
                          Siblings and Spouses
                          Mom's first ride
                          Want a copy of my valve adjust spreadsheet for your 2-valve per cylinder engine? Send me an e-mail request (not a PM)
                          (Click on my username in the upper-left corner for e-mail info.)

                          Comment


                            #14
                            VM Chart

                            Originally posted by Big T View Post
                            ... Where that VM chart with the overlapping systems on it?

                            Comment


                              #15
                              One last question... regarding the pilot fuel screws: cylinders 1 and 2 don't seat the tip enough to be seen inside the carb body. Cylinders 3 and 4 can be seen. The tips are fine, lengths are the same. I noticed that 2 of the slide needles were aluminum, and the other 2 were brass. I'm thinking 2 carb rebuild kits were used and maybe the pilot screws aren't 100% the same. Should this matter that I cannot see the tips in the carb body as long as they are turned out the same number of turns?

                              Comment

                              Working...
                              X