Announcement

Collapse
No announcement yet.

Adjusting Idle Mixture

Collapse
X
 
  • Filter
  • Time
  • Show
Clear All
new posts

    #31
    Originally posted by Chris P View Post
    i have the air/mixture screws turned out 2 turns. I've inspected the air box and it seems pretty well sealed up. Before i put these carbs back into position, is there anything else I should take care of while this space is open?
    Whenever I have rebuilt a set of carbs (and I have done dozens), I start with the mixture screws out 3 full turns, not 2. After the bike is warmed up, you will adjust each screw until it gives you the highest idle speed possible. They might end up in the 2 to 2 1/2 turn range, but starting at 2 turns might be just a bit too lean to run properly, and you still won't think you have it right. Starting with 3 turns is like having the "choke" partly ON, it gives it a richer mixture, making it easier to start.


    Originally posted by Chris P View Post
    Thanks eli, Im just sitting down to bench sync them right now. ... Im wondering if this is right: Carbs 1,2,4 the butterfly valve is open just enough so I can see the first hole at the top of the inside of the carb. Carb 3, is completely closed. The throttle screw is backed off completely. Does this sound right?
    No. Don't worry about the first hole at the top of the inside of the carb.
    Don't worry about using a paper clip, either.
    Adjust the master idle speed knob until you see a very slight sliver of light under the butterfly. Turn the center sync screw until you see a sliver the same size under carb #2. Then do the same thing with the left sync screw to get the same-size sliver under #1. Finally, adjust the right screw to adjust #4. Here is what you are looking for:

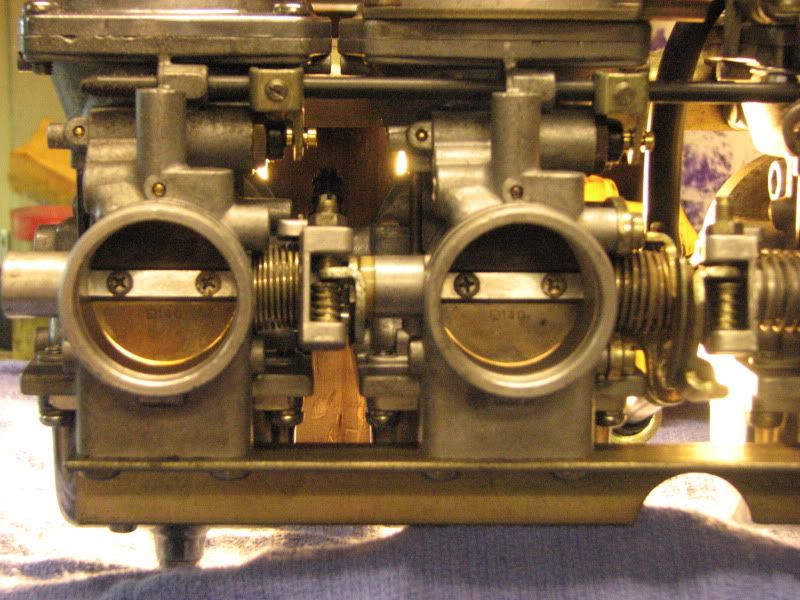
    Note the light under the butterfly. When you can operate the idle speed control and see that ALL the butterflies close at the same time, you have done a good bench sync. Turn the idle speed in a couple of turns and put the carbs back on the bike.

    Keep in mind that #1 is always the LEFT carb, and the LEFT carb is always on the LEFT side of the bike as if you were sitting on it, ready to ride.


    Originally posted by Chris P View Post
    Thanks for the to do list. Im looking into the valves shortly, was wondering if i should purchase the "real gasket" or the stock cardboard one, also do you think its a good idea to order new half moons (dont know the actually term for these but thats what they look like)?
    I tried the Real Gasket on one bike, but sold it soon after, so I don't know how well they really work. I have had no problems with the stock 'cardboard' gaskets. Just use a light film of oil or grease on them, they will come off easier at your next valve clearance check and can be re-used several times. New half moons are a good idea if you have just gotten the bike. They are cheap insurance.

    If you do decide to go with a Real Gasket and new half moons, install the half moons (with a thin film of RTV on the curved surface only) and then install the valve cover with no gasket at all. You only need to install the outer bolts, snug them down to clamp the half moons into place overnight. When the cover is removed, the half moons will be sitting flush with the head, and will not leak right at the corners. A cardboard gasket will push them into place right away, a Real Gasket will not be installed with enough force to do that, so take your time, do it right.

    .
    sigpic
    mine: 2000 Honda GoldWing GL1500SE and 1980 GS850G'K' "Junior"
    hers: 1982 GS850GL - "Angel" and 1969 Suzuki T250 Scrambler
    #1 son: 1986 Yamaha Venture Royale 1300 and 1982 GS650GL "Rat Bagger"
    #2 son: 1980 GS1000G
    Family Portrait
    Siblings and Spouses
    Mom's first ride
    Want a copy of my valve adjust spreadsheet for your 2-valve per cylinder engine? Send me an e-mail request (not a PM)
    (Click on my username in the upper-left corner for e-mail info.)

    Comment


      #32
      Originally posted by Chris P View Post
      Thanks for the to do list. Im looking into the valves shortly, was wondering if i should purchase the "real gasket" or the stock cardboard one, also do you think its a good idea to order new half moons (dont know the actually term for these but thats what they look like)?
      Real gasket was a waste of 25$ for me. They would not refund or issue a partial.
      Use the OEM and never worry about leaks.

      Comment


        #33


        Thanks for all the info. Im going to order the stock gasket but there seems to be a question of 16 holes or 17 holes. This is a picture of where my tach comes in. Can anyone tell me if i need the 17 hole pattern. Obviously when i count the bolts there is only 16, but Im not sure if a hole is required for the tach thingy. Sorry, Im new.
        Also dont know why the pic rotated but it should be rotated 90 clockwise, hopefully that helps
        Cheers
        Last edited by Guest; 04-08-2014, 08:52 AM. Reason: pic is rotated

        Comment


          #34
          16 bolt. The tach has nothing to do with it.
          http://img633.imageshack.us/img633/811/douMvs.jpg
          1980 GS1000GT (Daily rider with a 1983 1100G engine)
          1998 Honda ST1100 (Daily long distance rider)
          1982 GS850GLZ (Daily rider when the weather is crap)

          Darn, with so many daily riders it's hard to decide which one to jump on next.;)

          JTGS850GL aka Julius

          GS Resource Greetings

          Comment


            #35
            Originally posted by Chris P View Post

            Thanks for all the info. Im going to order the stock gasket but there seems to be a question of 16 holes or 17 holes. This is a picture of where my tach comes in. Can anyone tell me if i need the 17 hole pattern. Obviously when i count the bolts there is only 16, but Im not sure if a hole is required for the tach thingy.
            If you count 16 bolts, then that is what you have.
            The question is not "holes", but "bolts".


            Originally posted by Chris P View Post
            Sorry, Im new.
            Yeah, we're sorry you're new, too.


            Originally posted by Chris P View Post
            Also dont know why the pic rotated but it should be rotated 90 clockwise, hopefully that helps.
            Did you take the picture with an iPhone, iPad or other device that auto-rotates a picture?

            It knows which way is 'up', but doesn't bother to tell that to a REAL computer.

            .
            sigpic
            mine: 2000 Honda GoldWing GL1500SE and 1980 GS850G'K' "Junior"
            hers: 1982 GS850GL - "Angel" and 1969 Suzuki T250 Scrambler
            #1 son: 1986 Yamaha Venture Royale 1300 and 1982 GS650GL "Rat Bagger"
            #2 son: 1980 GS1000G
            Family Portrait
            Siblings and Spouses
            Mom's first ride
            Want a copy of my valve adjust spreadsheet for your 2-valve per cylinder engine? Send me an e-mail request (not a PM)
            (Click on my username in the upper-left corner for e-mail info.)

            Comment


              #36
              Originally posted by JTGS850GL View Post
              Adjust the valves first before you waste time trying to get it running right. GS's are very sensitive to valve adjustment and will not run correctly if any of the valves are too tight.
              This is the way to go, I was chasing a poor idle / lean running issue did the clearances made it a much easier process after they were sorted, idle now sounds very good, blip the throttle and she drops back to idle no problem.

              Comment


                #37
                Is that a plug lead in the pic? appears to be cracked / damaged

                Comment


                  #38
                  Originally posted by Steve View Post

                  Did you take the picture with an iPhone, iPad or other device that auto-rotates a picture?

                  .
                  It was taken with an iphone, damn you Apple!!!!
                  Thanks for helping me sort out the hole/bolt situation there.

                  Comment


                    #39
                    Good to know it works. I feel like if this doesnt work, I dont know what else is left to do. Ill be sure to keep the thread updated.

                    Comment


                      #40
                      Originally posted by Steve View Post
                      Did you take the picture with an iPhone, iPad or other device that auto-rotates a picture?
                      Like this:
                      http://img633.imageshack.us/img633/811/douMvs.jpg
                      1980 GS1000GT (Daily rider with a 1983 1100G engine)
                      1998 Honda ST1100 (Daily long distance rider)
                      1982 GS850GLZ (Daily rider when the weather is crap)

                      Darn, with so many daily riders it's hard to decide which one to jump on next.;)

                      JTGS850GL aka Julius

                      GS Resource Greetings

                      Comment


                        #41
                        So, is there a trick to getting this valve cover off. It looks as though the PO may have spray painted a bit of the engine. I only say that bc the gasket looks silver. I'm thinking just a little elbow grease but I just wanted to check with the pros. I've got all 16 bolts loose and removed the tach cable. Do the side covers come off and expose the half moon gaskets or do they come off with the whole assembly?

                        Comment


                          #42
                          Remove the chrome side covers and use a rubber mallet to give it a whack with all the bolts out. You'll also need to remove the vent cover on top (4 screws) of the valve cover and you may need to remove the horn to get the cover out.

                          Do NOT use the real gasket on your bike. The tach drive gear is in the valve cover and the gasket thickness is critical. Too thick and the gears will not mesh correctly. You need to use an OEM style gasket on any GS that has the tach in the valve cover.
                          Last edited by JTGS850GL; 04-08-2014, 08:51 PM.
                          http://img633.imageshack.us/img633/811/douMvs.jpg
                          1980 GS1000GT (Daily rider with a 1983 1100G engine)
                          1998 Honda ST1100 (Daily long distance rider)
                          1982 GS850GLZ (Daily rider when the weather is crap)

                          Darn, with so many daily riders it's hard to decide which one to jump on next.;)

                          JTGS850GL aka Julius

                          GS Resource Greetings

                          Comment


                            #43
                            Originally posted by Chris P View Post
                            Do the side covers come off and expose the half moon gaskets or do they come off with the whole assembly?
                            Originally posted by JTGS850GL View Post
                            Remove the chrome side covers and use a rubber mallet to give it a whack with all the bolts out.
                            BELAY THAT SUGGESTION.

                            On the 650 (and the 450), the chrome covers come off WITH THE COVER.

                            .
                            sigpic
                            mine: 2000 Honda GoldWing GL1500SE and 1980 GS850G'K' "Junior"
                            hers: 1982 GS850GL - "Angel" and 1969 Suzuki T250 Scrambler
                            #1 son: 1986 Yamaha Venture Royale 1300 and 1982 GS650GL "Rat Bagger"
                            #2 son: 1980 GS1000G
                            Family Portrait
                            Siblings and Spouses
                            Mom's first ride
                            Want a copy of my valve adjust spreadsheet for your 2-valve per cylinder engine? Send me an e-mail request (not a PM)
                            (Click on my username in the upper-left corner for e-mail info.)

                            Comment


                              #44


                              Took the valve cover off. The interior looks real good, clean oil, and i dont see any foreign material inside. However the gasket is complete s%*t. I guess im going to just scrape off as much as possible. ANy suggestions on what to use to clean it up. I ordered my gasket and end caps and when the bucket tool arrives I will begin taking out the shims. Ill be sure to keep the thread updated. Im sure Ill need some assistance again shortly.

                              Comment


                                #45
                                Originally posted by Chris P View Post
                                I ordered my gasket and end caps and when the bucket tool arrives I will begin taking out the shims.
                                Don't take out the shims until you understand the procedure. Only one comes out at a time, do not rotate the engine with one out!

                                I use my fingers on the gasket, push it sideways and big chunks of the gasket will snap off at once. Fingernail to scrape what's left, may need a razor blade for a few spots around the bolt holes but go easy.
                                Last edited by tkent02; 04-09-2014, 09:59 AM.
                                http://img.photobucket.com/albums/v5...tatesMap-1.jpg

                                Life is too short to ride an L.

                                Comment

                                Working...
                                X