.png "Powered by vBulletin")
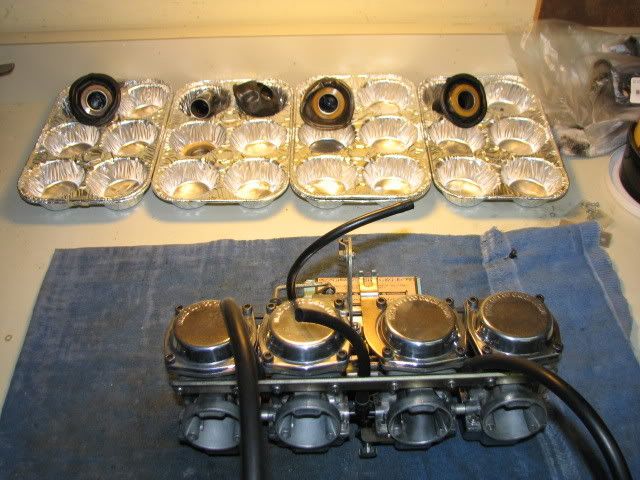
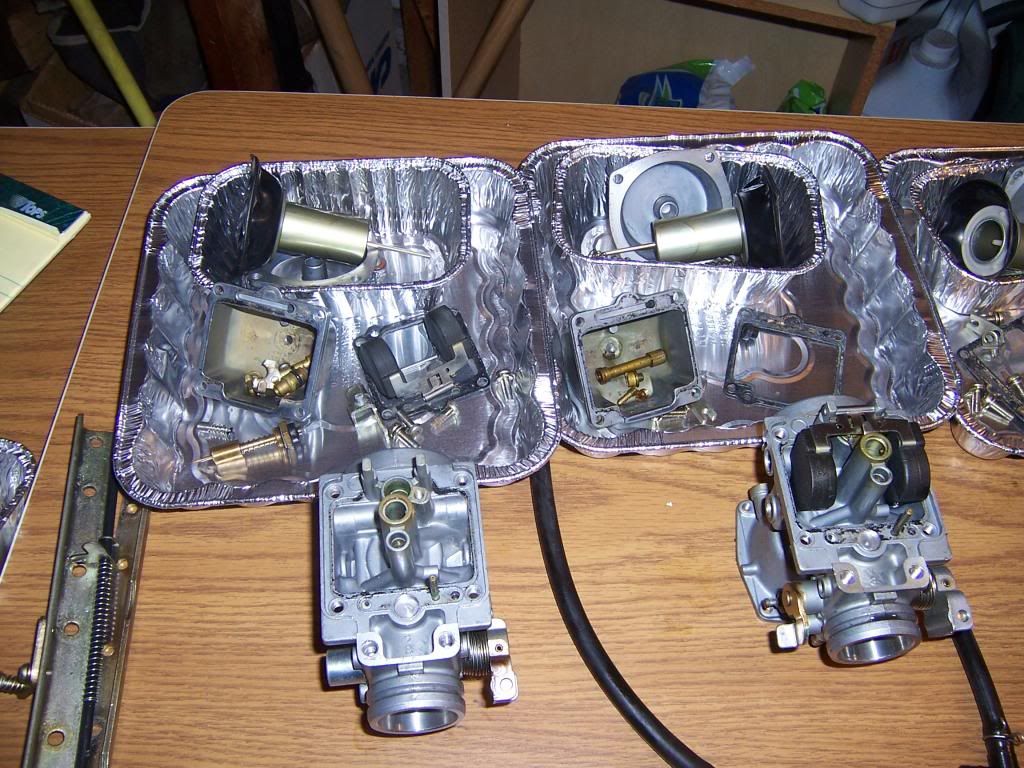
Well I got paid and now getting a slow start. I am working on a 82' GS650E. I live in Iowa (council bluffs) so it's cold here now and will take my time to do a good job per the tutorials on this site. So far I have bought some containers to get going, more too follow as I move through the process.carb containers.jpg
-
-
Good idea to keep organized.
Could have saved you some money already, though.
Disposable muffin tins from Dollar General are a buck a pair. Two pairs will work just fine.
Add a unique flavor to subsequent batches of muffins, too.
.sigpic
mine: 2000 Honda GoldWing GL1500SE and 1980 GS850G'K' "Junior"
hers: 1982 GS850GL - "Angel" and 1969 Suzuki T250 Scrambler
#1 son: 1986 Yamaha Venture Royale 1300 and 1982 GS650GL "Rat Bagger"
#2 son: 1980 GS1000G
Family Portrait
Siblings and Spouses
Mom's first ride
Want a copy of my valve adjust spreadsheet for your 2-valve per cylinder engine? Send me an e-mail request (not a PM)
(Click on my username in the upper-left corner for e-mail info.) -
Whatever method you use to stay organized is a good one.
Invest in quality tools to do the dis-assembly too.. Good JIS (Japanese Industrial Standard) Screwdrivers will help you to NOT strip screw heads.
Go slow - do it by the book - double check your work (If you do it right you only have to do it once)
I also subscribe to the tin foil pans (got mine at the grocery store for about $5 for the lot)
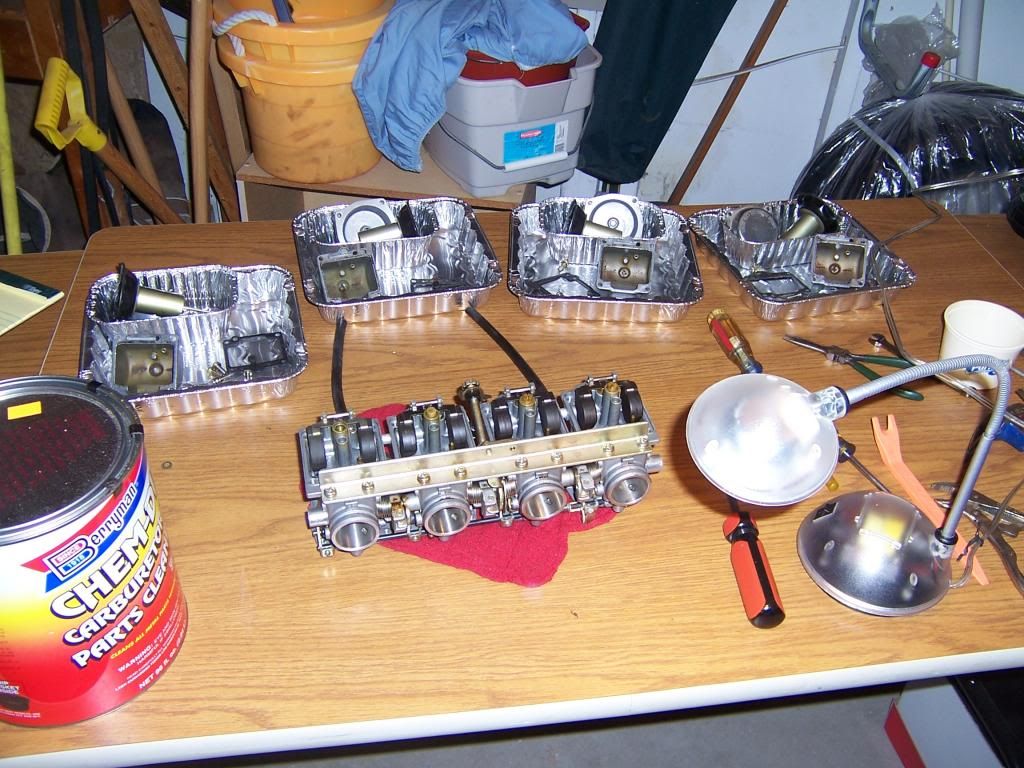
I like to take a LOT of pictures BEFORE and DURING the process -
That way I have a resource to look at for re-assembly of HOW they go together (in case I forget)
That really saved me from a long process when putting the enricher (choke) linkage back together...
On the 650 I couldn't remember how it hooked up....
Consider reassembly with Stainless Allen Head also...
On the rails, the float bowls and the carb tops...
Comment
-
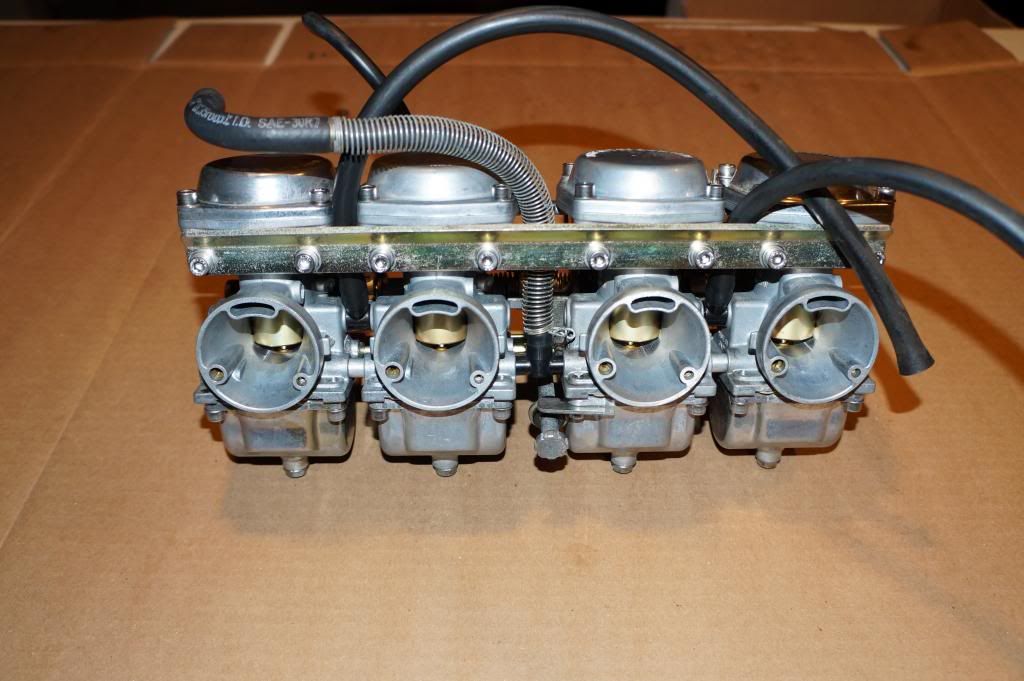
Hi again Steve! That's a good idea but I favor the plastic for some reason. What you see in the pic I bought for $3 total at the dollar store. What are those tubes called or what do they do, the ones on either side between carbs. My carbs do not have those hoses, just fuel and vacuumOriginally posted by Steve View PostComment
-
Hi Wing, I am basically basing my methods roughly off yours and Steve's organizational methods. I have a 6 foot heavy table at work that is out the way that I can use and no one will mess with it. I ordered stainless steel fasteners today (all around) and need to pick up anti seize (copper) , carb dip , carb spray before going too much further. (oh and or course new rubber rings too)Originally posted by Wingsconsin View PostComment
-
Sounds like you're on the right track. Keep us posted.
Comment
-
Those T-tubes are for the breathers. The hoses go over the airbox and behind. The one in the center is the fuel inlet and the vacuum hose comes off carb #2.
I use heavy duty zip-lock bags marked with a sharpie pen. It really comes down to just keeping everything organized. Most of the parts between the carbs can be interchanged. Just make sure you keep the float valves and seats together as they wear in together.
Hardest part of doing the job is getting those mixture screws out. If you have a relatively unmolested set of carbs then the jets should come out pretty easily as long as you use the correct screwdriver. Can't emphasize more the need to make sure you have the correct tools. Having the wrong screwdriver can ruin a good jet or worse. To get the mixture screws out once the caps are out, I use PB blaster and a propane torch. Spray in some PB blaster and then use the torch to get things really hot. Once the PB blaster is gone then spray some more into the opening and heat it again till it's gone and heat for just a little longer. While hot take the correct size screwdriver, press down and slowly unscrew it. If you get any resistance then repeat the PB blaster and heat. So far hasn't failed me.
Just finishing up a set of carbs from a GS1100G today. Depending on the carb dip you use you need to be VERY careful as to what you dip and what you don't. Anything with rubber does not get dipped. That includes the enrichment plungers, slides with diaphragms and various plastic parts. I use Berryman's professional parts cleaner. You'll get some debate on if there is a difference, but I will flat out tell you that it is different and MUCH more effective then the standard Berryman formula. The part number you're looking for is: Berryman's PN 901. The 996 is the new really weak stuff. You can't buy it in every state but in Georgia O'reilly's Auto parts carries it. The professional formula has a very distinctive moth bally smell. The 901 is a little more expensive and doesn't come with the gallon paint can (which you can buy at any home depot) or the parts strainer/basket but you can use anything that doesn't get dissolved by the cleaner. One little trick I've found is to put metal parts that have old dry O-rings into the dipping vat with the O-rings still attached. When they come out the O-rings will have swollen many times their normal size and are as soft as jelly. So much easier to get them off without even needing a pick.
Post pics as you go and good luck with the rebuild.Last edited by JTGS850GL; 12-19-2014, 05:26 PM.http://img633.imageshack.us/img633/811/douMvs.jpg
1980 GS1000GT (Daily rider with a 1983 1100G engine)
1998 Honda ST1100 (Daily long distance rider)
1982 GS850GLZ (Daily rider when the weather is crap)
Darn, with so many daily riders it's hard to decide which one to jump on next.;)
JTGS850GL aka Julius
GS Resource Greetings
Comment
-
I only use the carb dip for the brass parts (jets).
I fear the carb bodies may discolor in the carb dip so I use my Ultrasonic Cleaner with Simple Green solution for most of the process.
I have needle like "files" for poking through every hole on the jets and compressed air.
Here is a picture from my disassembly that shows the hoses laid out where they return to..
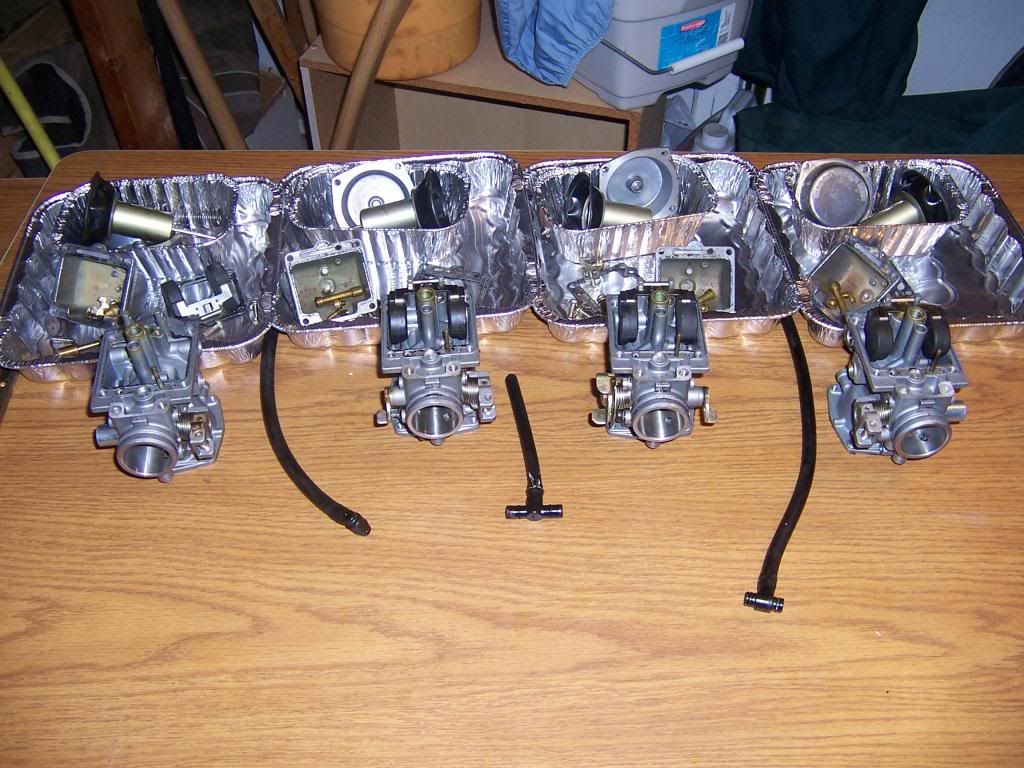
And closer up too ..
Comment
-
I wouldn't trust using just simple green and a sonic cleaner on the really gummed up carbs. A long soak has never discolored the carbs using the Berryman 901 product I described above.
I use this:

Not this:

They are NOT the same product. Absolutely no discoloration when using the 901. If you're really hard core and do a lot of parts cleaning you can also get the 5 gallon version as part number 905. The 901 is a replenisher for the 905.:

The 5 gallon 905 comes with metal strainer and is large enough that you could probably do an entire carb set at once.
After a dip I wash the carbs with hot water and then throw them, and all the parts I couldn't dip, into the sonic cleaner using straight Simple Green HD as the cleaning solution. After that I wash again, then squirt every passage with carb cleaner and poke every hole. Using the carb cleaner verifies that all the passages are clear and flow the same. Blow everything out with compressed air at the end.Last edited by JTGS850GL; 12-19-2014, 06:42 PM.http://img633.imageshack.us/img633/811/douMvs.jpg
1980 GS1000GT (Daily rider with a 1983 1100G engine)
1998 Honda ST1100 (Daily long distance rider)
1982 GS850GLZ (Daily rider when the weather is crap)
Darn, with so many daily riders it's hard to decide which one to jump on next.;)
JTGS850GL aka Julius
GS Resource Greetings
Comment
-
Looks like I will have to source some 901 cleaner to replenish the two cans I have here.
They are not doing too bad, but fresh stuff is oh, so much nicer.
.sigpic
mine: 2000 Honda GoldWing GL1500SE and 1980 GS850G'K' "Junior"
hers: 1982 GS850GL - "Angel" and 1969 Suzuki T250 Scrambler
#1 son: 1986 Yamaha Venture Royale 1300 and 1982 GS650GL "Rat Bagger"
#2 son: 1980 GS1000G
Family Portrait
Siblings and Spouses
Mom's first ride
Want a copy of my valve adjust spreadsheet for your 2-valve per cylinder engine? Send me an e-mail request (not a PM)
(Click on my username in the upper-left corner for e-mail info.)Comment
-
I dont worry about that slight greying. Most carbs we get are already well oxidated and greyish anyway, so whats the point.
I dip them, wash with hot soapy water, and then use the hemostats and some steel wool dipped in Berrymans B 12 to scrub the cracks and crevices clean and shiney. Then I hit the crab bodies on the wire wheel with a soft fine wire and the result is this.


 MY BIKES..1977 GS 750 B, 1978 GS 1000 C (X2)
1978 GS 1000 E, 1979 GS 1000 S, 1973 Yamaha TX 750, 1977 Kawasaki KZ 650B1, 1975 Honda GL1000 Goldwing, 1983 CB 650SC Nighthawk, 1972 Honda CB 350K4, 74 Honda CB550
NEVER SNEAK UP ON A SLEEPING DOG..NOT EVEN YOUR OWN.
I would rather trust my bike to a "QUACK" that KNOWS how to fix it rather than a book worm that THINKS HE KNOWS how to fix it.Comment
-
Ok, carbs are dipped and ultrasonic'ed and the float post has been repaired. Now I wonder whether the repair will hold up to ethanol which is in all of our gas now. Bigger question is how do I know if the float valves works correctly and I have a mix of different types and not sure whyComment
-
Pics of repair and details as to how you repaired it please?MY BIKES..1977 GS 750 B, 1978 GS 1000 C (X2)
1978 GS 1000 E, 1979 GS 1000 S, 1973 Yamaha TX 750, 1977 Kawasaki KZ 650B1, 1975 Honda GL1000 Goldwing, 1983 CB 650SC Nighthawk, 1972 Honda CB 350K4, 74 Honda CB550
NEVER SNEAK UP ON A SLEEPING DOG..NOT EVEN YOUR OWN.
I would rather trust my bike to a "QUACK" that KNOWS how to fix it rather than a book worm that THINKS HE KNOWS how to fix it.Comment
-
I followed what I saw on this site and others. It was a clean break off that had been glued back on and failed. I center punched both pieces, drilled hole in both, used a wood screw that I took the head off of and that was my dowel. Came out nicely and seems to be perfectly alignedComment
Comment