Announcement

Collapse
No announcement yet.

Headers won't slide into ports

Collapse
X
 
  • Filter
  • Time
  • Show
Clear All
new posts

    Headers won't slide into ports

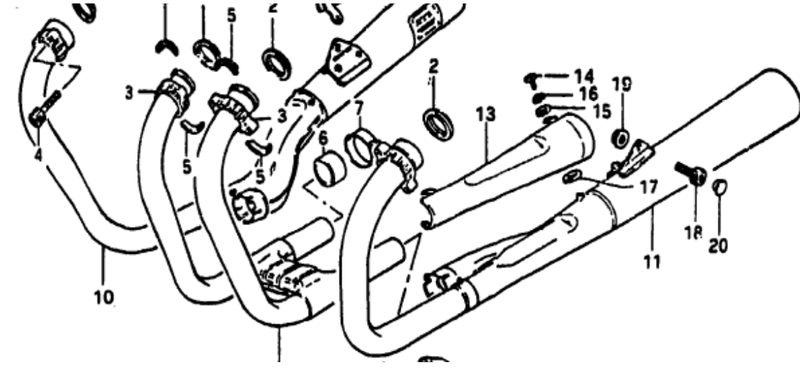
    Okay, what is the trick? I finally got around to putting the black chrome exhaust I picked up from Joe onto my 1100E. Everything was fine until I tried to slide the pipes into the exhaust ports. they go part of the way in and stop. I have tried wiggling and pounding them in with the heel of my hand but nothing moves that last half inch. I obviously don't want to pound with any tool that could dent the pipe. It seems like the most resistance is coming from 2 and 3, the two inside pipes with the little flange thingies you have to put on them. The flange pieces clear the hole; they are not catching, but they don't go in much farther.


    I get the feeling there is some simple technique here of which I am totally ignorant.
    ...
    Believe in truth. To abandon fact is to abandon freedom.

    Nature bats last.

    80 GS850G / 2010 Yamaha Majesty / 81 GS850G

    #2
    I don't recall, but I would guess you just snug them now with the bolts. It should take very little. If it binds pull it back out and recheck. Torque symmetrically of course.

    Comment


      #3
      A good dead blow hammer and pressure on all the flanges, drawing them down evenly, should get them started. The hammer I have is all vinyl and full of lead shot I guess. It won't dent or scratch the pipes but is a very handy tool.
      http://www.thegsresources.com/_forum...ine=1440711157'78 GS1000E, Dyna-S ignition, Dyna Green Coils, K&N pods, Delkevic SS 4-1 exhaust, Dynojet Stage 3 jet kit, Russell SS Brake Lines, Progressive suspension, Compu-Fire series Regulator 55402 and Advmonster cree LED headlight conversion.

      Comment


        #4
        Those middle pipes look awfully close to the frame cross brace.
        sigpic

        Don't say can't, as anything is possible with time and effort, but, if you don't have time things get tougher and require more effort.

        Comment


          #5
          The shims on the inside header belong on the outside of the flange
          1984 GS1100GK newest addition to the heard
          80 GS 1000gt- most favorite ride love this bike
          1978 GS1000E- Known as "RoadKill" , Finished :D
          83 gs750ed- first new purchase
          85 EX500- vintage track weapon
          1958Ducati 98 Tourismo
          “Remember When in doubt use full throttle, It may not improve the situation ,but it will end the suspense ,
          If it isn't going to make it faster or safer it isn't worth doing

          Comment


            #6
            Originally posted by hjfisk View Post
            The shims on the inside header belong on the outside of the flange
            Right, those shiny new shims go behind the ridge ring on the end of the pipes, between the ridge and the flange ring. You got them in the wrong place.
            They're used to push the pipe into the block.
            I have learn again this every few years with my 1990 GSX759F.

            Don, I'm disappointed in this failure of logical thinking on your part.
            "Only fe' collected the old way, has any value." from His Majesty O'Keefe (1954 film)
            1982 GS1100G- road bike, body, seat and suspension modded
            1990 GSX750F-(1127cc '92 GSXR engine) track bike, much re-engineered
            1987 Honda CBR600F Hurricane; hooligan bike, restored

            Comment


              #7
              Originally posted by hjfisk View Post
              The shims on the inside header belong on the outside of the flange
              Originally posted by Buffalo Bill View Post
              Right, those shiny new shims go behind the ridge ring on the end of the pipes, between the ridge and the flange ring. You got them in the wrong place.
              It may not be apparent from the picture, but those 'shims' are correctly placed. Haynes has a very good picture showing them on the pipe and there is really only one place they can fit. I used PVC tape to hold them together until I got them enough onto the port that they would stay on. I peeled the tape off because I thought it might be the cause of the binding but obviously not. They are called 'collet halves'. Personally I think 'flange thingies' is a much more descriptive term.

              I guess I will just pull the pipes back out, lube the port surface with some anti seize, find me a large delicate hammer, and .
              ...
              Last edited by dpep; 08-13-2015, 08:32 PM.
              Believe in truth. To abandon fact is to abandon freedom.

              Nature bats last.

              80 GS850G / 2010 Yamaha Majesty / 81 GS850G

              Comment


                #8
                Don, before you get "physical" with them, please humor us.
                Take the collet halves off, then slip the pipes into place, to see if they happen to fit better.

                If they do, put the collet halves back on the pipes (without removing the pipes from the head), then slip the collars over them and bolt them down.

                It's not real easy to use this picture as an assembly guide, but I think it's easy enough to see that Haynes got it wrong.
                The collets do not go between the pipes and the head, they go on the outside of the pipes, with the flange away from the engine.
                When the collar fits over the flange, it holds the pipe to the head, much like the split keepers on the tops of the valves.


                Of course, this assumes that you only have ONE gasket in each port.

                .
                Last edited by Steve; 08-13-2015, 08:59 PM.
                sigpic
                mine: 2000 Honda GoldWing GL1500SE and 1980 GS850G'K' "Junior"
                hers: 1982 GS850GL - "Angel" and 1969 Suzuki T250 Scrambler
                #1 son: 1986 Yamaha Venture Royale 1300 and 1982 GS650GL "Rat Bagger"
                #2 son: 1980 GS1000G
                Family Portrait
                Siblings and Spouses
                Mom's first ride
                Want a copy of my valve adjust spreadsheet for your 2-valve per cylinder engine? Send me an e-mail request (not a PM)
                (Click on my username in the upper-left corner for e-mail info.)

                Comment


                  #9
                  Haynes done it again? Why when there are manuals and parts finches available for free download?

                  Comment


                    #10
                    Originally posted by dpep View Post
                    It may not be apparent from the picture, but those 'shims' are correctly placed. Haynes has a very good picture showing them on the pipe and there is really only one place they can fit. I used PVC tape to hold them together until I got them enough onto the port that they would stay on. I peeled the tape off because I thought it might be the cause of the binding but obviously not. They are called 'collet halves'. Personally I think 'flange thingies' is a much more descriptive term.

                    I guess I will just pull the pipes back out, lube the port surface with some anti seize, find me a large delicate hammer, and .
                    ...
                    Just a suggestion here, you might try fitting the downpipes by themselves separately that might help see where the hang up is, I think I know what you mean by the collets fitting only one way in that they sit in a wide groove then the clamp pulls down on them, that is not what it seems in the diagram.
                    Looking at your picture the inside curve of the pipe looks like its contacting the frame cross brace.
                    sigpic

                    Don't say can't, as anything is possible with time and effort, but, if you don't have time things get tougher and require more effort.

                    Comment


                      #11
                      Originally posted by hjfisk View Post
                      The shims on the inside header belong on the outside of the flange
                      i agree with this. that is all.
                      2002 bmw r1150gs 1978 gs1000E skunk les pew 1979 gs1000L dragbike
                      82 gs1100L probably the next project
                      1980 gs1000G the ugly 1978 gs750E need any parts?
                      https://m.youtube.com/watch?v=m_m2oYJkx1A
                      1978 gs1000E skunk #2 RLAP
                      https://live.staticflickr.com/65535/...2f1debec_t.jpg

                      Comment


                        #12
                        Just to confirm what you guys are saying using the picture below.

                        The pipe on the left has the shims fitting in the groove between the two flanges that exist on the inside pipes as Haynes shows it and as what would seem logical as the shims are the exact width of that groove and there is no groove on the outside pipes which have only one flange.

                        The pipe in the middle has the shim being secured by a rubber band in the correct location.

                        The pipe on the right is one of the two outside pipes which have no front flange. If the middle pipe shim placement is correct the the logical question becomes why do the two middle pipes even have a front flange?


                        ...
                        Last edited by dpep; 08-14-2015, 05:13 PM.
                        Believe in truth. To abandon fact is to abandon freedom.

                        Nature bats last.

                        80 GS850G / 2010 Yamaha Majesty / 81 GS850G

                        Comment


                          #13
                          I'm wondering why the L & R pipes don't have a flange on the end. That gives a wider contact with the exhaust gasket ring.
                          On the GSXR and GSXF there's only the flange on the pipe end, and the example on the left is how it's done on those. Sometimes I tried to do it the way you have in the middle and it leaked, noisy too, but my GSX doesn't have that second outer flange.

                          Do you have exhaust gasket rings tucked into the cylinder head? Because I'm sure it needs them.
                          "Only fe' collected the old way, has any value." from His Majesty O'Keefe (1954 film)
                          1982 GS1100G- road bike, body, seat and suspension modded
                          1990 GSX750F-(1127cc '92 GSXR engine) track bike, much re-engineered
                          1987 Honda CBR600F Hurricane; hooligan bike, restored

                          Comment


                            #14
                            - you need copper washers in the exhaust port to seal

                            - put the #2 and #3 pipes in first

                            the #2 and #3 need the collets put in place before the clamp, but after the pipe is in place, (that is why they are split).

                            The one you have pictured and say it is in the correct position..... the collet is backwards

                            -#1 and #4 don't use collets, but they need sealing washers.
                            Last edited by derwood; 08-14-2015, 07:13 PM.
                            GSX1300R NT650 XV535

                            Comment


                              #15
                              I just put the stock exhaust on my GS 1000 today and it went together like derwood says. Your pic of the one on the left (#3) is what mine looked like as it was being installed. Agreed, the #2 cylinder collet looks backwards.
                              Larry

                              '79 GS 1000E
                              '93 Honda ST 1100 SOLD-- now residing in Arizona.
                              '18 Triumph Tiger 800 (gone too soon)
                              '19 Triumph Tiger 800 Christmas 2018 to me from me.
                              '01 BMW R1100RL project purchased from a friend, now for sale.

                              Comment

                              Working...
                              X