Announcement

Collapse
No announcement yet.

Budget carb/intake boots and tools

Collapse
X
 
  • Filter
  • Time
  • Show
Clear All
new posts

    Budget carb/intake boots and tools

    I know that you get what you pay for but these items are worth noting for people who can't afford the extra money. I found the intake boots from a Japanese company and fit great and look exactly like the originals. http://www.ebay.com/itm/131762875063

    I found this valve shim tool at as good price also... Still waiting for it to arrive in the next few days and will update it as soon as I get to try it out. http://www.ebay.com/itm/400952277802

    This carb screw driver I have not ordered but may still for future use..it's made for adjusting the screws on the bottom of the carburetor. http://www.ebay.com/itm/201644163716

    #2
    Wow I think I'm going to give those boots a try. Do the accept the same size O-rings?
    1980/1981 GS450 - GS500 Cylinder + Piston Swap - "De-L'ed", custom seat, CB350 bits, 18" rear, etc.
    1977 GS550
    1977 GS750 - Cross country trip thread

    Comment


      #3
      The boots look interesting, will have to see if they come for the bikes that I have.

      Good luck with the valve shim tool. I don't know if the tool for the Seca is the same size as the one for the GS, but I have enough problems using the one for the GS. I use a folded zip-tie with NO problems.

      That screw adjuster looks like the same Motion Pro tool that is available at Z1 for about the same money. I have one, have only used it once. On most of the VM carbs, you set the screws while the carbs are on the bench for the setup you have (airbox/pods and stock/aftermarket exhaust), put the carbs back on the bike, then fine-tune the mixture using the air screws on the sides of the carbs. There is very little need to adjust the screws on the bottom, but if you have an empty slot in your tool drawer that is just begging to be filled, ... go for it.

      .
      sigpic
      mine: 2000 Honda GoldWing GL1500SE and 1980 GS850G'K' "Junior"
      hers: 1982 GS850GL - "Angel" and 1969 Suzuki T250 Scrambler
      #1 son: 1986 Yamaha Venture Royale 1300 and 1982 GS650GL "Rat Bagger"
      #2 son: 1980 GS1000G
      Family Portrait
      Siblings and Spouses
      Mom's first ride
      Want a copy of my valve adjust spreadsheet for your 2-valve per cylinder engine? Send me an e-mail request (not a PM)
      (Click on my username in the upper-left corner for e-mail info.)

      Comment


        #4
        Originally posted by Steve View Post
        The boots look interesting, will have to see if they come for the bikes that I have.

        Good luck with the valve shim tool. I don't know if the tool for the Seca is the same size as the one for the GS, but I have enough problems using the one for the GS. I use a folded zip-tie with NO problems.

        That screw adjuster looks like the same Motion Pro tool that is available at Z1 for about the same money. I have one, have only used it once. On most of the VM carbs, you set the screws while the carbs are on the bench for the setup you have (airbox/pods and stock/aftermarket exhaust), put the carbs back on the bike, then fine-tune the mixture using the air screws on the sides of the carbs. There is very little need to adjust the screws on the bottom, but if you have an empty slot in your tool drawer that is just begging to be filled, ... go for it.

        .
        How do you use a folded zip tie to depress valve shim buckets?
        Current Rides: 82 GS1100E, 00 Triumph 955 Speed Triple:twistedevil:, 03 Kawasaki ZRX1200, 01 Honda GL1800, '15 Kawasaki 1000 Versys
        Past Rides: 72 Honda SL-125, Kawasaki KE-175, 77 GS750 with total yosh stage 1 kit, 79 GS1000s, 80 GS1000S, 82 GS750e,82 GS1000S, 84 VF500f, 86 FZR600, 95 Triumph Sprint 900,96 Triumph Sprint, 97 Triumph Sprint, 01 Kawasaki ZRX1200, 07 Triumph Tiger 1050, 01 Yam YFZ250F
        Work in progress: 78 GS1000, unknown year GS1100ES

        Comment


          #5
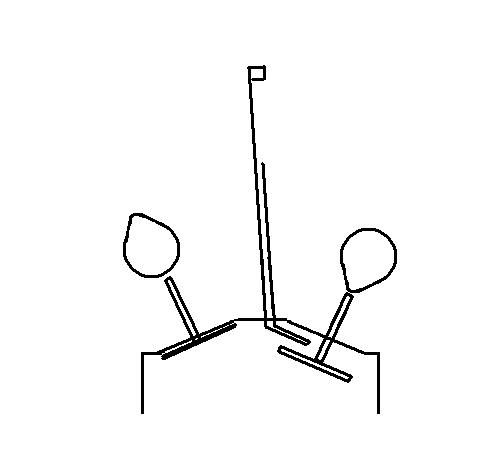
          Select a decently-long (about 10-12") zip tie.
          Fold it at half-length to double its thickness.
          Use tape or heat shrink to hold it folded.
          Put another fold about 1/2-3/4" from the folded end, about 45 degrees of bend is plenty.
          Remove the spark plugs. It's easier to turn the crank, so they should be out, anyway.
          Rotate the crank so the cam is fully-depressing the desired valve.
          Insert the folded end of the zip-tie between the edge of the valve that you can see through the plug hole and the head.
          Rotate the crank one full turn, the cam lobe will be pointing away from the valve.
          Remove/inspect/change the shim.
          Rotate the crank one full turn, pull the zip-tie out.
          Repeat as necessary.

          Here is a simple drawing that might help you see the concept:


          Some have tried it and claimed that it is a LOT of crank-turning. Yes, it is, but only the first time you do any particular bike. You will have to give the crank two full turns to inspect/change each shim, and additional partial turns to line up the next valve. But you only have to do the first time. After that, thanks to my handy-dandy spreadsheet (see info in my sig), you will KNOW what is in there and you will KNOW what the clearances were when you last did the valves, so you will have shims already purchased for potential candidates. And, since you might only have to change two or three shims the next time through, that is a whopping four or six turns of the crank.

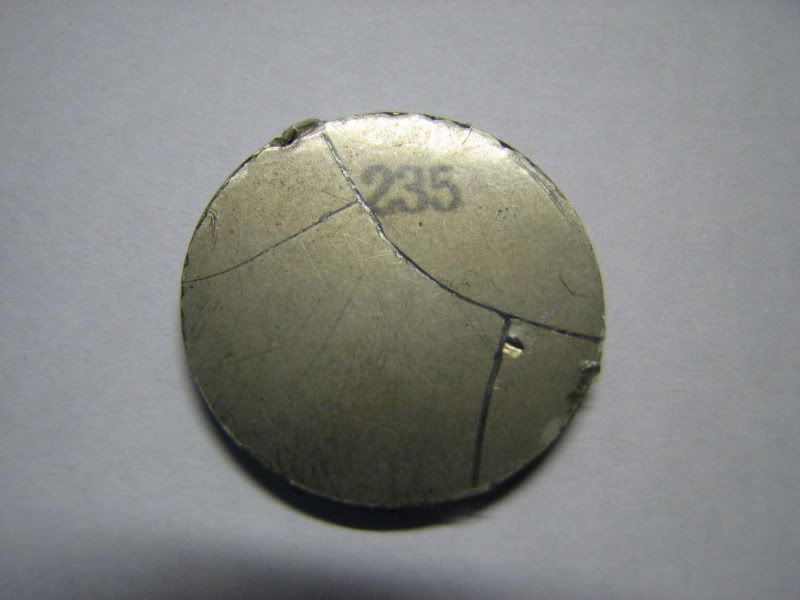
          To me, the security of not having the "official tool" slip off the side of the bucket, potentially shattering the shim is definitely worth a little bit of crank turning.

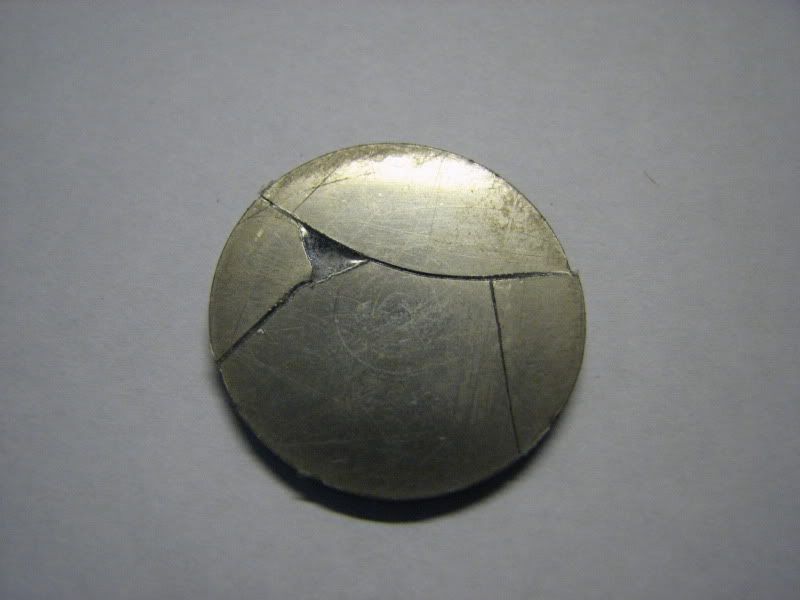
          Here is an example of what can happen if a shim is not quite fully-seated and you bump the tool off the bucket:


          This was on a previous Kawasaki, not a GS, but the concept is the same. I spent several minutes fishing with a magnet, then several more minutes assembling pieces to see how much I had found. I was satisfied that I was not going to find much more, and did not feel that the missing pieces were much of a danger, so I continued with my adjustment with a new shim.

          .
          sigpic
          mine: 2000 Honda GoldWing GL1500SE and 1980 GS850G'K' "Junior"
          hers: 1982 GS850GL - "Angel" and 1969 Suzuki T250 Scrambler
          #1 son: 1986 Yamaha Venture Royale 1300 and 1982 GS650GL "Rat Bagger"
          #2 son: 1980 GS1000G
          Family Portrait
          Siblings and Spouses
          Mom's first ride
          Want a copy of my valve adjust spreadsheet for your 2-valve per cylinder engine? Send me an e-mail request (not a PM)
          (Click on my username in the upper-left corner for e-mail info.)

          Comment


            #6
            Thank you!
            Current Rides: 82 GS1100E, 00 Triumph 955 Speed Triple:twistedevil:, 03 Kawasaki ZRX1200, 01 Honda GL1800, '15 Kawasaki 1000 Versys
            Past Rides: 72 Honda SL-125, Kawasaki KE-175, 77 GS750 with total yosh stage 1 kit, 79 GS1000s, 80 GS1000S, 82 GS750e,82 GS1000S, 84 VF500f, 86 FZR600, 95 Triumph Sprint 900,96 Triumph Sprint, 97 Triumph Sprint, 01 Kawasaki ZRX1200, 07 Triumph Tiger 1050, 01 Yam YFZ250F
            Work in progress: 78 GS1000, unknown year GS1100ES

            Comment


              #7
              Originally posted by sam000lee View Post
              Wow I think I'm going to give those boots a try. Do the accept the same size O-rings?
              The boots fit perfectly and the only difference I found was the fact it didn't have the Suzuki "S" on them... O- rings fit also just fine...I would have replaced them also but I had bought a new set from Robert Barr just a few months before

              Comment


                #8
                good find, alot of these pattern parts are actually of excellent quality, and getting better all the time.
                1983 GS 1100 ESD :D

                Comment


                  #9
                  Cruzinimage is his store's name. I've bought piston rings, chains, cables, carb boots, small rubber parts, etc at a fraction of the price of some other places. Delivery from Japan is faster than some places I have purchased from in America.
                  80 gs1100 16-v ported & polished, 1 mm oversize intake valves, 1150 carbs w/Dynojet stage 3, plus Bandit/gsxr upgrades

                  Comment


                    #10
                    Got my boots and installed them - So far so good Orings from cycleorings fit well. I didn't do a leak test or anything but the fit is good and the rubber is soft.


                    1980/1981 GS450 - GS500 Cylinder + Piston Swap - "De-L'ed", custom seat, CB350 bits, 18" rear, etc.
                    1977 GS550
                    1977 GS750 - Cross country trip thread

                    Comment


                      #11
                      Good to hear. Could you please do a review of them after you've had them on the bike for a few months and done some miles with them, thanks.
                      Rob
                      1983 1100ES, 98' ST1100, 02' DR-Z400E and a few other 'bits and pieces'
                      Are you on the GSR Google Earth Map yet? http://www.thegsresources.com/_forum...d.php?t=170533

                      Comment


                        #12
                        Originally posted by azr View Post
                        Good to hear. Could you please do a review of them after you've had them on the bike for a few months and done some miles with them, thanks.

                        Yup will do. Hoping to take the GS750 on a 4/5 day camping trip this weekend so will get some quality time with my new boots.
                        1980/1981 GS450 - GS500 Cylinder + Piston Swap - "De-L'ed", custom seat, CB350 bits, 18" rear, etc.
                        1977 GS550
                        1977 GS750 - Cross country trip thread

                        Comment

                        Working...
                        X