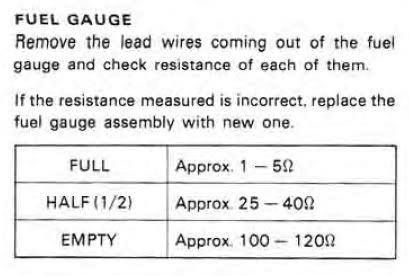
How much work would it be to convert the fuel gauge on a GS1100 or other model to work as a voltmeter at the flip of a switch? I assume there is some sort of resistance required to make it work without creating a dead short and going up in smoke. I know Kawasaki had this feature on their tachometers for many years. It would be an elegant solution to use the stock GS gauge for a secondary function. I think my GS1100 Haynes manual has the working resistances for the fuel sender from empty to full. How would you go about mimicking this with a simple circuit which could be switched in and out?
-
-
Doing this would be a little more involved than adjusting the resistances. This works well for the fuel gauge because it simply uses a potentiometer to compare the fuel level derived voltage to the bike running voltage. Problem is, if you want 3/4 tank on your gas gauge to be 12v for example, you would have no reference voltage to keep it there as ur bike voltage varies with RPM. To do this you would need to regulate a voltage down, the same thing the electronic tach does on our bikes. Not a big deal, just a little more involved. Either way, i like the idea! -
I love this idea!
I would probably leave my fuel gauge on voltmeter most of the time.
Electrical gurus, please work this out!!!Comment
-
Before you go re-arranging a few wires, please be aware that the fuel gauge uses a separate 7 volt regulator to power it.
Simply moving wires to read battery voltage might have catastrophic (or dogastrophic) consequences.
Not saying it can't be done, just be aware of what you are getting into.
.sigpic
mine: 2000 Honda GoldWing GL1500SE and 1980 GS850G'K' "Junior"
hers: 1982 GS850GL - "Angel" and 1969 Suzuki T250 Scrambler
#1 son: 1986 Yamaha Venture Royale 1300 and 1982 GS650GL "Rat Bagger"
#2 son: 1980 GS1000G
Family Portrait
Siblings and Spouses
Mom's first ride
Want a copy of my valve adjust spreadsheet for your 2-valve per cylinder engine? Send me an e-mail request (not a PM)
(Click on my username in the upper-left corner for e-mail info.)Comment
-
My manual states that the action of the gauge is heavily damped so that the needle stays in the position it was in when shut off. This might lead to some sluggish response if it could be done. I'm guessing the oil temp gauge would be a similar setup?Comment
-
sigpic
mine: 2000 Honda GoldWing GL1500SE and 1980 GS850G'K' "Junior"
hers: 1982 GS850GL - "Angel" and 1969 Suzuki T250 Scrambler
#1 son: 1986 Yamaha Venture Royale 1300 and 1982 GS650GL "Rat Bagger"
#2 son: 1980 GS1000G
Family Portrait
Siblings and Spouses
Mom's first ride
Want a copy of my valve adjust spreadsheet for your 2-valve per cylinder engine? Send me an e-mail request (not a PM)
(Click on my username in the upper-left corner for e-mail info.)Comment
-
Ok. Bypass the fuel sender. Put full voltage to the gauge through enough resistance so that 13.5v reads 3/4 sweep, leaving some range to display an overcharging condition. Maybe protect the gauge with a zener diode in case the regulator fails and lets the voltage spike really high. I suppose you will need to find the internal resistance of the gauge to properly size the resistors.Comment
-
I did some calculations and it looks like you will need an op amp drive the output of the gauge.
The gauge goes to full deflection when there is max current. Max current occurs when the gauge ouput is at zero voltage. So the op amp is needed to scale and invert the battery voltage with the voltage reference (e.g. 8V) being the minimum output and zero volts providing the maximum output.Comment
-
Well, the fuel gauge is extremely sluggish when tested with a 9v battery. This is desirable behavior for a gas gauge as you don't want it flopping around with every bump induced change in the fuel level. The oil temp gauge jumps quite ferociously however. Not much help for those without one I'm afraid. There are five wires going to the gauge. Gray and Black/White provides power to the gauge light, while Black/White, Orange and Pink operates the gauge itself. Pink goes to the oil temp sensor, so I guess it is acting as a variable resistance drain to ground which alters current flow through the gauge. Sadly, the manual gives no resistance readings for the oil temp sensor, and i wouldn't have a clue as to how to set up the op amp to invert the voltage signal or scale it to provide a proper gate/base input.Last edited by Guest; 03-30-2012, 05:05 PM.Comment

Comment