Announcement

Collapse
No announcement yet.

GS1150 headlight (train light) install

Collapse
X
 
  • Filter
  • Time
  • Show
Clear All
new posts

    GS1150 headlight (train light) install

    I am installing the very large headlight from a GS1150 on a RYCA CS-1 (LS650 Savage-based cafe racer). I didn't get all the parts for the complete headlight assembly.

    What is supposed to go in the rectangular hole?

    I suspect the round holes are for wiring. Are those holes supposed to have grommets or edge liners, etc.?
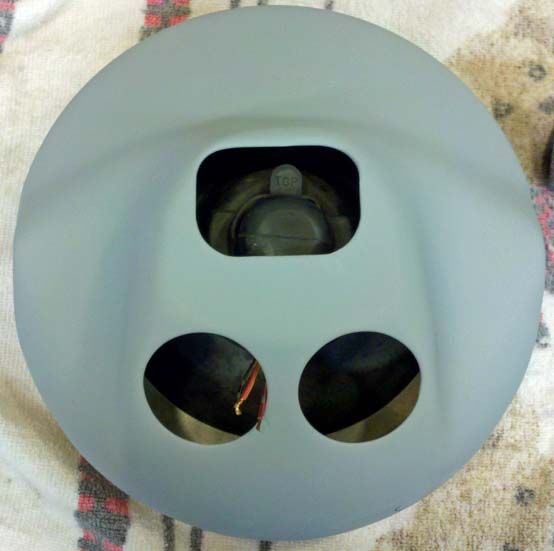
    Last edited by Guest; 10-15-2012, 12:40 PM. Reason: typos

    #2
    I just checked my '82 GS1100EZ which has a train light. And I was surprised to find out that absolutely nothing fits on the hole, no grommets etc. or either of the other two holes, it's just a pass through for the wiring. I'd take a picture, but the head light assembly almost butts up against the gauge cluster so you wouldn't be able to see much if anything.
    Here's the parts fische.

    sigpic
    Steve
    "The world is a book, and those who do not travel read only one page." :cool:
    _________________
    '79 GS1000EN
    '82 GS1100EZ

    Comment


      #3
      Originally posted by sedelen View Post
      I just checked my '82 GS1100EZ which has a train light. And I was surprised to find out that absolutely nothing fits on the hole, no grommets etc. or either of the other two holes, it's just a pass through for the wiring......Here's the parts fische.

      http://www.boulevardsuzuki.com/fiche...1984&fveh=2162


      Thanks for the comment and the reference. I have seen that parts diagram at various sites and I just assumed the angle just wasn't right.

      I think I'll carve a rectangular block to fit in that rectangular hole. I suspect that hole is there to allow access to the bulb for replacement. I have a piece of old mudflap about 1/4" thick that ought to do the trick.

      The other two holes are for wiring, I would assume. I'll block one of them off, and put some edge protection on the other (or a grommet) to protect the wires.

      I'll be using an HID headlight system.
      -- The charging system on the LS650 Savage is not very strong.
      -- An HID system takes about half the watts of a standard H4 bulb.
      -- I need the electrical "headroom" for an electric jacket. I want to ride this thing year-round.


      There appears to be plenty of room in that bucket for HID paraphernalia. Think how bright the night will be with an HID system spewing light from an 8" reflector!!
      Last edited by Guest; 10-15-2012, 12:45 PM.

      Comment


        #4
        You may want to consider just which wires go through that hole.
        On mine all the turn signal wires go through it, the right handlebar switching wires go through it, the front brake switch wire goes through it, one comes up from the chassis but I have looked too hard to see what that is and the big bulky gauge cluster wires go through it, along with the big plastic connectors.

        As far as it being there for the bulb replacement, I'll just say this, I don't think so. It's far easier if you remove the chrome rim and remove the headlight as an assembly, I can even imagine doing it any other way. You would have to disconnect all those wires to remove them, mine are held in place with bendable clamps (which means you go to remove the headlight assembly from the shell anyway) and work the bulb and boot out and the new one in. Then you got to figure out how to connect all those wiring connectors and feed them back through.
        sigpic
        Steve
        "The world is a book, and those who do not travel read only one page." :cool:
        _________________
        '79 GS1000EN
        '82 GS1100EZ

        Comment


          #5
          You may want to consider just which wires go through that hole. It's really simple on this RYCA conversion. The only wires that will go inside the bucket are the wires for the H4 bulb and for the turn signals.


          As far as it being there for the bulb replacement, I'll just say this, I don't think so. That may well be the case. I was just commenting that the way it appears on this unit so far, is that you could reach in there, pull the three-connector plug off the back of the bulb, slide the rubber cover out of the way, pull the bulb out and replace it, then reassemble. I agree with you, though, it is not all that big a deal to pop the assembly out of the bucket and have free/easy access to everything. Using this procedure makes even more reason to block off that hole for weather-resistance purposes, eh?
          Last edited by Guest; 10-15-2012, 05:04 PM. Reason: typo

          Comment


            #6
            Nope. There are two screws on the rim of the reflector that allows you to drop the entire lens out the front. Then you rotate the bulb to unlock it from the reflector. Done it a few times.

            Comment


              #7
              Originally posted by koolaid_kid View Post
              Nope. There are two screws on the rim of the reflector that allows you to drop the entire lens out the front. Then you rotate the bulb to unlock it from the reflector. Done it a few times.
              My two screws are back from the rim on the outside at about a 4 & 8 o'clock position but attach to the rim on the inside, but that's the way to do it for sure. I think were talking about the same thing.
              The only one I have on the rim adjusts the headlight beam.
              But I've only done it once.
              sigpic
              Steve
              "The world is a book, and those who do not travel read only one page." :cool:
              _________________
              '79 GS1000EN
              '82 GS1100EZ

              Comment


                #8
                Yes, we are talking about the same thing but in different words.

                Comment


                  #9
                  Another issue for this install is brackets. How best to attach this thing to the bike. There are several versions of fork-mounted brackets. I'd like to have something that has some rubber in it somewhere for vibration reduction, but I don't want it to look like something a bridge engineer would create.

                  The distance between the sides of the bucket where the mounting bolts go is 8 7/8" which is exactly the same distance from the outer edges of the forks. The distance between the inside edges of the forks is 6".

                  This will take some ingenuity to have it function well, yet not look dorky.
                  Last edited by Guest; 10-17-2012, 09:17 AM.

                  Comment

                  Working...
                  X