Announcement
Collapse
No announcement yet.
GS1000 regulator
Collapse
X
-
GS1000 regulator
I have been looking on the forum and trying to decide if I want to replace my regulator. From the pictures and tutorial's I have seen all the ones that people replace are smaller than the one on my bike and in a different place. I have a 1980 GS1000E and the regulator is located on the left side under the side cover. It is larger than the ones I have seen on 850's and others. Did Suzuki use a different one on the E model? Do they all need to be replaced no matter what because they are the NOS ones? The bike has 7000 miles since new and I pulled it off and looked at the back side and cleaned any corrosion that was there as well as all the grounds. Any advise would be great. I am planning 2 very long trips this summer and I want to make sure they will be trouble free.Tags: None
-
Mine's still working fine after 35 years
The stator got replaced after 3 years1978 GS 1000 (since new)
1979 GS 1000 (The Fridge, superbike replica project)
1978 GS 1000 (parts)
1981 GS 850 (anyone want a project?)
1981 GPZ 550 (backroad screamer)
1970 450 Mk IIID (THUMP!)
2007 DRz 400S
1999 ATK 490ES
1994 DR 350SES
-
The need to change the regulator is directly influenced by testing the voltage of the electrical system while the engine is running at a few specific speeds.
If the voltage is not within spec and some routine preventive/corrective measures do not fix the problem, replace the regulator.
That does not matter if it is the original regulator or a replacement unit. Just because it has been replaced once does not mean it's immune from further replacement.
.sigpic
mine: 2000 Honda GoldWing GL1500SE and 1980 GS850G'K' "Junior"
hers: 1982 GS850GL - "Angel" and 1969 Suzuki T250 Scrambler
#1 son: 1986 Yamaha Venture Royale 1300 and 1982 GS650GL "Rat Bagger"
#2 son: 1980 GS1000G
Family Portrait
Siblings and Spouses
Mom's first ride
Want a copy of my valve adjust spreadsheet for your 2-valve per cylinder engine? Send me an e-mail request (not a PM)
(Click on my username in the upper-left corner for e-mail info.)
Comment
-
Suzuki was very creative with R/R size and placement- plus some owners had their own ideas. A Shindengen R/R ( 30 yearold one) is about 3 inch by 3.25 inch typically.Originally posted by bomber737 View PostI have been looking on the forum and trying to decide if I want to replace my regulator. From the pictures and tutorial's I have seen all the ones that people replace are smaller than the one on my bike and in a different place.
As was mentioned ,test regularly. If you want piece of mind, install an onboard voltmeter- this will likely give you warning signs when your charging system is failing.1981 gs650L
"We are all born ignorant, but you have to work hard to stay stupid" Ben Franklin
Comment
-
The Suzuki RR's were a poor design and will eventually fail, often allowing too much voltage causing batteries to boil off fluid or destroying the stater. The newer series type RR's seem to be the answer to the problems. Maintenance still requires a good cleaning or replacement of harness wiring connectors that may have heated up due to corrosion in the connectors or switches. This causes low voltage high current connections that often results in discolored or blackened connectors. You should go through the harness connectors on any old bike to eliminate hidden problems before you begin testing for electrical issues. It eliminates a lot of tail chasing and wasted effort.http://www.thegsresources.com/_forum...ine=1440711157'78 GS1000E, Dyna-S ignition, Dyna Green Coils, K&N pods, Delkevic SS 4-1 exhaust, Dynojet Stage 3 jet kit, Russell SS Brake Lines, Progressive suspension, Compu-Fire series Regulator 55402 and Advmonster cree LED headlight conversion.
Comment
-
 SVSooke
OP has the old style separate regulator and rectifier.

Like the ones on the plate,the rectifier is sticking out at 90 degrees.The regulator is the one above it.Still debating whether to use these or a R/R.
Comment
-
I had that type on my '78 and '79, both failed, ruining a battery and a stater.http://www.thegsresources.com/_forum...ine=1440711157'78 GS1000E, Dyna-S ignition, Dyna Green Coils, K&N pods, Delkevic SS 4-1 exhaust, Dynojet Stage 3 jet kit, Russell SS Brake Lines, Progressive suspension, Compu-Fire series Regulator 55402 and Advmonster cree LED headlight conversion.
Comment
-
 bomber737
I did just install a volt meter so I can watch the system while I am riding. I soldered it to the low beam leads of the headlight since I wanted switched power and it reads 10.5 volts with the engine not running. If I find it does not read what it should in the future I will move the leads to the meter to some place else but for now this seems to work well. I have included a picture of the placement of my regulator. It looks like its different than other bikes I have seen.
[IMG]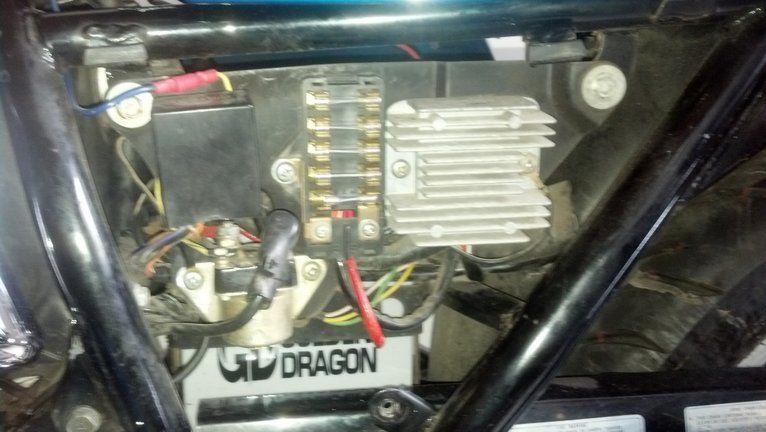 [/IMG]
[IMG]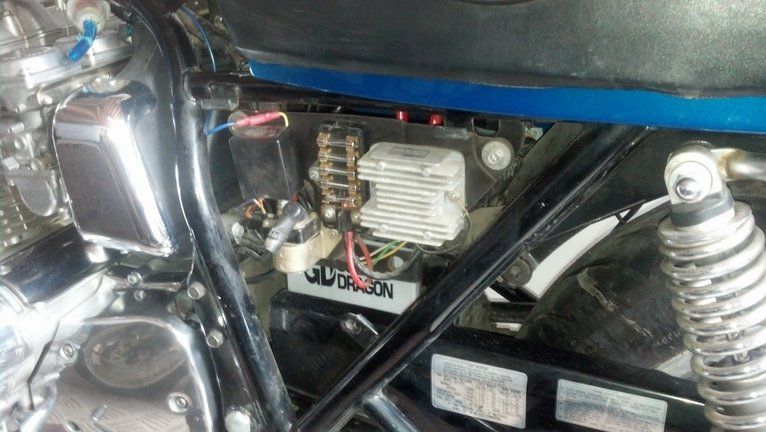 [/IMG]
[IMG]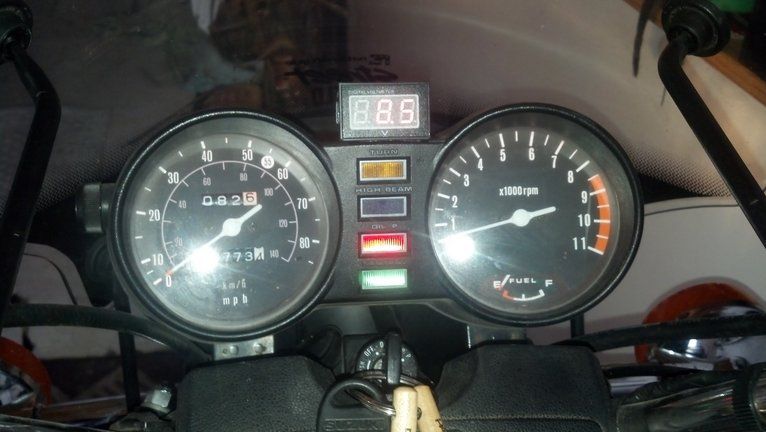 [/IMG]
Last edited by Guest; 02-25-2013, 12:02 PM.
Comment
-
That R/R looks like a bead blasted Shindengen- does the sticker on it say something like SH-....? It's a good size- better than stock!
The switched lead off of key switch would give you closer to actual battery voltage reading- likely hiding in headlight bucket.
Edit; On second thought, it looks to be a NIppon Denso unit, maybe 32800-34210 ?? stock on my 650, lasted 30 years , but failed. Start looking for replacement ( the Shindengens are superior)1981 gs650L
"We are all born ignorant, but you have to work hard to stay stupid" Ben Franklin
Comment
-
 bomber737
I did not bead blast the regulator. It is exactly as it came to me and it is exactly as it came from the dealer. I got the bike with 3700 miles on it from the original owner. I will look and see if it is a sh or a denso. Have any idea what color the switched wire out of the ignition switch is?
Comment
-
 bomber737
So here is a picture of the regulator that I have on my bike. I think from the markings that is must be a denso. If it is does that mean it is more prone to failure?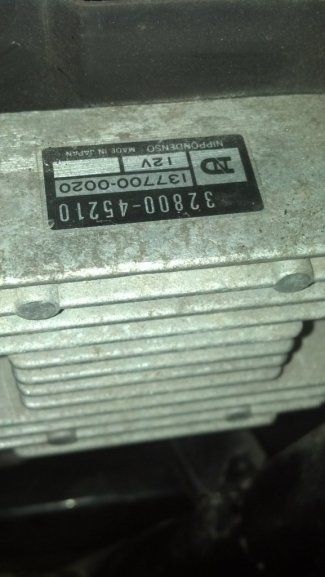
Comment
-
I changed mine out to the Honda unit recommended on this forum. It was the same size and fit fine. It also had a sixth sensor wire that I hooked to the taillight. I soldered the stator wires directly to the R/R bypassing the vestigial headlight loop. Fortunately my stator was OK. Followed all the instructions in The Stator Papers. It works great.NO PIC THANKS TO FOTO BUCKET FOR BEING RIDICULOUS
Current Rides: 1980 Suzuki GS1000ET, 2009 Yamaha FZ1, 1983 Honda CB1100F, 2006 H-D Fatboy
Previous Rides: 1972 Yamaha DS7, 1977 Yamaha RD400D, '79 RD400F Daytona Special, '82 RD350LC, 1980 Suzuki GS1000E (sold that one), 1982 Honda CB900F, 1984 Kawasaki GPZ900R
Comment
-
Forum LongTimerGSResource Superstar
Past Site Supporter- Oct 2006
- 13994
- London, UK to Redondo Beach, California
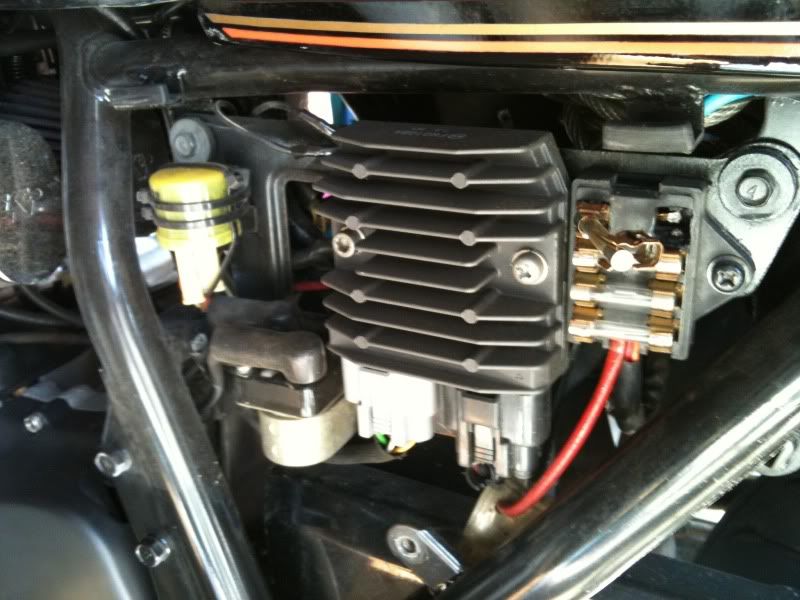
The shindengen fits ok with a strap & a few washers on that model.... The strap & approx 5mm of washers/spacer go on the left bolt. The right bolt uses a longer bolt that also goes through the fusebox.
The fuse box fault shown in the picture is common & is caused by wires moving around degrading the plastic. Cure was to fill the back of the fuse box with epoxy after re-soldering.
 1980 GS1000G - Sold
1978 GS1000E - Finished!
1980 GS550E - Fixed & given to a friend
1983 GS750ES Special - Sold
2009 KLR 650 - Sold - gone to TX!
1982 GS1100G - Rebuilt and finished. - Sold
2009 TE610 - Dual Sporting around dreaming of Dakar..... - FOR SALE!
www.parasiticsanalytics.com
TWINPOT BRAKE UPGRADE LINKY: http://www.thegsresources.com/_forum...e-on-78-Skunk/
Comment
-
 bomber737
I guess I have some things to think about. Thanks for everyone's input. I think I will just keep what I have for the time being and keep a watch on it with the volt meter. What I would really want to do before riding season is change out the fuse block with a spade type so now its off to look for a thread about that. Thanks again guys
Comment
-
 gremlin
if you have a napa auto parts store, they will have a blade type fuse panel that will fit on the bike. just make sure its water tight. it will last longer.
Part Number: NW 785210
Product Line: NAPA Wire Products
Attributes:
# Terminals : 6 Circuit ATO / ATC LED Fuse Panel
Amp Rating : 30 Amps per Circuit, 100 Amps Max Input
Contents : (1) Fuse Panel w/ Cover
Manufacturer Part Number : 31076-7
Product Application : Accessory Installation
Style Name : ATO / ATC Fuse Panels w/ LED Indicators
Type : ATO / ATC Fuse Panels w/ LED Indicators
Warranty:
Comment
.png)
Comment