Announcement

Collapse
No announcement yet.

Solid State Power Box STANDARD INSTALLATION

Collapse
X
 
  • Filter
  • Time
  • Show
Clear All
new posts

    #31
    Originally posted by salty_monk View Post
    Jim,

    Did you ever figure out something on charging back through the accessory port or is this still a No No?

    Just so I know, not bothered either way as I will just leave my SAE pigtail connected to the battery if so.

    By the way - I've done many thousands of miles on bikes with posi-tite & posi-tap connectors for non essentials (heated grips, relay trigger switches etc) & at this stage I think I'd trust one as a permanent connection for anything... They do waterproof ones now too which should be as good as anything out there....

    Dan,
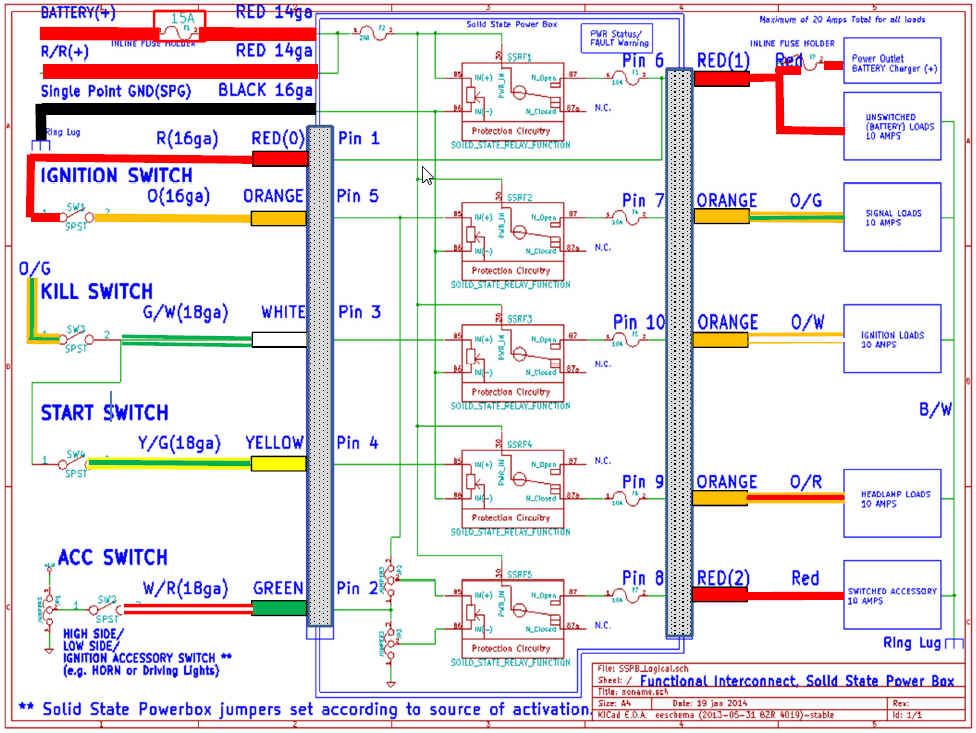
    Yes you can charge back through the Pin 6 or Pin 1. They are electrically the same inside of the SSPB. That is how mine is hooked up and what is shown on the functional diagram.

    The issue you are referring to is that there is a not a full 10 amp limit charging on pin 1 and 6; it is closer to 6 amps. The SSPB would handle 10 amps going out, but since I can't control the charging going in I put a reset able fuse limited to 10 amps /10 sec, or 6 amps/100 sec or 4.75 amps/1000, or 4 amps/10,000 sec etc...

    Charging a battery you should not be exceeding about .25C ; for a 14 ampHr battery that is 3.5 amps; in steady state the trickle charger is closer to 1-2 amps max.

    This only applies to the unswitched power pins 1 and 6. You should not try and charge from any other pin as the internal protections will not work. So either put a charger on either of these two pins or run the charger direct to the battery. For a power socket that is used to charge the battery (current going in) or charge an Iphone (current coming out) use only pins 1 or 6.

    look at upper right hand corner to see charger connection.


    Jim

    Comment


      #32
      Originally posted by TooManyToys View Post
      There is always a different way .....

      You did a good job on the videos and the work in it. For the uninitiated they should have no issue after reviewing them. I was throwing some items out for others information.

      My (our) experience with options 1 and 2 was the folding of the sleeve never gave a good solid crimp like the full barrel. With the full barrel even the worst of the guys still had a good connection. I also still apply a light amount of solder to a crimped connection rather then worry about an oxidation issue later on.

      For the Posi-Locks we used them under the hood as well as connecting to ABS wheel sensors to acquire wheel speed. They were quite good ..... but if it was a long term test vehicle, the Posi was replaced with a soldered, wrapped joint. We just could not take the chance of bad test data. Behind a dash I've had no problem in considering them as permanent.

      If I was splicing into the harness like the videos the only thing I would do differently is not use the wire ties and the overall shrink tube. I would use non-adhesive harness tape (often on eBay) and wrap the bundle with the ends tied off. It would permit the bundle to bend a little better, although it takes some skill to do that well.

      But well done, Jim. Very well done.
      Thanks you for the complements. I was a little tedious with it but I wanted to show a simple way to get a reasonable result.

      Yea, I don't particularly like the zip ties under the heat shrink, but the heat shrink is not bad. Yes I guess the non adhesive tape would be more flexible but in the end I was trying to immobilize/support the wire attached to the solder joints and so being a little stiffer would be my choice if I was not planing to crimp.

      I assume this is the stuff you are referring to?


      I can see the the barrel crimps would be much stronger than the brass open barrel crimps. But I wonder if after installing 10 in a single bundle that they would not be a little less bulky and probably provide enough support as a unit especially if covered with heat shrink.

      Don't know if you had a chance to look at the crimp guide?
      Last edited by posplayr; 02-03-2014, 09:34 PM.

      Comment


        #33
        Yes, that's an example of the tape. You can either tie off the ends or use a brush on adhesive to lock it down.

        After reading the crimp guide no one should have any excuse for not doing it right. Another great job.

        Comment


          #34
          Originally posted by TooManyToys View Post
          Yes, that's an example of the tape. You can either tie off the ends or use a brush on adhesive to lock it down.

          After reading the crimp guide no one should have any excuse for not doing it right. Another great job.
          Thanks for the comments, I put quite a bit of work into that. Not sure if you got the whole story but I also bought the proper MOLEX crimper although it is now obsolete ($65 off ebay). The inexpensive ebay crimper (also available for $27 from Amazon) is the best option above all else it would appear for these little MOLEX pins. The pins are so small that you really need jaws that come together in parallel with each other rather than the scissor action most crimper make. The updated MOLEX crimper closes the jaws end wise but in parallel. They are $235 I dont plan on buying them

          I crimped and soldered about 150 Molex pins Tues night . They are coming out well just using the ETC-39.
          1. Jaw D and then E for the conductor
          2. Jaw C for the insulator.
          3. A little solder flowed into the crimp using a heat sink clip on the insulation crimp.


          This is turning out to be a very versatile crimp er for the DIYer. It does not do dual crimps (for conductor and insulation together) but that is the good news. Since it is single jawed you can mix and match sizes depending upon your crimp and wire. It also has a parallelogram design that keeps the jaws parallel as they compress.

          I also use it for crimping a single 14 ga and two 16 ga wires into a single 10-12 ga crimp for the Single Point Ground (SPG) harness. It takes a while to get the knack of it but you can get a good crimp when using a little solder.

          Last edited by posplayr; 02-06-2014, 01:55 PM.

          Comment


            #35


            1983 GS 1100E w/ 1230 kit, .340 lift Web Cams, Ape heavy duty valve springs, 83 1100 head with 1.5mm oversized SS intake valves, 1150 crank, Vance and Hines 1150 SuperHub, Star Racing high volume oil pump gears, 36mm carebs Dynojet stage 3 jet kit, Posplayr's SSPB, Progressive rear shocks and fork springs, Dyna 2000, Dynatek green coils and Vance & Hines 4-1 exhaust.
            1985 GS1150ES stock with 85 Red E bodywork.

            Comment


              #36


              1983 GS 1100E w/ 1230 kit, .340 lift Web Cams, Ape heavy duty valve springs, 83 1100 head with 1.5mm oversized SS intake valves, 1150 crank, Vance and Hines 1150 SuperHub, Star Racing high volume oil pump gears, 36mm carebs Dynojet stage 3 jet kit, Posplayr's SSPB, Progressive rear shocks and fork springs, Dyna 2000, Dynatek green coils and Vance & Hines 4-1 exhaust.
              1985 GS1150ES stock with 85 Red E bodywork.

              Comment


                #37
                I installed the SSPB today and I am very happy with the results.
                I had to uninstall the old coil relay mod and bring it back to stock.
                While there I tidied up my connections on my Dyna 2000.
                Cut off the old Red connection for the R/R and capped it off with shrink wrap.
                I ended up cutting out the dingy old plug in the headlight bucket and wired in the headlight auto-off when you start the bike.
                Soldered in the new plug for the SSPB which includes an extra hot and a switched hot for whatever your heart desires.
                Jim also gives you an option for an ACC in the bucket when you follow his instructions. You can change how it is switched under the SSPB cover.
                The bike started right up and I noticed right away how bright the headlight and panel lights are.
                I checked the charging with my new series R/R ad it ran up to 14.3 and I cut off the motor there.
                1983 GS 1100E w/ 1230 kit, .340 lift Web Cams, Ape heavy duty valve springs, 83 1100 head with 1.5mm oversized SS intake valves, 1150 crank, Vance and Hines 1150 SuperHub, Star Racing high volume oil pump gears, 36mm carebs Dynojet stage 3 jet kit, Posplayr's SSPB, Progressive rear shocks and fork springs, Dyna 2000, Dynatek green coils and Vance & Hines 4-1 exhaust.
                1985 GS1150ES stock with 85 Red E bodywork.

                Comment


                  #38
                  You can follow Civilrock's SSPB install with his whole electrical overhaul here.


                  [/QUOTE]

                  Comment


                    #39
                    Originally posted by chef1366 View Post
                    I installed the SSPB today and I am very happy with the results.
                    I had to uninstall the old coil relay mod and bring it back to stock.
                    While there I tidied up my connections on my Dyna 2000.
                    Cut off the old Red connection for the R/R and capped it off with shrink wrap.
                    I ended up cutting out the dingy old plug in the headlight bucket and wired in the headlight auto-off when you start the bike.
                    Soldered in the new plug for the SSPB which includes an extra hot and a switched hot for whatever your heart desires.
                    Jim also gives you an option for an ACC in the bucket when you follow his instructions. You can change how it is switched under the SSPB cover.
                    The bike started right up and I noticed right away how bright the headlight and panel lights are.
                    I checked the charging with my new series R/R ad it ran up to 14.3 and I cut off the motor there.
                    Looks good Bill, I documented those RH handlebar connections with additional suggestions here.

                    Comment


                      #40
                      This thing rocks.

                      I didn't know I needed this little device. But after installing it on the bike, it's really genius.

                      1. Gives you the popular coil relay mod built in.
                      2. Gives you a headlight cut out on start.
                      3. Replaces the old technology fuse box.
                      4. Provides protection for the whole wiring harness.

                      I have to admit it took me a while to understand the GS wiring harness, and it took me a while to understand the modifications that come with the SSPB. But in the end, it's good stuff. And if you find out more about posplayr, you learn that you're putting Military grade, Skunk Works design technology into your little 80's scooter. It's very cool.

                      For me, I installed the SSPB at the same time as I installed a Bandit instrument cluster, GSXR handlebar controls, Series R/R, and new starter relay. I also deleted the TSCU (Turn signal control unit) and the CPCU (check panel control unit) so I had a lot of things going on.

                      I was learning as I was going, and expecting to make some mistakes. The SSPB gave me the confidence that it would protect the harness if I made a big mistake. It was also nice to see that little green light. I listened to the alarm in your instructional video, so I was waiting for it as I turned the key. Jim even suggested that I purposely create a short on the bike to see first hand how it works. I have to admit, I've blown dozens of fuses either making mistakes, testing something out, or trying to push a circuit too far. Having the ability to reset, and even a warning that you're doing something wrong is very handy to the DIY guy messing around.

                      Once I get my harness all taped up and installed I'll post up some pictures of all the glory.

                      -Kevin

                      Comment


                        #41
                        Jim,

                        Finally getting some warmer weather around here and decided it was time to get going on the SSPB installation. Unfortunately, I've already run into a snag. On my '82 550M, the unit will NOT fit into the stock location. No way, no how. I'll figure something out but just wanted to make everyone aware of this fact that I didn't pick up on initially.

                        Here's the stock '82 550 fusebox setup. As you can see, no room above and below is blocked by the rear brake MC.

                        1982 GS550M Rebuilt Winter '12 - 550 to 673cc engine conversion.
                        1989 Kawasaki ZX-7 Ninja
                        2016 Ducati Scrambler Full Throttle

                        Comment


                          #42
                          Originally posted by Sci85 View Post
                          Jim,

                          Finally getting some warmer weather around here and decided it was time to get going on the SSPB installation. Unfortunately, I've already run into a snag. On my '82 550M, the unit will NOT fit into the stock location. No way, no how. I'll figure something out but just wanted to make everyone aware of this fact that I didn't pick up on initially.

                          Here's the stock '82 550 fusebox setup. As you can see, no room above and below is blocked by the rear brake MC.

                          Well you are definitely correct, it doesn't look anything like the picture I sent you.

                          However not all is lost. It looks like you will be swimming in room after you get rid of those other two fused devices. You might have to move the solenoid and then mount the SSPB where it is.

                          You got the horizontal tabbed version. If that won't fit see if a tabless (with studds in the back) would work better.

                          Comment


                            #43
                            Yeah, we'll see what we can figure out once i get the wiring setup understood. Hopefully I get enough time this weekend to make some good progress on it.
                            1982 GS550M Rebuilt Winter '12 - 550 to 673cc engine conversion.
                            1989 Kawasaki ZX-7 Ninja
                            2016 Ducati Scrambler Full Throttle

                            Comment


                              #44
                              Originally posted by Sci85 View Post
                              Jim,

                              Finally getting some warmer weather around here and decided it was time to get going on the SSPB installation. Unfortunately, I've already run into a snag. On my '82 550M, the unit will NOT fit into the stock location. No way, no how. I'll figure something out but just wanted to make everyone aware of this fact that I didn't pick up on initially.

                              Here's the stock '82 550 fusebox setup. As you can see, no room above and below is blocked by the rear brake MC.

                              Make everyone aware of what? You should of worked this out privately with Jim and not step on his product which has worked perfectly for me.
                              Jim will go above and beyond to make sure you get this installed properly with good costumer service.
                              1983 GS 1100E w/ 1230 kit, .340 lift Web Cams, Ape heavy duty valve springs, 83 1100 head with 1.5mm oversized SS intake valves, 1150 crank, Vance and Hines 1150 SuperHub, Star Racing high volume oil pump gears, 36mm carebs Dynojet stage 3 jet kit, Posplayr's SSPB, Progressive rear shocks and fork springs, Dyna 2000, Dynatek green coils and Vance & Hines 4-1 exhaust.
                              1985 GS1150ES stock with 85 Red E bodywork.

                              Comment


                                #45
                                Make everyone aware who has a 550 model that some modification is necessary to fit the SSPB. It will not go into the factory location like the pictures of the 1100.

                                I don't see how in the world you can read anything more than that into my post. Oh well, some people...

                                And Jim, yeah, I think once I move that stuff it will work. I didn't realize at first that the left hand main fuse box was redundant. Thanks for pointing that out.
                                1982 GS550M Rebuilt Winter '12 - 550 to 673cc engine conversion.
                                1989 Kawasaki ZX-7 Ninja
                                2016 Ducati Scrambler Full Throttle

                                Comment

                                Working...
                                X