Announcement

Collapse
No announcement yet.

Polaris R/R

Collapse
X
 
  • Filter
  • Time
  • Show
Clear All
new posts

    Polaris R/R

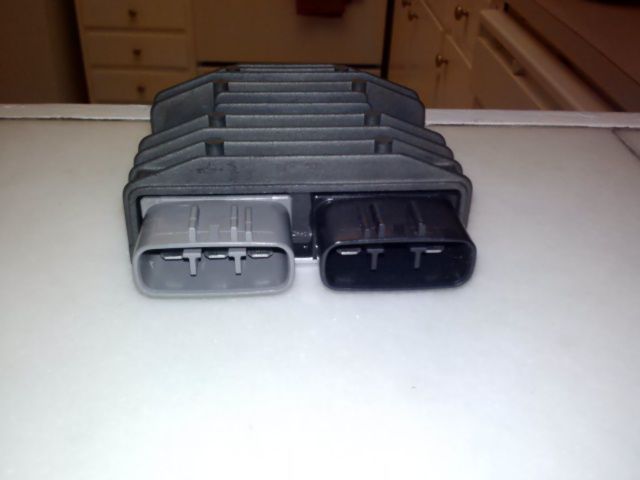
    Well guys, I finally got my new Polaris R/R in (took a little over a week - but hard to beat for $79 total), and I am ready to get this thing mounted up so that I can start riding in confidence. That being said, I know this came highly recommended, which is why I bought it. Everyone makes it seem simple, saying connect the 3 stator wires directly to the R/R. Just wanted to ensure that I was making this clear and simple enough for myself:


    On the left is the 3 prongs, on the right, 2 prongs. I wire the 3 stator wires directly to the 3 pronged side by 1) removing the plastic part to the plug, and rigging it, or 2) using disconnects to slide each wire onto each prong individually?

    As far as the 2-pronged plug, I connect it as normal as well?

    Forgive me if this is a dumb post, I have just been having charging problems since I got the bike, and I am ready to take her down the open road without having to count my mileage until my battery dies. Thanks in advance for any help!

    - Mike

    #2
    You have it.

    The two prongs on picture right are positive and negative, so make sure you get those wired correctly. There should have been a sticker on one showing polarity. If it didn't come with, somebody can look it up. I think there is a photograph on roadstercycle showing that.
    '83 GS650G
    '83 GS550es (didn't like the colours in the 80's, but they've grown on me)

    Comment


      #3
      Personally, I would either use spade connectors and push them on the terminals or get the proper connectors and splice that onto your stator wires.

      When you get to the side with the two terminals, the terminal closer to the stator wires is the + terminal, the one farther away is the - terminal.

      .
      sigpic
      mine: 2000 Honda GoldWing GL1500SE and 1980 GS850G'K' "Junior"
      hers: 1982 GS850GL - "Angel" and 1969 Suzuki T250 Scrambler
      #1 son: 1986 Yamaha Venture Royale 1300 and 1982 GS650GL "Rat Bagger"
      #2 son: 1980 GS1000G
      Family Portrait
      Siblings and Spouses
      Mom's first ride
      Want a copy of my valve adjust spreadsheet for your 2-valve per cylinder engine? Send me an e-mail request (not a PM)
      (Click on my username in the upper-left corner for e-mail info.)

      Comment


        #4
        Hi Steve,
        How opportune for me as I am also at this stage. Please finish the thought on the wiring for us. The + & - connect directly to the battery? What to do with the factory wiring that normally connect to the fuse box?

        Thanks,

        Comment


          #5
          Helpful as always, guys. I second Lloyd's questions.

          Comment


            #6
            Originally posted by rlloydl View Post
            Hi Steve,
            How opportune for me as I am also at this stage. Please finish the thought on the wiring for us. The + & - connect directly to the battery? What to do with the factory wiring that normally connect to the fuse box?

            Thanks,
            Avoid wiring this way, you're asking for eventual trouble as the original main fuse will now carry close to its max amp rating all the time that bike runs (up to time it doesn't and bike shuts off) ; go here, ponder posplayr's explanation


            1981 gs650L

            "We are all born ignorant, but you have to work hard to stay stupid" Ben Franklin

            Comment


              #7
              Yes, the stock wiring scheme is best, as long as it's in good condition. The output of the R/R should connect to the stock red wire in the harness. The negative terminal of the R/R should be connected to your 'single-ground' connection point and, ultimately, to the battery.

              .
              sigpic
              mine: 2000 Honda GoldWing GL1500SE and 1980 GS850G'K' "Junior"
              hers: 1982 GS850GL - "Angel" and 1969 Suzuki T250 Scrambler
              #1 son: 1986 Yamaha Venture Royale 1300 and 1982 GS650GL "Rat Bagger"
              #2 son: 1980 GS1000G
              Family Portrait
              Siblings and Spouses
              Mom's first ride
              Want a copy of my valve adjust spreadsheet for your 2-valve per cylinder engine? Send me an e-mail request (not a PM)
              (Click on my username in the upper-left corner for e-mail info.)

              Comment


                #8
                Perfect timing Mike1414, mine is sitting in the post office today and gonna pick it up after work!

                Comment


                  #9
                  triumph harness

                  Search forums for Triumph harness. It's only about $9 at the dealer. Solder that to your stator leads and factory harness, then plug it right up. Perfect fit.
                  https://drive.google.com/open?id=0B9zH8w8Civs8ejBJWjdvYi1LNTg&resourcekey=0-hlJp0Yc4K_VN9g7Jyy4KQg&authuser=fussbucket_1%40msn.com&usp=drive_fs
                  1983 GS750ED-Horsetraded for the Ironhead
                  1981 HD XLH

                  Drew's 850 L Restoration

                  Drew's 83 750E Project

                  Comment


                    #10
                    Originally posted by jsandidge View Post
                    Search forums for Triumph harness. It's only about $9 at the dealer. Solder that to your stator leads and factory harness, then plug it right up. Perfect fit.
                    I already have my Triumph adapter, but it sure would be nice to know what Trimuph model it comes on, so I can look it up for the next bike.

                    .
                    sigpic
                    mine: 2000 Honda GoldWing GL1500SE and 1980 GS850G'K' "Junior"
                    hers: 1982 GS850GL - "Angel" and 1969 Suzuki T250 Scrambler
                    #1 son: 1986 Yamaha Venture Royale 1300 and 1982 GS650GL "Rat Bagger"
                    #2 son: 1980 GS1000G
                    Family Portrait
                    Siblings and Spouses
                    Mom's first ride
                    Want a copy of my valve adjust spreadsheet for your 2-valve per cylinder engine? Send me an e-mail request (not a PM)
                    (Click on my username in the upper-left corner for e-mail info.)

                    Comment


                      #11
                      since the forum was down for updates, i ended up finding the info on a triumph forum. the inside one on the 2 pin connector goes to + and the outside pin goes to the -. for those i went straight to the battery

                      Comment


                        #12
                        Originally posted by 60ratrod View Post
                        since the forum was down for updates, i ended up finding the info on a triumph forum. the inside one on the 2 pin connector goes to + and the outside pin goes to the -. for those i went straight to the battery
                        Did you change any other wiring?

                        As noted above, the function of your MAIN fuse has now changed. It will be handling the entire load of the bike ALL THE TIME.

                        Just in case you have not examined your wiring diagram and charging system, in the original configuration, the MAIN fuse only handles the load of the bike when you first turn the key ON, before starting the bike. Once the engine is running, the charging system will be doing as much as it can (its output is dependant on engine speed) to carry the load. Once its output is enough to satisfy the needs of the bike, any excess will be pumped back the other way through the MAIN fuse to charge the battery.

                        The load of the headlights and the coils is less than 15 amps, which is usually handled directly by the charging system and any excess (usually no more than 5-7 amps) will go back through the fuse to charge the battery. Since you have re-directed your R/R output to the battery, all 15 amps will flow through the MAIN fuse all the time.

                        Good luck with that. I hope you at least installed an in-line fuse between the R/R and the battery.

                        .
                        sigpic
                        mine: 2000 Honda GoldWing GL1500SE and 1980 GS850G'K' "Junior"
                        hers: 1982 GS850GL - "Angel" and 1969 Suzuki T250 Scrambler
                        #1 son: 1986 Yamaha Venture Royale 1300 and 1982 GS650GL "Rat Bagger"
                        #2 son: 1980 GS1000G
                        Family Portrait
                        Siblings and Spouses
                        Mom's first ride
                        Want a copy of my valve adjust spreadsheet for your 2-valve per cylinder engine? Send me an e-mail request (not a PM)
                        (Click on my username in the upper-left corner for e-mail info.)

                        Comment


                          #13
                          everything i saw on here that told ME that i didn't need and inline fuse, and that it is undesired. or maybe that was with the original r/r. well i'll get one tomorrow and get it installed.

                          Comment


                            #14
                            Originally posted by 60ratrod View Post
                            everything i saw on here that told ME that i didn't need and inline fuse, and that it is undesired. or maybe that was with the original r/r. well i'll get one tomorrow and get it installed.
                            The original R/R did have a fuse in-line before it got to the battery.

                            Can't imagine why you would think it's "undesired". If something inside the R/R shorts out, you have nothing but nice, heavy-gauge wire between it and the battery. With the current that it should be able to carry, things are going to get PLENTY warm before something finally releases its smoke.

                            It is MUCH better to use a fuse as your "smoke safety valve".

                            .
                            sigpic
                            mine: 2000 Honda GoldWing GL1500SE and 1980 GS850G'K' "Junior"
                            hers: 1982 GS850GL - "Angel" and 1969 Suzuki T250 Scrambler
                            #1 son: 1986 Yamaha Venture Royale 1300 and 1982 GS650GL "Rat Bagger"
                            #2 son: 1980 GS1000G
                            Family Portrait
                            Siblings and Spouses
                            Mom's first ride
                            Want a copy of my valve adjust spreadsheet for your 2-valve per cylinder engine? Send me an e-mail request (not a PM)
                            (Click on my username in the upper-left corner for e-mail info.)

                            Comment


                              #15
                              Steve, this is certainly an unfortunate situation. It appears OP is getting confused about needing some type is fuse between battery and the rest of the system and the practice of wiring r/r directly across the battery which would also Need an inline fuse.

                              As noted it would really be bad to not end up with a fuse somewhere.

                              For OP, there are two wiring methods both of which have to have a fuse. In one case (preferred) you us the original wording just clean up the fusebox and connections. You only need a 15 amp main fuse in fusebox.

                              second method which has been popularized but which is not a sound approach is one where the R/r with in line fuse is attached directly across the battery. In the case the original signal flow is altered and a larger fuse is required. Generally at least a 20 amp and sometimes it has been reported that 25 amp is nesessary.

                              Comment

                              Working...
                              X