Announcement

Collapse
No announcement yet.

1980 GS850L ignition timing adjustment for each cylinder pair

Collapse
X
 
  • Filter
  • Time
  • Show
Clear All
new posts

    1980 GS850L ignition timing adjustment for each cylinder pair

    I was checking the ignition timing for my 850 with electronic ignition and mechanical advance. I'm looking through the plate the modules are bolted to and seeing the spinning advance mechanism.

    Using a timing light I see where the two marks (lines) are for one pair of cylinders indicating below a certain RPM and above a certain RPM. Then I put the timing light lead on either of the other pair of spark plug leads. I don't see two marks for the other pair of cylinders on the spinning advance mechanism. Instead of two lines like the first pair, I see one dot.

    The two pickup modules can be adjusted individually but there is a dab of what looks like epoxy adhesive on the screw that locks the two pickup modules together as one unit that can be adjusted to set the ignition timing.

    I have no clue if this dab of glue is factory stock or if someone put it there. Has anyone else seen what I'm referring to ? It's beige in color and seems to be doing a fine job of keeping the screw from loosening.

    Has anyone ever had reason to adjust (in order to synchronize) the ignition timing for each pair of cylinders independantly ?

    If so, how do you know what the "other" pair - the pair with only a dot - is timed at ? Whatever I'm missing here, I'm hoping it's fairly obvious to somebody who can help me out with this.

    #2
    Pretty sure there is no adjustment on ignition timing with electronic ignition, unless someone messed with it and changed things. Should be a manual on your bike on Basscliff's site.

    Comment


      #3
      I could not find any photographs in the forums showing what I have in my 1980 GS850L model T. It has transistorized ignition with two pickup coils and a mechanical advance mechanism. Figured I might as well add some pics so here they are. My way of paying back for all the good advice I have received from reading other posts. Hope these pics helps someone else as much as I've been helped.

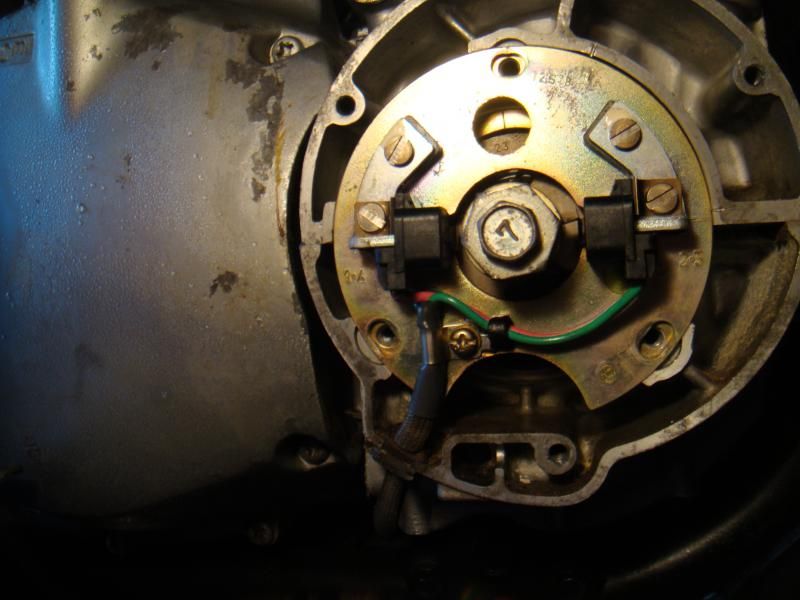
      These three sloted holes allowed some adjustment but not enough. Max advance WAS 27 BTDC at 2500 RPM and above :

      http://

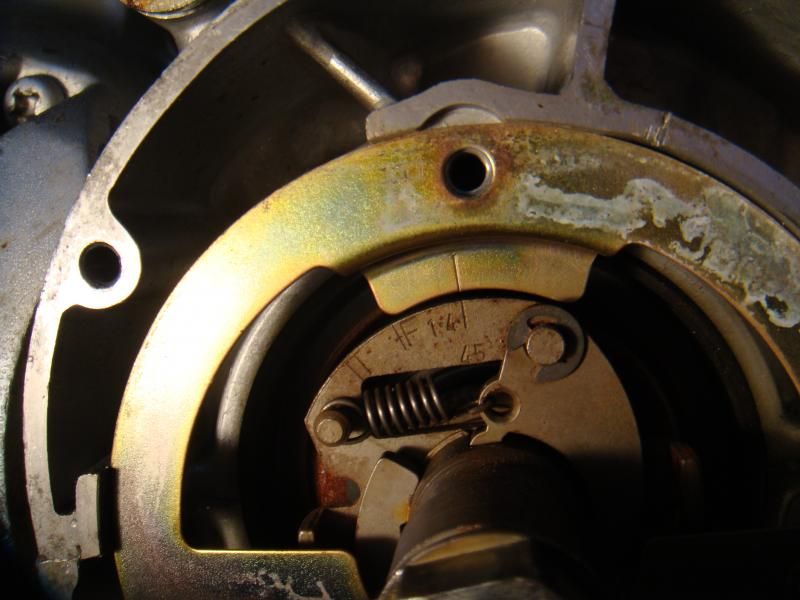
      With the adjustment plate removed it's easier to see the marks for cylinder 1 and 4 on the "timing advance governor" as it is called in the manual I got from Basscliff's site. I assume the "T"=Top Dead Center, the "F"=17 degrees Before top Dead Center and the "1dot4"= 37 Degrees Before Top Dead Center :

      http://

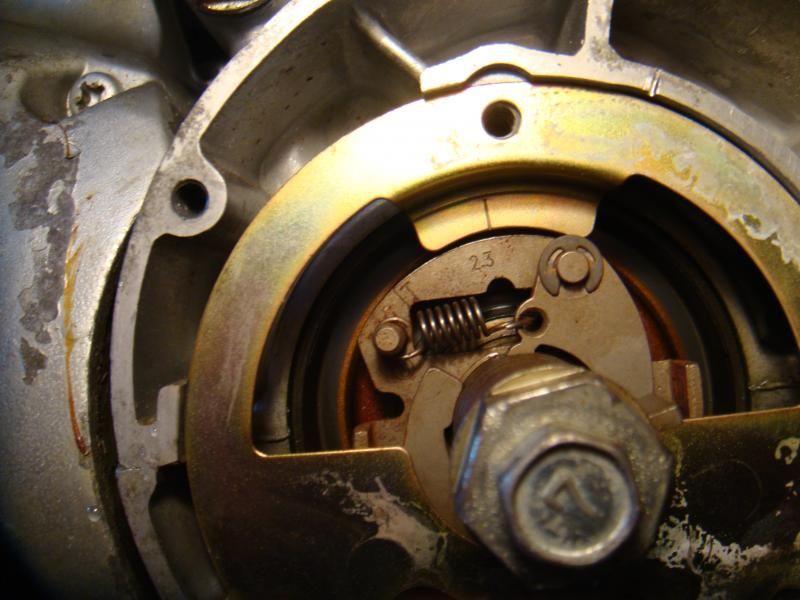
      Not sure why the same marks were not included by the factory for cylinders 2 and 3 except maybe because there is no adjustment for the individual pickup coils on the plate. I read the "T" mark (Top Dead Center) and used my digital timing advance light to check the timing for both pairs of cylinders. They are the same. The pickup coils have little nubs that keep them sucurely positioned on the adjustment plate :

      http://

      I had to elongate the adjustment holes to achieve 37 degrees maximum advance (from 2500 RPM and up). I was looking at the wrong timing marks previously and had the ignition timing retarded by a considerable amount. Hopefully MPG will be noticeably better than the 39-40 I've been logging. The engine sure has a lot more sparkle now than it did and 60 MPH seems almost effortless.

      I'm not used to what these engines are supposed to sound like but I do know what preignition from too much ignition timing advance sounds like in many other makes of engines. I cannot hear any with the timing set like this. Hope I am not too far advanced. Keeping my fingers crossed ... as always. I'll have a look at the plugs after a couple of tankfuls of gasoline. May have to rejet again. Time (and miles) will tell. My past experience tells me that 30-32 degrees advance is maximum with this relaitively low (8.8:1) compression ratio and regular gasloine 87 octane. Eventually I'll be satisfied but until then, nothing is sacred.

      Yes, I've gone at this completely backwards but one thing after another is getting the attention it needs. In the meantime, I've enjoyed using this and she has been a reliable form of transportation.
      Last edited by Guest; 11-14-2014, 11:49 AM.

      Comment


        #4
        The position of the F mark is odd in your pic- it should be closer to the T mark (about 10 degrees). Full advance of about 37 degrees by 3500 rpm is normal. Here's a pic of my spare unit, note the marks
        edit: iPad is flipping pic for dome reason!
        Attached Files
        Last edited by tom203; 11-14-2014, 05:29 PM. Reason: Upside down
        1981 gs650L

        "We are all born ignorant, but you have to work hard to stay stupid" Ben Franklin

        Comment


          #5
          Hi Tom,

          I don't have the actual specification in front of me for your bike but It appears your 650 runs around 10 degrees BTDC at idle and then advances to 37 BTDC.

          The 850 specification is 17 BTDC below 1500 RPM and 37 from 2350 RPM on up. That would explain the different positions of the T mark on each of our advance governers. I'm not sure why the adjustment plate on "Little Suzy" was made to allow only 27 degrees of maximum advance though. Maybe during the throes of meeting ever more stringent emissions standards of that time period (1979-80) the Suzuki engineers tried backing off the overall timing advance. It was idling at 7 degrees BTDC. The idle mixture screws seem to be more responsive to tuning now that the engine is idling with 12 degrees of ignition timing advance.

          The advance governor seems to do it's job properly by providing the full 20 degrees (17 to 37) range. Nothing looks any newer then the rest of the bike or modified except for the elongated holes I just made. Guess I should have gotten a picture of those.

          I like the Scotch tape photo-op stand, you pressed into service ;>)

          Comment


            #6
            Originally posted by tirebiter View Post
            I was checking the ignition timing for my 850 with electronic ignition and mechanical advance. I'm looking through the plate the modules are bolted to and seeing the spinning advance mechanism.

            Using a timing light I see where the two marks (lines) are for one pair of cylinders indicating below a certain RPM and above a certain RPM. Then I put the timing light lead on either of the other pair of spark plug leads. I don't see two marks for the other pair of cylinders on the spinning advance mechanism. Instead of two lines like the first pair, I see one dot.

            The two pickup modules can be adjusted individually but there is a dab of what looks like epoxy adhesive on the screw that locks the two pickup modules together as one unit that can be adjusted to set the ignition timing.

            I have no clue if this dab of glue is factory stock or if someone put it there. Has anyone else seen what I'm referring to ? It's beige in color and seems to be doing a fine job of keeping the screw from loosening.

            Has anyone ever had reason to adjust (in order to synchronize) the ignition timing for each pair of cylinders independantly ?

            If so, how do you know what the "other" pair - the pair with only a dot - is timed at ? Whatever I'm missing here, I'm hoping it's fairly obvious to somebody who can help me out with this.
            The original points system needed a way of adjusting the timing of 2&3 subsequent to 1&4, so were marked accordingly. The introduction of the electronic ignition system made it apparent that once the base setting for 1&4 was achieved, 2&3 were never going to move, so no adjustment was needed or provided. So the theory went, but some have found a slight tweak is actually necessary.
            In my own case I have an aftermarket EI unit on a '79 advance and backplate, so have the best of both - a fully-marked backplate and an adjustable pickup for both coils.
            ---- Dave

            Only a dog knows why a motorcyclist sticks his head out of a car window

            Comment


              #7
              Grimly ... ya ok ... so that would explain the slight butsoild thump thump thump I feel at extre-eem-ly low RPMs as if two cylinders were not doing their job quite as well. I did not disturb the pickup coil mounts, deciding to leave the "glued" screw heads intact for now.

              I noticed considerable spark scatter which could be attributed to a very old timing light or something wrong-ignition related. I'll get back on this soon enough. Just knowing that others have seen some discrepancy between the pairs gives me reason to continue my pursuit.

              There is a reason this particular (built in 1979) bike only had 28,000 miles on it when I bought her, this summer (2014). Maybe part of that is related to the synchronization of ignition timing between the cylinder pairs.

              Comment


                #8
                When the system is set up exactly as it should be, these are very smooth engines, no doubt. In the case I described, I had swapped over the ignitor, backplate and coils from one bike over to the other, and had failed to check 2&3 after I'd timed 1&4. It was like that for a year, running well enough, but not as right as it should have been. I discovered the aftermarket pickups were adjustable for a good reason - 2&3 were a good couple of degrees retarded from 1&4. Once I sussed that, smoothness was restored.
                In fact, the normal smoothness of these engines is a good indicator of something starting to go wrong - like LT connections starting to corrode in the ignition circuit, etc. Most riders wouldn't really notice this, but if it's something you're riding every day, it shows up and a five minute fiddle with connectors can save a breakdown later on.
                ---- Dave

                Only a dog knows why a motorcyclist sticks his head out of a car window

                Comment

                Working...
                X