Failing that, DeOxit is the recommended method around here, but in the absence of that, I usually resort to fibreglass pencils, etc and contact cleaner spray normally sold for more industrial uses. In the absence of _that_ I use anything to hand and just remember to do it properly later, as any cleaned up contact that actually works is better than one that doesn't.
Announcement
Collapse
No announcement yet.
turn signal question. Right switch and lights works, left lights stay on.
Collapse
X
-
You can dis-assemble the male and female pins and sockets from within the two halves of connector body - you'll need a v.slim flat pick, like a jeweller's screwdriver or similar to get in beside them and flatten the tang that sticks up.
Failing that, DeOxit is the recommended method around here, but in the absence of that, I usually resort to fibreglass pencils, etc and contact cleaner spray normally sold for more industrial uses. In the absence of _that_ I use anything to hand and just remember to do it properly later, as any cleaned up contact that actually works is better than one that doesn't.---- Dave
Only a dog knows why a motorcyclist sticks his head out of a car window
-
 William Groebe
Ok, so I'm a little disheartened. I cleaned out the male and female connection points with mini brushes and contact spray, but the left blinkers still don't work consistently. I feel like I must be missing something obvious. I'm going to reconnect all my connectors along the wiring harness and hope I just messed something up when putting this machine back together.
On another note, but very related topic, at the same time my left blinkers stopped working my headlight had gone out. I spent the past few weeks working on the blinkers and only yesterday bought a new headlight bulb. Well, what do you know? I put it in yesterday and it doesn't turn on. So this whole time I've had a problem with my headlight wiring and left turn signal wiring. ARGH! I hate electrical problems. Not sure what to do now. I'm at a loss.
sad face, angry face, poop emoticon.
Comment
-
do you have a manual or wiring diagram for your bike? no? try here... I would (and have) remove all the old wiring and connections and replace with new. You would be surprised how far up and inside the insulation corosion travels.... especially on these old bikes....Last edited by mvalenti; 06-03-2015, 12:52 PM.-Mark
Boston, MA
Suck Squeeze Bang Blow..
sigpic
1980 GS850G with 79 carbs.....
Comment
-
 William Groebe
 -
The juice for headlight circuit runs thru this switch, so be suspicious. Check the headlight fuse - look for power on both sides. Try a jumper ground to headlight bulb in case you got corrosion issues.1981 gs650L
"We are all born ignorant, but you have to work hard to stay stupid" Ben Franklin
Comment
-
 William Groebe
All the fuses are good, but I haven't tested for power on both sides of the fuse with a multimeter. I'm not even exactly sure how to do that. Touch the positive tip to the fuse connecting clip and the negative tip to the frame?
Also, I don't know what it means to "try a jumper ground to headlight bulb." Do you mind clarifying what that means?
I know I'm an electrical ignoramus, but we all had to start somewhere and I'm starting near zero. By this time next year I'll hopefully be building my own wiring harnesses.
Comment
-
 William Groebe
Ok,
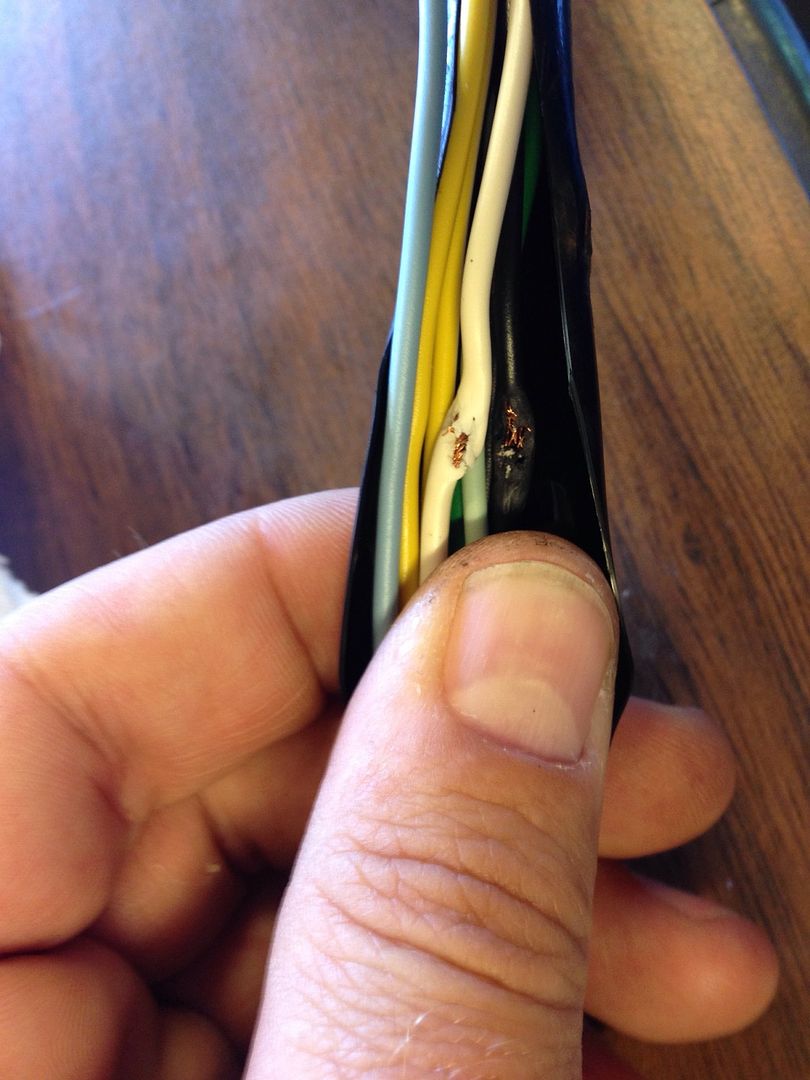
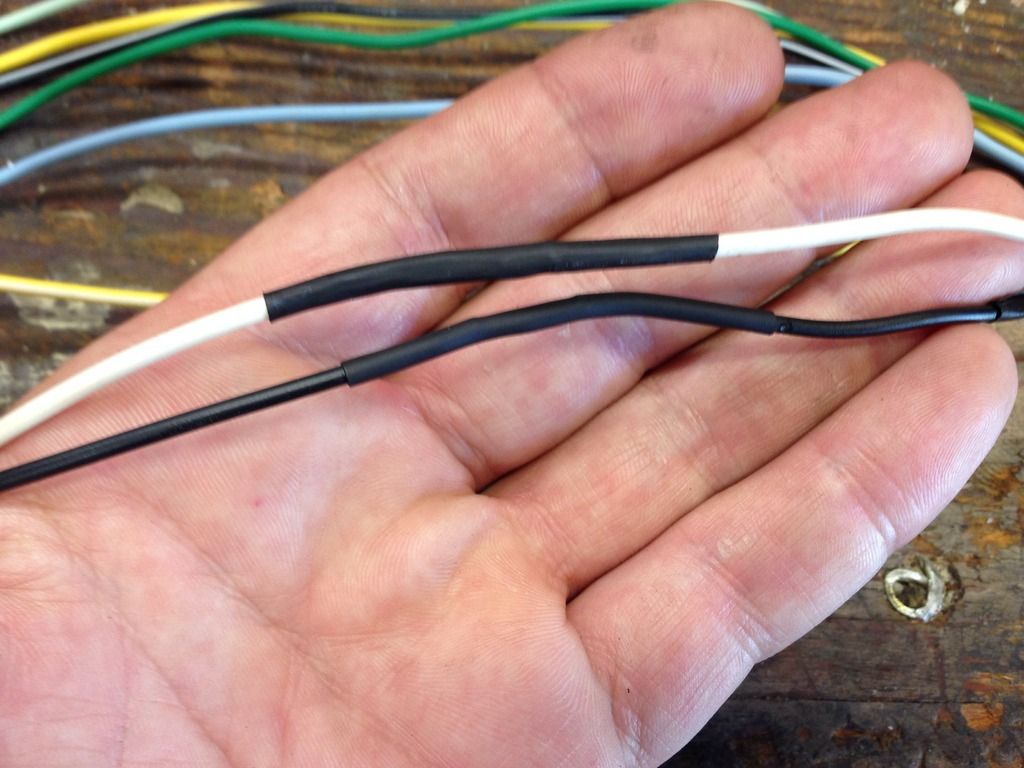
So I looked up online how to use my multimeter. I did a continuity test along the length of the wires going from the turn signal switch to the multiconnector. All the wires were fine except the black one. I assume it's the ground. So I cut away the black wire protector and came across this. two of the wires are totally jacked. At least I know what the problem is now. Just need to solder these wires back together and use the heat shrink tubing to wrap it up, then I'll be golden. hopefully

Comment
-
 William Groebe
Comment
-
 William Groebe
Ok. Spoke too soon. My headlight still doesn't work. Since all the wires from the switcher to the multi connector now test positive for continuity I'm going to have to track down the headlight issue somewhere else.
Comment
-
 William Groebe
Nevermind. Figured it out. Though I'd reconnected the multi connector, there is an individual yellow wire that has a separate individual connector that I'd overlooked connecting when I did my testing.
Headlight works. All is good. Thanks to all.
Comment
-
Glad you found the problem. Usually you can find the external damage entry point without having to completely disassemble the harness. You would have to look carefully and it would be easy to overlook what seems to be a puncture wound to the harness. It also looks as if neither wire was actually cut, they were shorted through the cut insulation. If the majority of the strands are still in place you could just seperate the wires and use some liquid tape then wrap the whole area with some outside electrical tape. One other trick if the number of strands in tack is high is just put a little solder tight into the cut. It will not be much different than a cut and twist repair.
Your repair should work fine it is just pretty invasive to the harness that is generally not required. The good news is you will have a new found respect got your harness. Last edited by posplayr; 06-07-2015, 03:00 PM.
Comment
-
Great thought, but not necessary on this bike.Originally posted by Grimly View Post... the switch is a two-tiered design, which not only connects the turn signals on the side of your choice, but also connects a 12V feed to the main turn signal control unit (the auto-timer/canceller unit). ...
To the best of my knowledge, none of the 650s ever had self-cancelling signals.
Not sure if any of the 750s did, but the 850-and-up bikes did, as long as they were not the "basic" '78 or '79 1000. All of the "E", "G", "L" and "GL" models that were 850cc and larger had them.
.sigpic
mine: 2000 Honda GoldWing GL1500SE and 1980 GS850G'K' "Junior"
hers: 1982 GS850GL - "Angel" and 1969 Suzuki T250 Scrambler
#1 son: 1986 Yamaha Venture Royale 1300 and 1982 GS650GL "Rat Bagger"
#2 son: 1980 GS1000G
Family Portrait
Siblings and Spouses
Mom's first ride
Want a copy of my valve adjust spreadsheet for your 2-valve per cylinder engine? Send me an e-mail request (not a PM)
(Click on my username in the upper-left corner for e-mail info.)
Comment
-
 William Groebe
Steve, you are correct. I do not have self-cancelling turn signals. Actually, I've never had self-cancelling signals on any of my previous bikes either.
To be completely honest, I didn't even know they existed.
Comment
.png)

Comment