Announcement

Collapse
No announcement yet.

front sprocket spacers

Collapse
X
 
  • Filter
  • Time
  • Show
Clear All
new posts

    front sprocket spacers

    I've got an '82 GS750T. I purchased a set of sprockets and chain from Z1Enterprises to do a 530 conversion. Unfortunately, the original front sprocket has spacers on it. I can't get the bolts to come out (or budge). Not that it matters, because the bolt holes on the spacers are completely different than the ones on the new sprocket.

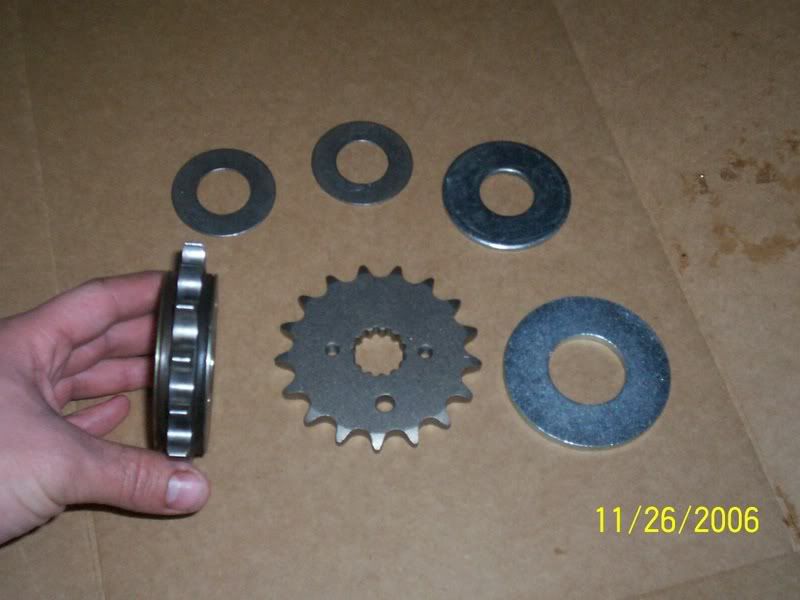
    This is the sprocket I purchased.

    So I got online and went back to Z1 and looked up spacers.
    1.25mm spacer
    6mm spacer
    These just look like washers to me. Not at all what the current spacers look like. Well, could be...

    The current ones look like I need the sprocket, the 6mm, then the 1.25mm on top of it (on both sides of the sprocket) but there are bolt holes through them. There is a gasket/o-ring thing on one of them as well.

    I don't see why an o-ring is needed there, it spins with the sprocket so it's not holding grease in place, or anything.

    Couldn't I just buy a set of big washers and drill/tap them out in the holes I need? Wouldn't I have to drill/tap these out anyway? Or do I just need the right thickness of washers to keep the chain from touching anything that isn't a sprocket?

    #2
    Yes you can just build the spacer in washers.

    Dink

    Comment


      #3
      Yes you can use washers.
      Local hardware store for less than $1.

      I used them on my 1000 conversion years ago, no problems.
      Keith
      -------------------------------------------
      1980 GS1000S, blue and white
      2015Triumph Trophy SE

      Ever notice you never see a motorcycle parked in front of a psychiatrist office?

      Comment


        #4
        Thanks! I'll be hitting up the hardware store this afternoon, then.

        Well, went to the hardware store, and they didn't have anything that seemed like it might work. Moseyed on over to Napa, and got four washers over there. They're not the same diameter as the origional spacers, but according to the calipers, they make it the same thickness.

        Will this work?

        Do I need to drill holes in them and make them spin with the sprocket, or can they just be on there freely? If I have to attach them, I'll have to find a drill press, then tap them. Got the taps, at least. (Or dies, I never can remember which I need.) If I don't have to attach them, I can throw it back together tomorrow morning.
        Last edited by Guest; 11-26-2006, 12:17 PM. Reason: hit up the hardware store

        Comment


          #5
          I went to the Suzuki dealership today to see if I could get some actual spacers. They told me that they'd never seen any spacers like the ones I have on my origional. Also, that the spacers aren't actually spacers, but support (sort of?) for the chain, for the inside edges... somehow.

          Anyway, they said that the spacers aren't needed. They come sometimes on factory sprockets, but they've never seen any aftermarket ones come with them.

          So I'm going to just install the sprocket as is, and as long as everything lines up correctly, then I'll just go with it. If there's a reason I shouldn't do this, let me know, and I'll see about fabricating some spacers.

          Comment


            #6
            Well, I broke down and called Z1 and ordered a front sprocket spacer. He said that I need only one. I don't know if I believe what he said about needing it. It should be here Monday or Tuesday. I've got the bad feeling I'll have to drill the holes and tap them so I can attach it to the sprocket itself.

            Comment


              #7
              The o-ring is a chain cushion not a seal. You can reuse the original inner spacer as it has a small hole which will fit snug over the drive shaft. The original outer spacer will not work as the hole is too big. Forget about tapping new holes.. you don't need them just lay the original inner spacer, then the sprocket then the new 6mm spacer you got from Z1. Done.

              A picture of the parts you are working with would be a big help for us to figure out what you got and how to help.
              Last edited by DimitriT; 12-02-2006, 06:37 PM.

              Comment


                #8
                If I remember right, I took my original sprocket off and put my new spacer the the new sprocket locking washer and nut. Done. The spacer is there to take up the room left by the removal of the original sprocket with it's built in cushion/absorber (the thing with the 3 bolts in it). I think a 7/8" washer works good as a spacer. The 6mm spacer the aftermarket suppliers sell is nice though.

                Comment


                  #9
                  On install, and it's been a while, was Spacer against "motor, or motor side, sprocket and another spacer to keep the nut off the sprocket.

                  Been a few years, many miles and no issues.
                  Keith
                  -------------------------------------------
                  1980 GS1000S, blue and white
                  2015Triumph Trophy SE

                  Ever notice you never see a motorcycle parked in front of a psychiatrist office?

                  Comment


                    #10
                    Ok, finally got my pictures uploaded. Been working two jobs, and there's gone all of my time. However, without further ado...

                    Here is my current parts ensemble... On the left is the original sprocket, with spacers on it. On the right is the new sprocket, with the various washers that make the new assembly the same thickness as the original.


                    This is the same photo, but with a side view of the original sprocket and spacers.


                    I have since ordered and received the 6mm spacer from Z1Enterprises. So from what I gather, all I have to do is put my nice new spacer (as long as it fits on the inside) against the engine, then the sprocket, and a washer to keep the nut off of the sprocket. Make sure everything that lines up properly, and away I go...
                    Last edited by Guest; 12-06-2006, 12:16 AM.

                    Comment


                      #11
                      Originally posted by froldt View Post
                      I have since ordered and received the 6mm spacer from Z1Enterprises. So from what I gather, all I have to do is put my nice new spacer (as long as it fits on the inside) against the engine, then the sprocket, and a washer to keep the nut off of the sprocket. Make sure everything that lines up properly, and away I go...
                      Spacer goes outside of the sprocket; the sprocket on then the spacer, lockwasher and nut.

                      Dink

                      Comment


                        #12
                        Originally posted by froldt View Post
                        I have since ordered and received the 6mm spacer from Z1Enterprises. So from what I gather, all I have to do is put my nice new spacer (as long as it fits on the inside) against the engine, then the sprocket, and a washer to keep the nut off of the sprocket. Make sure everything that lines up properly, and away I go...
                        When I did this, I was able to disassemble my original sprocket and spacers.

                        I took the inner spacer (side that goes against the motor) and put that in first (without fastening it to the new sprocket). Then went the new sprocket, finally I put in the 6mm spacer from Z1. This should give you identical-to-stock spacing.

                        Comment


                          #13
                          is there 1 way

                          reviving an old thread. does this just come down to personal preferance or is there a right way to do it. from what i just read some people have the spacer on the inside, some on the out, some reuse the original spacer on the inside. is there a definitive answer? z1 was unsure so they directed me here.

                          thanks
                          nick

                          Comment


                            #14
                            Those things that look like spacers have confused a lot of folks. The orig. sprocket has no spacer. Those things are noise dampeners that look like spacers. Install the old sprocket, Then measure from a fixed part of the eng. case to the center of a tooth on that sprocket. Then install the new sprocket & take the same measurement as with the first. They should measure the same. or very close.
                            1983 GS1100E, 1983 CB1100F, 1991 GSX1100G, 1996 Kaw. ZL600 Eliminator, 1999 Bandit 1200S, 2005 Bandit 1200S, 2000 Kaw. ZRX 1100

                            Comment


                              #15
                              thanks, after i checked that out the correct way to do it is sprocket spacer lockwasher nut. you were right on if you look the original "spacer" doesn't actually hold the sprocket out at all so it isn't actually a spacer.

                              thanks for the help.

                              nick

                              Comment

                              Working...
                              X