.png "Powered by vBulletin")
Nowhere have I been able to find pictures or instructions, or even the OEM part. I ordered just the diaphragm, received it, but now I don't have the foggiest on how to reassemble. Does the little hole in the rubber square go up toward the petcock filter, down toward the ground, left toward front wheel or right toward rear wheel? Does the square plastic part go in any other way besides the obvious? Where does the spring go, on the rear of the Big round flat circle or over the metal nipple with the o-ring on it? Does the entire assembly face with the nipple part going into the petcock or the flat big metal circle going in toward the petcock? Lastly, does the metal plate that attaches with the four screws go with the hose inlet at the top toward the sky, bottom towards the ground, to the left toward the front wheel, or to the right toward the rear wheel? Can I get a witness? Photos would be rad.
-
-
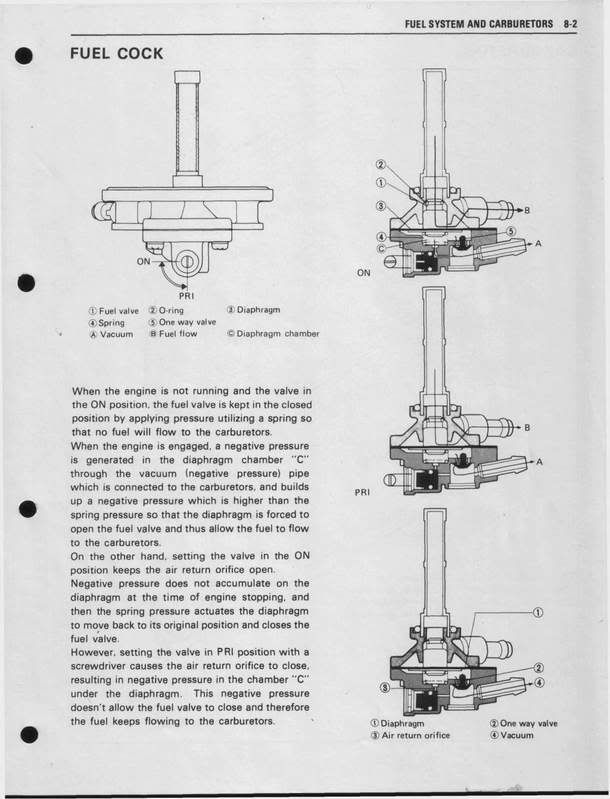
Here is the part diagram and functional explanation of the petcock for my bike from the factory service manual. I hope it helps you.
-
Thanks alot, but mine's a '79 GS1000, and the petcock is different. It has the three position lever and it's innards are more vertical. I think as the principles go, it might work. I'll let you know.Last edited by Guest; 12-23-2006, 05:18 PM.Comment
-
I have the same questions as the rebuild kit I installed doesn't solve the leaking problem. Fuel flows in all three positions. The only suggestions I have received so far is to buy a new one.
Anyone have a suggestion on where to find parts to convert to a petcock without the vacumn position? Does the bike really need that feature?Comment
-
No, the bike does not need that feature, but it is oh, so handy.
I just looked through my two Clymer books, and they do not show a good picture of the petcock blow-up. The couple of times I have had to to this were a while ago, so I am going off memory here, and I can't even remember what memory is.
Jeeptrix:
The spring should go on the output side of the diaphragm. Its purpose is to make sure the diaphragm pushes the valve closed unless there is vacuum pulling it open. It sounds to me like you either don't have the valve seated correctly or the spring is on the wrong side of the diaphragm.
Devillox:
Really hate to say it, but you should have paid more attention to what was where when you took it all apart. There are times when the new parts may look a little different, but they are close enough that you should recognize it.
Does the little hole in the rubber square go up toward the petcock filter, down toward the ground, left toward front wheel or right toward rear wheel? If the 'rubber square' is the diaphragm, it should not have ANY holes in it. It might just be a gasket between the halves of the petcock, and the hole would be where the fuel flows through. You would have to inspect the control valve to see how fuel flow would be affected in each of the three positions (RES, ON, PRI) to determine orientation of the hole.
Does the square plastic part go in any other way besides the obvious? It has been long enough that I don't remember a 'square plastic part', so it probably goes where it is obvious.
Where does the spring go, on the rear of the Big round flat circle or over the metal nipple with the o-ring on it? Does the entire assembly face with the nipple part going into the petcock or the flat big metal circle going in toward the petcock? It sounds like the 'metal nipple with the o-ring' is the valve and it needs to face a hole, meaning it needs to face the control lever. The spring goes on the side opposite the nipple, pushing on the 'flat big metal circle' so it forces it closed. When vacuum is applied (engine running), it pulls the diaphragm against the spring, opening the fuel passage.
Lastly, does the metal plate that attaches with the four screws go with the hose inlet at the top toward the sky, bottom towards the ground, to the left toward the front wheel, or to the right toward the rear wheel? This would mostly depend on clearances between your tank and your frame. On my 650L it points to the back wheel. On my (wife's) 850L it is angled up a little, about a 2 o'clock position. If it happens to point down, that is not a problem unless the hose will be pinched against something. Put it in a position where the hose is not kinked and you will have easy access when you need to remove the tank.
.sigpic
mine: 2000 Honda GoldWing GL1500SE and 1980 GS850G'K' "Junior"
hers: 1982 GS850GL - "Angel" and 1969 Suzuki T250 Scrambler
#1 son: 1986 Yamaha Venture Royale 1300 and 1982 GS650GL "Rat Bagger"
#2 son: 1980 GS1000G
Family Portrait
Siblings and Spouses
Mom's first ride
Want a copy of my valve adjust spreadsheet for your 2-valve per cylinder engine? Send me an e-mail request (not a PM)
(Click on my username in the upper-left corner for e-mail info.)Comment
-

Comment
-
Totally a moot point now, as I received a Pingel and adapter plate for Xmas, from all people, my mom! I'm still going to try to repair the OEM, as I have 2 brand new diaphragms and just replaced all the other gaskets.
Steve: Thanks so much for taking the time to answer the post point by point. Very considerate!
Thomas: The part I'm talking about is the rear of the petcock that isn't exposed in that fische. You can just see the inlet under the 8. That part comes off with 4 screws and the diaphragm is below that.
Thanks again for the help, on freakin Xmas of all days!Comment
-
Can you ask you mom where she got the parts? I need to replace the whole assembly.Comment
-
The easy source for exploded diagrams is

Several places also sell microfiche cards for about $10 with the entire set of exploded diagrams for many models, along with original part numbers.
Taking photos with a camera that has a "macro" (close-up) feature also simplifies re-assembly. Two other tricks: 1) make a sketch while disassembling . 2) Disassemble in a clean area and place all parts in order. If a part needs to replaced and you have to wait to get it, reassemble what you have without tightening, while you can remember how it came apart.sigpic[Tom]
“The greatest service this country could render the rest of the world would be to put its own house in order and to make of American civilization an example of decency, humanity, and societal success from which others could derive whatever they might find useful to their own purposes.” George KennanComment
Comment