Announcement

Collapse
No announcement yet.

Honda R/R

Collapse
X
 
  • Filter
  • Time
  • Show
Clear All
new posts

    Honda R/R

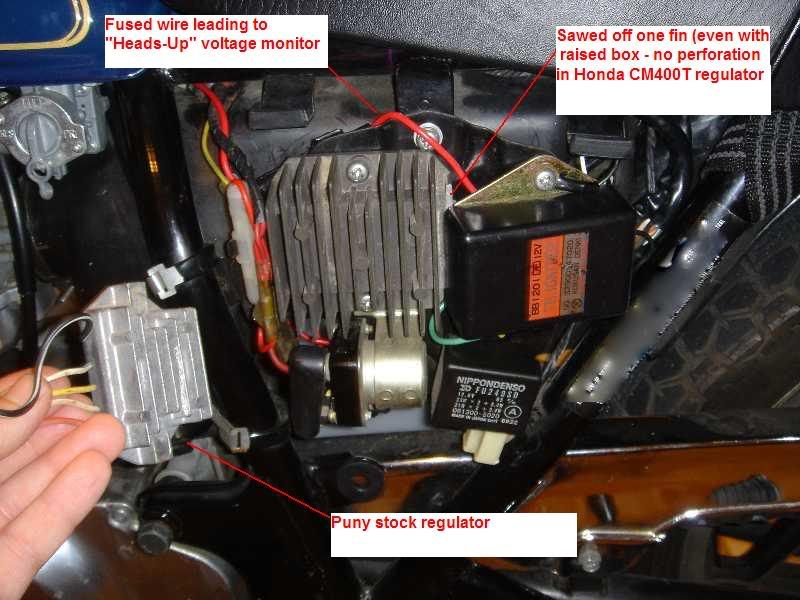
    I wired in a Honda R/R today. I used duaneage's simple wiring diagram for the game plan.

    On the Honda R/R there are three yellow wires that connect to the three stator wires any order. I used 14 guage wire. Soldered in about eight inches of wire directly to each yellow R/R wire. (all three) Crimped a male end 14 guage plug in type wire connector to the other end of each. Crimped a female end 14 guage plug in wire connector to each of the three stator wires. Used dielectric grease on all the connections.

    On the Honda R/R the ground wire is Green. I soldered about eight inches of 14 guage wire to the Green wire from the Honda R/R. On the other end I crimped a 14 guage eye to attach to the negative terminal of the battery.

    On the Honda R/R the red wire goes to the red wire that was connected to the Suzuki R/R. I soldered in about four inches of 14 guage wire to the red Honda R/R wire and put a male 14 guage male wire connector on the other end. I cut off the bullet end of the red wire from the bikes wiring harness and crimped in a 14 guage female wire connector. Plugged it together with dielectric grease.

    On the Honda R/R the black wire is a sense wire. It needs to connect to to a live wire when the ignition is turned on. I used duanege's idea and used the orange wire that goes into the rear brake switch. You need to make a T connector to tap into this wire and run it to the black Honda R/R wire. To make the T connector I used 18 guage wire. I cut a three inch piece and a eighteen inch piece. I stripped the middle of the three inch wire and soldered in the eighteen inch wire. On one end of the three inch wire I put a female 18-22 guage bullet wire connector and a male on the other end. Solder the other end of the Eighteen inch wire to the Black wire from the Honda R/R. Disconnect the orange rear brake switch bullet connector and snap in the other end of the T connector with dielectric grease.

    I checked the charging system as soon as I was done and it was perfect. The bike idles better also.
    1983 GS 1100E w/ 1230 kit, .340 lift Web Cams, Ape heavy duty valve springs, 83 1100 head with 1.5mm oversized SS intake valves, 1150 crank, Vance and Hines 1150 SuperHub, Star Racing high volume oil pump gears, 36mm carebs Dynojet stage 3 jet kit, Posplayr's SSPB, Progressive rear shocks and fork springs, Dyna 2000, Dynatek green coils and Vance & Hines 4-1 exhaust.
    1985 GS1150ES stock with 85 Red E bodywork.


    #2
    Did you happen to take pics of before and after??:-D I work better with pictures...8-[

    Comment


      #3
      That was the Oh Yeah" after I was done.
      1983 GS 1100E w/ 1230 kit, .340 lift Web Cams, Ape heavy duty valve springs, 83 1100 head with 1.5mm oversized SS intake valves, 1150 crank, Vance and Hines 1150 SuperHub, Star Racing high volume oil pump gears, 36mm carebs Dynojet stage 3 jet kit, Posplayr's SSPB, Progressive rear shocks and fork springs, Dyna 2000, Dynatek green coils and Vance & Hines 4-1 exhaust.
      1985 GS1150ES stock with 85 Red E bodywork.

      Comment


        #4
        I'll try to post pics, if and when I get to it, because I know I'll get stuck!!

        Comment


          #5
          If you can rebuild a carburetor, installing a Honda R/R is easy. First time I did it, it took less than half an hour. Of course, I didn't have to solder in as much extra wire, apparently the leads from my CBR600 regulator were much longer. Bolted right up, too!

          Comment


            #6
            It was extremely easy. I did end up with some extra wire but no airbox on my part gave me plenty of room.
            1983 GS 1100E w/ 1230 kit, .340 lift Web Cams, Ape heavy duty valve springs, 83 1100 head with 1.5mm oversized SS intake valves, 1150 crank, Vance and Hines 1150 SuperHub, Star Racing high volume oil pump gears, 36mm carebs Dynojet stage 3 jet kit, Posplayr's SSPB, Progressive rear shocks and fork springs, Dyna 2000, Dynatek green coils and Vance & Hines 4-1 exhaust.
            1985 GS1150ES stock with 85 Red E bodywork.

            Comment


              #7
              Maybe that's why it was so easy....I love pods!

              Comment


                #8
                I picked up a Nighthawk RR for my friends GS450. It has all the above mentioned wires, plus a white wire that is bundled with the three yellow wires. Any ideas what it's for, or how to hook it up?

                Comment


                  #9
                  My bro-in-law's Nighthawk 650's charging system is equipped with a field coil generator, not sure about others. It has two extra wires going under the stator cover.

                  Comment


                    #10
                    I wrote up a post about putting a CM400 R/R in my GS450l..

                    Originally posted by speedzter2000 View Post
                    Did you happen to take pics <snip>[
                    Wrote something similar up a year or so ago

                    Here's one pic I still have:

                    Comment


                      #11
                      Had a chuckle over a little blurb in an article about a guy that had a used Yamaha XJ750. Guy was looking for parts at the local "breaker" (breaker = junk yard) and noted below:

                      "The misfiring didn't entirely disappear until I'd fitted new HT leads, coils and caps. I was beginning to think that the electronic ignition unit had gone.....according to breakers good ones were as rare as working GS Suzuki rectifiers.

                      Ed

                      To measure is to know.

                      Mikuni O-ring Kits For Sale...https://www.thegsresources.com/_foru...ts#post1703182

                      Top Newbie Mistakes thread...http://www.thegsresources.com/_forum...d.php?t=171846

                      Carb rebuild tutorial...https://gsarchive.bwringer.com/mtsac...d_Tutorial.pdf

                      KZ750E Rebuild Thread...http://www.thegsresources.com/_forum...0-Resurrection

                      Comment


                        #12
                        So, I started pulling my bike apart for this project today. I got one of the "kits" from duneage.

                        First trick was finding the R/R. Found it on the bottom of the battery box. Realized I was going to have to remove the battery box in order to get to the R/R. Started taking it out, which required removing all the stuff stuck to the sides of the battery box. The plate that holds the fuse block and starter relay on it had a screw stripped, so I ended up drilling that buzzard out.

                        I may take this opportunity to repaint the battery box and the fuse block/starter relay mounting plate. They're pretty grungy.

                        What the heck is the black box sandwiched between that plate and the battery box?

                        I have a few questions. Is there any reason I can't (or shouldn't) just cut the old R/R connector off the old R/R and crimp the new terminals on to that for the three stator wires and the red wire? Is it wiser to just unplug the stator wires where they are butt-connected in to the other wires (that run to the R/R plug and the ignition switch)?

                        I'm going to have to lengthen my green wire, since it doesn't look like it will be long enough to run to the negative battery terminal.

                        Where exactly did you guys cut/connect your red wire if you didn't use the existing plug? Just right behind the plug?

                        Comment


                          #13
                          The main reasons to not use the original plug is that it's 20+ years old and, by design, crap. Fresh spade plugs, or, even better, marine grade plugs give much better connection and therefore current.

                          My regulator was mounted on the side of the battery box, and the regulator wires on a CBR600 are pretty long, I didn't have to extend anything but the actuator wire.

                          Comment


                            #14
                            Originally posted by jtolbert View Post
                            So, I started pulling my bike apart for this project today. I got one of the "kits" from duneage.

                            First trick was finding the R/R. Found it on the bottom of the battery box. Realized I was going to have to remove the battery box in order to get to the R/R. Started taking it out, which required removing all the stuff stuck to the sides of the battery box. The plate that holds the fuse block and starter relay on it had a screw stripped, so I ended up drilling that buzzard out.

                            I may take this opportunity to repaint the battery box and the fuse block/starter relay mounting plate. They're pretty grungy.

                            What the heck is the black box sandwiched between that plate and the battery box?

                            I have a few questions. Is there any reason I can't (or shouldn't) just cut the old R/R connector off the old R/R and crimp the new terminals on to that for the three stator wires and the red wire? Is it wiser to just unplug the stator wires where they are butt-connected in to the other wires (that run to the R/R plug and the ignition switch)?

                            I'm going to have to lengthen my green wire, since it doesn't look like it will be long enough to run to the negative battery terminal.

                            Where exactly did you guys cut/connect your red wire if you didn't use the existing plug? Just right behind the plug?
                            What year is your bike?
                            1983 GS 1100E w/ 1230 kit, .340 lift Web Cams, Ape heavy duty valve springs, 83 1100 head with 1.5mm oversized SS intake valves, 1150 crank, Vance and Hines 1150 SuperHub, Star Racing high volume oil pump gears, 36mm carebs Dynojet stage 3 jet kit, Posplayr's SSPB, Progressive rear shocks and fork springs, Dyna 2000, Dynatek green coils and Vance & Hines 4-1 exhaust.
                            1985 GS1150ES stock with 85 Red E bodywork.

                            Comment


                              #15
                              '83 GS1100GL.

                              I got the "kit" from duneage...has bullet terminals already crimped on the wire, the "tee" for the voltage sensor already on the wire, etc.

                              Comment

                              Working...
                              X