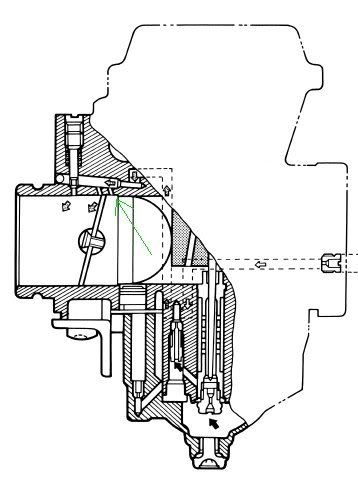
I am totally ignorant of carb anatomy....I don't want to remove the carbs so I'm going to attempt to remove the float bowl, the pilot jet and go from there. I think it will also involve the air mixture screw at the top...right? Any advice on how to go from here would be most appreciated!! By the way, I have fine wire and I have air pressure. Thanks to all!!
Announcement
Collapse
No announcement yet.
Carb anatomy..
Collapse
X
-
Forum SageCharter Member
Past Site Supporter- May 2002
- 3869
- The Gulf Coast of south Florida in the winter and northern Nevada in the summer
Carb anatomy..
I'm hoping I'm on the 'home stretch' figuring out what's wrong with my non-firing cylinder... #4. '49er' thinks it may be the pilot circuit so I'm gonna try to see if it is still stayed clogged up after my latest carb rebuild (which was done by 'the book').
I am totally ignorant of carb anatomy....I don't want to remove the carbs so I'm going to attempt to remove the float bowl, the pilot jet and go from there. I think it will also involve the air mixture screw at the top...right? Any advice on how to go from here would be most appreciated!! By the way, I have fine wire and I have air pressure. Thanks to all!!1980 GS1100E....Number 15!Tags: None
-
Have you browsed the Carb Cleaning Series in the Garage Section?
Lots of good information and good pictures, too. Be careful with the "fine wire". If it is steel, like a torch tip cleaning tool, keep it in the tool box. Better to use a strand or two of copper from a piece of 10- or 12-gauge copper wire. It is soft enough that it will not gouge out the brass jets like a steel wire will.
Along with the "fine wire" and air pressure, you need carb cleaner spray and SAFETY GLASSES. :shock:
There are passages in the carb that will spray right back into your face, so be careful.
.sigpic
mine: 2000 Honda GoldWing GL1500SE and 1980 GS850G'K' "Junior"
hers: 1982 GS850GL - "Angel" and 1969 Suzuki T250 Scrambler
#1 son: 1986 Yamaha Venture Royale 1300 and 1982 GS650GL "Rat Bagger"
#2 son: 1980 GS1000G
Family Portrait
Siblings and Spouses
Mom's first ride
Want a copy of my valve adjust spreadsheet for your 2-valve per cylinder engine? Send me an e-mail request (not a PM)
(Click on my username in the upper-left corner for e-mail info.)
-
TheCafeKid
Originally posted by Steve View PostHave you browsed the Carb Cleaning Series in the Garage Section?
Lots of good information and good pictures, too. Be careful with the "fine wire". If it is steel, like a torch tip cleaning tool, keep it in the tool box. Better to use a strand or two of copper from a piece of 10- or 12-gauge copper wire. It is soft enough that it will not gouge out the brass jets like a steel wire will.
Along with the "fine wire" and air pressure, you need carb cleaner spray and SAFETY GLASSES. :shock:
There are passages in the carb that will spray right back into your face, so be careful.
.
Comment
-
Forum SageCharter Member
Past Site Supporter- May 2002
- 3869
- The Gulf Coast of south Florida in the winter and northern Nevada in the summer
Yes!
Right! I just don't understand the passages and what goes from where to where.
In other words, if I push a thin wire through the mixture screw opening, where will it end up?
What if I push a wire through the tube where the removed pilot jet was removed from..where will it end up?
Will they end up in the same place??
If you know the answer to these questions...that would be most helpful!!
Thanks, as always!:-D1980 GS1100E....Number 15!
Comment
-
walt
i have read these carb posts over and over on so many bike sites. i don't care what my carbs look like on the outside. i refuse to do repeated cleanings to get the pilot circuits cleared. waiting over night is too long. i use gumout carb+choke cleaner and question anyone that claims that berrymans or what ever works better. find a set of carbs that have an 1/8 or more of varnish buildup in the float bowls. berrymans won't clean it as fast or as clean as gumout period. a toothbrush and gumout will have them looking as clean as new in no time at all. the pilot circuits should be cleaned both ways with gumout and compressed air both ways with the pilot screw and the pilot jet removed. you can even use an electric air pump aka black&decker air station will do the trick. the only trick is to repeat the cleanings in both directions at least three to four time just to be sure. gumout can dissolve varnish so fast it's easy to clean carbs back to right. for those who have the mikuni BS carbs do clean the choke tube and the jet in the carb bowl too. maybe you guys in california can't buy gumout anymore. ask for someone to send you a couple of cans or a case. cleaning carbs is not a mystery nor is it difficult.Last edited by Guest; 12-10-2007, 10:58 PM.
Comment
-
Ironriot
I'm with you on the Berryman's sucking at cleaning. I used it and it turned my parts black with some kinda wierd film. Its almost impossible to take off
Comment
-
1983 GS 1100E w/ 1230 kit, .340 lift Web Cams, Ape heavy duty valve springs, 83 1100 head with 1.5mm oversized SS intake valves, 1150 crank, Vance and Hines 1150 SuperHub, Star Racing high volume oil pump gears, 36mm carebs Dynojet stage 3 jet kit, Posplayr's SSPB, Progressive rear shocks and fork springs, Dyna 2000, Dynatek green coils and Vance & Hines 4-1 exhaust.
1985 GS1150ES stock with 85 Red E bodywork.
Comment
-
Forum SageCharter Member
Past Site Supporter- May 2002
- 3869
- The Gulf Coast of south Florida in the winter and northern Nevada in the summer
Thanks!
Thanks, Bill! As I have often read regarding carbs, everything is related. I guess I'll need to work that wire as best as possible and see how it goes from there. Your picture is the best I've ever seen of the pathway. Thank you!1980 GS1100E....Number 15!
Comment
Comment