.png "Powered by vBulletin")
Could someone please give me detailed directions on how to wire my headlight to a three way toggle switch. One side of the toggle for low beam. The other side for high beam. My left hand control broke and I just want a clean handlebar look. So, the toggle switch is my answer. I also want to wire my turn signals to a toggle. My bike is near cmpletion. This is my last ordeal. So any help is appreciated.
-
-
First of all ... what bike are we talking about? :shock:
Next ... do you currently have a headlight switch on the bike? If you do, do you want to retain the ability to turn the light off, or would you like the simple elegance of having the light come on with the ignition switch and then having a simple switch to select high/low beam?
Either one is rather easy, but let me know which diagram to send you.
.sigpic
mine: 2000 Honda GoldWing GL1500SE and 1980 GS850G'K' "Junior"
hers: 1982 GS850GL - "Angel" and 1969 Suzuki T250 Scrambler
#1 son: 1986 Yamaha Venture Royale 1300 and 1982 GS650GL "Rat Bagger"
#2 son: 1980 GS1000G
Family Portrait
Siblings and Spouses
Mom's first ride
Want a copy of my valve adjust spreadsheet for your 2-valve per cylinder engine? Send me an e-mail request (not a PM)
(Click on my username in the upper-left corner for e-mail info.) -
I'm sorry, its for a 1981 gs850gl. At this point I would just settle for having it turn on when the bike is turned on. However, I would like to be able to alternate from low beam to high beam when needed. I do not have the original control. However, I know what wires are for high beam/low beam.Comment
-
Here ya go.
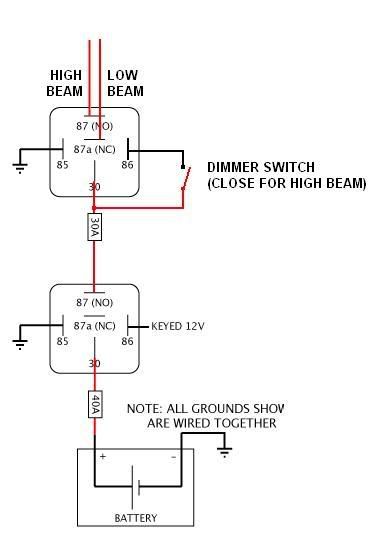
Installation will be nicely done with two relays. The one closest to the battery can be found at any auto parts store as a fog light relay. The second one needs to be a double-throw relay. Easily found at Parts Express. Inexpensive, too, and this same relay will work for both positions. They also have sockets available to help with wiring the relays.
In this diagram, the first relay is triggered by turning on the ignition key. The second relay passes current through the NC (normally closed) terminal to the low beam. When you flip the switch (it can be a sub-mini switch from Radio Shack), the current then goes out the NO (normally open) contacts to the high beam.
 sigpic
mine: 2000 Honda GoldWing GL1500SE and 1980 GS850G'K' "Junior"
hers: 1982 GS850GL - "Angel" and 1969 Suzuki T250 Scrambler
#1 son: 1986 Yamaha Venture Royale 1300 and 1982 GS650GL "Rat Bagger"
#2 son: 1980 GS1000G
Family Portrait
Siblings and Spouses
Mom's first ride
Want a copy of my valve adjust spreadsheet for your 2-valve per cylinder engine? Send me an e-mail request (not a PM)
(Click on my username in the upper-left corner for e-mail info.)Comment
-
Darn Nice work Steve. You are the man.Comment
-
Thanks, but let's give credit where credit is due. 8-[
I just borrowed the left half of demark's thread on wiring his Electrosport speedo, horn and heated handgrips, then adapted it to strictly headlight use.
.sigpic
mine: 2000 Honda GoldWing GL1500SE and 1980 GS850G'K' "Junior"
hers: 1982 GS850GL - "Angel" and 1969 Suzuki T250 Scrambler
#1 son: 1986 Yamaha Venture Royale 1300 and 1982 GS650GL "Rat Bagger"
#2 son: 1980 GS1000G
Family Portrait
Siblings and Spouses
Mom's first ride
Want a copy of my valve adjust spreadsheet for your 2-valve per cylinder engine? Send me an e-mail request (not a PM)
(Click on my username in the upper-left corner for e-mail info.)Comment
-
I hate to disagree with Steve, but I disagree with most of the above.Originally posted by Steve View Post
First of all, the fuses ... 40 amp !!! WTF !!!
Thats WAY to high. If the headlamp is a 65 watt one, then a 5 amp fuse is right. If you have a bigger headlight (up to 130 watts) then a 10 amp fuse. If you want to be really conservative, then 7.5 or 15 amp above.
If you get a dead short, it won't matter, both a 10 amp and a 40 amp fuse will blow. But if a wire gets worn through, and only a strand or two short out, the difference may matter, with a smaller fuse blowing, and a larger one letting a fire happen.
2nd, why is the 30 amp fuse there at all, it's not needed, just a waste of time, effort, and money.
3rd, why the bottom relay?
nicholascott says he know which wires are for the headlight.
Presumeably that means he knows which wire was the one bringing 12 volts into the original headlight switch. Just use that wire as your 12 volt source. If he was adding higher power lights, which would burn out the ignition switch, then sure ... but to get the OEM lights working, just use the provided switched 12 volt source from the wiring harness.
4th, why the top relay.
Just use a SPDT switch rated at least 5 amps (or 10 amps if your light is more than 65 watts but less than 130)
----
The whole thing is WAY WAY WAY more complicated than it needs to be.
He doesn't need any fuses or relays. Just one switch. Thats all.
Take the switched 12 volt wire that was originally going into the headlight switch, and connect it to the center terminal of a SPDT switch rated at least 5 amps (or 10 amps if your light is more than 65 watts but less than 130).
Connect the high beam wire to one of the outside terminals, connect the low beam wire to the other outside terminal.
Done !!!
Appropriate switches from radio shack appear to be:
Model: 275-603, Model: 275-711, Model: 275-635, Model: 275-652, Model: 275-691, 275-695, Catalog #: 275-636, Model: 275-663
(note, some of these are DPDT. That just means you would have an extra set of terminals on the switch that are not used)
I'm sure Pep Boys or any other auto store has appropriate switches too.
Make sure they say 5 amps and SPDT (numbers bigger than 5 and DPDT are ok too, see above)
---
That gets you lights on whenever the ignition is on. If you want to be able to turn the lights off too, there are 2 options.
1) Instead of using a switch labled as "SPDT" you would use one labled "SPDT - center off" like RS Model: 275-654. You would hook up as above. I don't recommend this option because it would be more difficult to see (or tell by feel) what you have your lighting set to.
2) Take the switched 12 volt wire that was originally going into the headlight switch, and connect it to one terminal of a SPST switch rated at least 5 amps (or 10 amps if your light is more than 65 watts but less than 130).
Connect a wire to the other terminal, and connect the other end of that to the center terminal of a SPDT switch rated at least 5 amps (or 10 amps if your light is more than 65 watts but less than 130).
Connect the high beam wire to one of the outside terminals, connect the low beam wire to the other outside terminal.
So this method adds an on-off switch to the very first description.Comment
-
Actually, going back and re-reading his original request, I have second, or many third thoughts. Any of the switches readily available at Radio Shack are not realy weather-resistant, let alone waterproof. His best bet would be to find a left switch assembly from one of the bikes that uses a single switch for turn signals and high/low beam selection. This auction on eBay will be over soon, but is an example. Seems that this switch is standard on '82 and newer GSs.Originally posted by bakalorz View Post
.Last edited by Steve; 01-17-2008, 03:24 PM.sigpic
mine: 2000 Honda GoldWing GL1500SE and 1980 GS850G'K' "Junior"
hers: 1982 GS850GL - "Angel" and 1969 Suzuki T250 Scrambler
#1 son: 1986 Yamaha Venture Royale 1300 and 1982 GS650GL "Rat Bagger"
#2 son: 1980 GS1000G
Family Portrait
Siblings and Spouses
Mom's first ride
Want a copy of my valve adjust spreadsheet for your 2-valve per cylinder engine? Send me an e-mail request (not a PM)
(Click on my username in the upper-left corner for e-mail info.)Comment
-
Gee, that image looks familiar! =)
Anyway, go see my list of parts on the "Electrosport speedo" thread. There is a switch from trail tech that will meet your needs. It is a three position switch (off/low/high) and a momentary contact switch ... they call it a kill switch, but if you don't hook one of the leads to ground, it is just a normal switch. As such, you could use it for a horn.
You can find it at:
As for the fuses on my original diagram, the one for the headlight could be a 10A and the main could probably be a 30A.Comment
-
Everybody thanks for the great response. Well, I got my headlight wired up and working just fine. And it wasn't all that hard. Especially with the very detailed responses I received. Thank you. Now on to wiring my turn signals to a toggle!Comment
-
Last edited by Steve; 01-18-2008, 05:23 AM.sigpic
mine: 2000 Honda GoldWing GL1500SE and 1980 GS850G'K' "Junior"
hers: 1982 GS850GL - "Angel" and 1969 Suzuki T250 Scrambler
#1 son: 1986 Yamaha Venture Royale 1300 and 1982 GS650GL "Rat Bagger"
#2 son: 1980 GS1000G
Family Portrait
Siblings and Spouses
Mom's first ride
Want a copy of my valve adjust spreadsheet for your 2-valve per cylinder engine? Send me an e-mail request (not a PM)
(Click on my username in the upper-left corner for e-mail info.)Comment

Comment