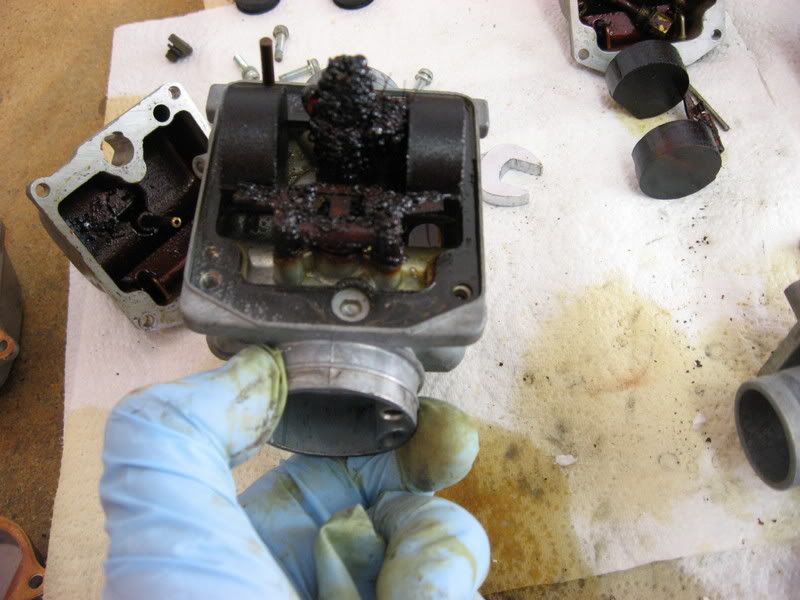
I did indeed spray the hell out of every orifice in the carbs....I followed the link on page 2 of this thread which shows all internal parts removal.I also used it to make sure I didnt miss any air or fuel passages I needed to poke or spray clean.I even made sure to make and use the "special tool" lol.Right now the carbs look nearly new inside.Once I get my intake boot o-rings I can re-install everything, seal it up, and then see where I am at with things...
-
Last edited by Guest; 02-20-2008, 07:07 PM. -
Ed
To measure is to know.
Mikuni O-ring Kits For Sale...https://www.thegsresources.com/_foru...ts#post1703182
Top Newbie Mistakes thread...http://www.thegsresources.com/_forum...d.php?t=171846
Carb rebuild tutorial...https://gsarchive.bwringer.com/mtsac...d_Tutorial.pdf
KZ750E Rebuild Thread...http://www.thegsresources.com/_forum...0-ResurrectionComment
-
I've rebuild several sets of GS carbs so far and even on the cleanest ones, when I pulled the carbs apart and un-ganged them the connection tube O-rings crumbled in my hands. Also as said before, the pilot jets and the pilot screw passages need to be spotless or the bike will not run right.Ed
To measure is to know.
Mikuni O-ring Kits For Sale...https://www.thegsresources.com/_foru...ts#post1703182
Top Newbie Mistakes thread...http://www.thegsresources.com/_forum...d.php?t=171846
Carb rebuild tutorial...https://gsarchive.bwringer.com/mtsac...d_Tutorial.pdf
KZ750E Rebuild Thread...http://www.thegsresources.com/_forum...0-ResurrectionComment
-
Disassemble the carbs THEMSELVES but do NOT separate the carbs from each other onless the o rings in the supply tubes BETWEEN them are leaking! Leave the carb rack all together if you don't have leaks there! You will only be creating WAY more work than you need otherwise. Pull out ALL of the jets in the carbs & clean them WELL with carb cleaner & a welding torch tip cleaner. Use the smallest tip cleaner that will work & don't force it in. If it won't fit, use a smaller one. Pay SPECIAL attention to the PILOT jets(the ones under the rubber plugs) as they will make it impossible to run off choke if they are clogged. Also, after you drill the plugs for the mixture screws, spray WD-40 in the tops of the screws & let it soak in overnight before EVER trying to move the screws. Those screwheads are SOOO easy to destroy if you try to rush things! After EVERYTHING is clean enough to eat off of, reassemble everything after spraying just a LITTLE WD-40 in ALL of the jet passages before you screw the jets in. Don't worry, it will all dilute when you fill the carbs with gas. If you can find a way, fill the carbs to check for leaks before you put them back on the bike as this makes it WAY easier to fix leaks without wasted effort & the nightmare of trying to get them in & out. Just so you know, the air box is almost IMPOSSIBLE to take off the bike without either destroying it or removing the engine first. I know these bikes VERY well as I have been working on GSs since they came out. PM me for my phone # if you want help while you are actually doing it. I guarantee you I can save you a LOT of time & headache! Good luck & welcome to the Resources! Ray.Comment
-
Just so you know, the air box is almost IMPOSSIBLE to take off the bike without either destroying it or removing the engine first.
Ray.....It only took 15 minutes after I ever began working on the bike to realize this fact.The shape of the airbox and the way it fits between the carbs and the frame of the bike makes for a nearly impossible mission of taking the airbox out....its 100 percent fact that if I were to get it out, and get the carbs back on FIRST, that there is NO WAY to get the airbox back in. I guess its just going to be the PUSH/PULL/CUSS method of getting things sealed up on friday....With the exception of seperating the carbs from eachother I have these things spotless...all jets and passages are clean and clear......Comment
-
Ray-
I've read enough of your posts here to demonstrate to me that you are knowledgeable as well as helpful. Regarding not un-ganging the carbs though, you are dead wrong. I've rebuilt several sets of GS mikuni's and in each case the O-rings on the interconnect tubes crumbled in my hands when touching them. Not good. It's well worth the effort to pull the carbs apart and assure everything is properly sealed before moving forward.
Keep up the good work.
EdEd
To measure is to know.
Mikuni O-ring Kits For Sale...https://www.thegsresources.com/_foru...ts#post1703182
Top Newbie Mistakes thread...http://www.thegsresources.com/_forum...d.php?t=171846
Carb rebuild tutorial...https://gsarchive.bwringer.com/mtsac...d_Tutorial.pdf
KZ750E Rebuild Thread...http://www.thegsresources.com/_forum...0-ResurrectionComment
-
Those carbs I would dip. But most carbs don't look anything like that.
Carburetors aren't some mystical thing. It's easy enough to determine whether you've got all the passages clean or not. Squirt in one orifice and observe it coming out the appropriate other ones properly. Repeat for all orifices.
There's no reason to disturb the mid-tube o-rings. If they're not leaking, leave 'em together and they'll probably stay not-leaking. The only time I've battled leaks in that area is when I separated them. The passages between the carbs are large and it's easy enough to make sure they're not obstructed without dismantling the rack.Comment
-
I only agree with that IF the carbs are leaking there when you test fill them BEFORE putting them on the bike. The ONLY ones I've ever had to change were on bikes that had been parked for more than 3 or 4 years & had long enough to dry out AND deteriorate. But, yes, they can be an issue. Ray.Comment
-
Well just an update guys...I got my new intake boot o-rings and got them on.My air filter is in place, got the carbs back on, and started the bike tonight...At this point I think I have a good intake leak going on. When I started the bike the RPM's immediately go up to about 4000 and hang there. Im going to go out and go over all the boots again I guess....any other suggestions are of course welcome...thanks guysComment
-
Also I have a question....I just noticed I have 2 exhaust bolts that are snapped off. Thats gonna be a great time to drill and tap at a later date...Well would the exhaust leaks cause any problems with me trying to get the motor running right? Should I make these two repairs first?Comment
-
Fellow owner of GS700ES (Same Bike)
I've read all the posts and agree on lots of various points. I also aquired a bike that was sitting for ?? years outside in New England weather with the carbs OFF! I completly went through the carbs, they were missing rubber pilot jet plugs/1 wrong needle jet and slide/spring etc.. I spent 40-50 bucks just trying to get parts. The y-5 needle jet is not made any longer! Any way I found a complete set on E-bay and won the bid for a total of $53.00 with shipping! What a deal! I was able to get it running with the other set but not very well. The set I got off of E-bay were very clean, I decided to just slap them on and see what they would do? It ran pretty decent, but would stumble when the throttle was wrapped up.. (They had all stock jetting!) I have a 4 into 1 pipe and UNI pods (worn out) and heard that I needed to go up 2 sizes from 122.5 (stock for BS32SS) to 130.0's and what a complete difference NO stummble, I actually took it out on the road for the first time today (30 deg brrr). It runs pretty good but I still need to go up one size on the pilot jet from (stock 37.5 without holes) to a 40.0 without holes and that should do it. (DID NOT SOAK) but used 1-2 cans and many hours of cleaning/wire wheeling and various other methonds of cleaning. I bought the O-ring kit and new Intake O-rings (must do) and now need to transfer all of those NEW items over to the carbs I just got.
P.S. look on my previous post on a easy way to put the carbs back on (2x4 piece of wood)..Comment
-
Leaks on the exhaust side could make things interesting. It's definitely a priority to fix, but I'm not sure it's what's causing your current issue of revving to 4k on its own.
Have you checked that the choke (enrichener) isn't stuck on and make sure the idle screw in the rear between #2 and #3 is adjusted properly? Is your throttle cable too tight? Is the vacuum from #2 carb to petcock either plugged or hooked up with no leaks? Are the sync ports in the intake runners sealed well? Are any of the intake rubbers folded over (not seated right) or not clamped?
And, just to be thorough, you do know it's normal for the bike to hold a high RPM while the choke is on during warmup?Last edited by Guest; 02-25-2008, 12:26 PM.Comment
-
the revving up to 4k could mean a cable is stuck , either the choke or throttle. another thing is the choke slides could be stuck. another thing that could be wrong is your idle screw is in too far. does the engine speed stay steady or does it fluctuate?
you might want to balance your carbs too.Comment
-
Ok..I meticulously went over all the rubber boots...Im totally convinced they are sealed up tight now. My throttle cable appears to have some slack in it down by the carbs, and my choke cable and/or slide are not stuck.
After I sealed up the boots properly that made a huge difference in the idle and it stayed around 1000 Rmps.I have the air screws backed out 1 1/2 turns. I noticed that the #1 and #2 header pipes get WAY too hot to touch (learned that the only way someone could) and I know that I have a bolt snapped off and exhaust leak in each of the #3 and #4 header pipes...so Im sure thats why they are much cooler to the touch
Also, my air filter smells like gas......its not saturated, and there is no liquid in the airbox...but it definitely smells like fuel.....brand new K&N with gas in it...
I dont understand why, but when the bike was idling I could not operate the throttle AT ALL......it either bogged it down or stalled completely....so frusterating to not be able to figure this out and move on to putting new rubber and brake pads on this thingLast edited by Guest; 02-26-2008, 07:48 PM.Comment
Comment