Announcement

Collapse
No announcement yet.

Carb Rebuild series question

Collapse
X
 
  • Filter
  • Time
  • Show
Clear All
new posts

    Carb Rebuild series question

    Everyone always asks what led to the question so here it is.

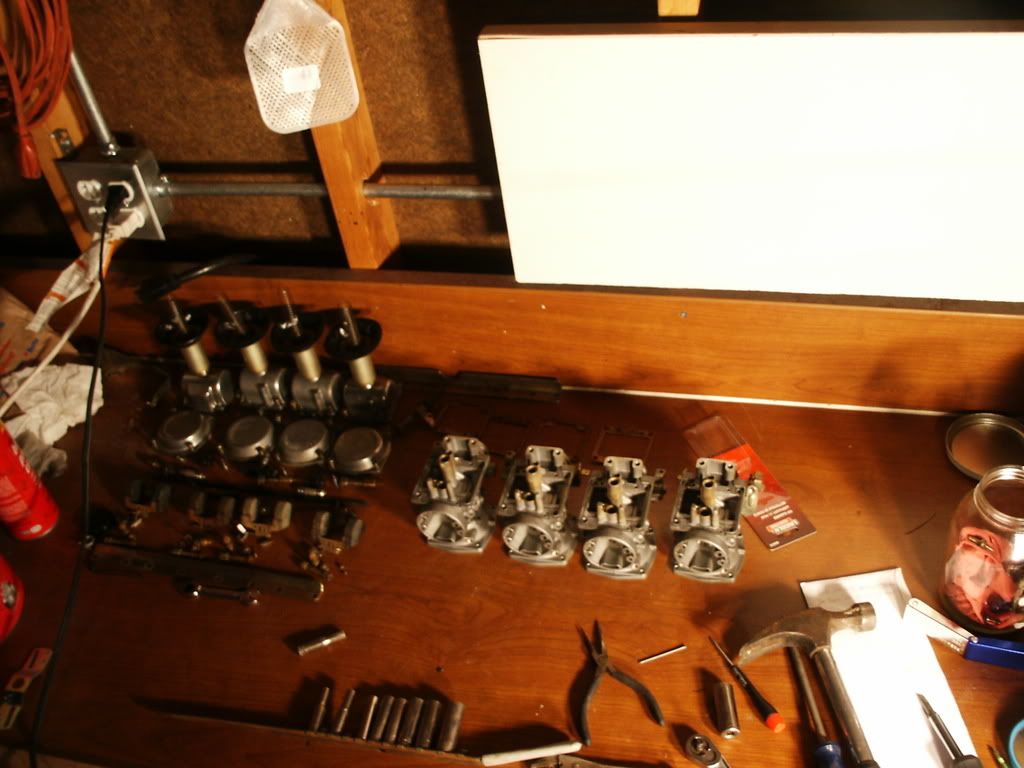
    Road Rash's bike sat for a few years and the carbs got all gummy: 82 GS1100GL; 10G on the clock. Anyways, I tore the carbs down (did not separate), and poked, prodded, cleaned with carb spray and installed what I am assuming to be shoddy aftermarket needles. (partsnmore)

    The bike has recently within 500 miles had
    1) valves adj (shims)
    2) new manifold boots and o-rings with a tight airbox.
    3) Checked for any external air leaks and all checked out well, but still experiences a long warm up time... Idle screws are out 3_1/4 turns to achieve the highest RPM and then a tad richer.
    4) Of course they were sync'd

    Here's my first interesting observation, the fuel level in my bowls ( I also own an 82GS1100GL) were lower than his by 3 mm. Notice I didn't say float height, but actual fuel level was higher in his bowls than mine, yet mine runs like an ape and his still runs lean with the choke on for a long time. I assume something must be clogged that the little poking wire just couldn't get to. I even shot carb cleaner through the carbs and all orifices were open, or so I thought.

    1) So with the fuel level being higher in his bowls and his bike still running lean can we safely assume the needles(even though they are aftermarket) are ok? His original OEM needles were gummed stuck and warranted replacement and I didn't know any better at the time.

    2) Should I tell him to spring for new needles and seats (OEM) and new plugs (little black ones in the carb) for the bike?

    3) I also noticed in the carb rebuild series the butterfly was never removed and the carb was dipped, but what about the seals on the outside of the butterfly shaft? 13651-51010's? 2 per carb. Do they not get destroyed by the carb dip?

    I did pick up the Berryman's carb dip, but was concerned about the butterfly seals being chewed up and causing further problems. The screws are peened in the shaft and would most likely be a real chore to pull them out and then to have to purchase new screws if they didn't chew up the shaft.

    Any thoughts or comments welcomed.

    P.S. I did compare my factory OEM needles to the aftermarket and I could tell a difference with how the spring tension was. It was still a baffling discovery to find out the carbs with the higher fuel level run lean.

    I also have a Robert Barr O-ring kit that will be installed.

    Thanks for your time!

    #2
    My guess is that the issue relates to the needles and maybe some internal leaks due old o-rings.

    Your question about seals on the shafts is a good one, not sure about the answer. I do know that the carbs should be fully broken down and the o-rings on the interconnection tubes should be replaced since these o-rings typically are hard and brittle.

    If you still have the stock needles I'd put them back in. Pay attention to the needle height - there should be a plastic washer on top of the needle. Reducing the thickness of this washer richens the mixture some and is recommended by people like me that have had favorable results with this mod.

    Good luck.
    Ed

    To measure is to know.

    Mikuni O-ring Kits For Sale...https://www.thegsresources.com/_foru...ts#post1703182

    Top Newbie Mistakes thread...http://www.thegsresources.com/_forum...d.php?t=171846

    Carb rebuild tutorial...https://gsarchive.bwringer.com/mtsac...d_Tutorial.pdf

    KZ750E Rebuild Thread...http://www.thegsresources.com/_forum...0-Resurrection

    Comment


      #3
      Originally posted by Nessism View Post
      My guess is that the issue relates to the needles and maybe some internal leaks due old o-rings.

      Your question about seals on the shafts is a good one, not sure about the answer. I do know that the carbs should be fully broken down and the o-rings on the interconnection tubes should be replaced since these o-rings typically are hard and brittle.

      If you still have the stock needles I'd put them back in. Pay attention to the needle height - there should be a plastic washer on top of the needle. Reducing the thickness of this washer richens the mixture some and is recommended by people like me that have had favorable results with this mod.

      Good luck.
      Yes, I do have the RB kit to replace the o-rings between the carbs.

      The butterfly shaft seals is my biggest concern, but I was curious if anyone has removed them prior to dipping?

      I no longer have the stock needles because they ruined from sitting.


      You wouldn't happen to have a picture of this o-ring on top of the needle would you?


      Oh ya here is my current progress.

      Comment


        #4
        I did find this which raises a bit of concern about the carb rebuild series.


        arveejay wrote: on page 2


        There is a rubber seal on each end of the rod which the butterfly sits in. If you soak the carb without removing those seals they will melt and suck air to no end. The carb soak is very good IF the carbs are completely stripped only. If you don't completely strip them you should use spray cleaner only, and don't let it sit that way too long."

        Comment


          #5
          I have dipped several sets of carbs and never taken the butterflies out. Can't say that I have had a problem because of that, either. And no, I don't dip the carbs for the 15-30 minutes recommended on the can. I usually dip for 15-30 hours, and once accidentaly left one carb in for about 48 hours. It was a VERY clean carb with no problems. \\/


          .
          sigpic
          mine: 2000 Honda GoldWing GL1500SE and 1980 GS850G'K' "Junior"
          hers: 1982 GS850GL - "Angel" and 1969 Suzuki T250 Scrambler
          #1 son: 1986 Yamaha Venture Royale 1300 and 1982 GS650GL "Rat Bagger"
          #2 son: 1980 GS1000G
          Family Portrait
          Siblings and Spouses
          Mom's first ride
          Want a copy of my valve adjust spreadsheet for your 2-valve per cylinder engine? Send me an e-mail request (not a PM)
          (Click on my username in the upper-left corner for e-mail info.)

          Comment


            #6
            There’s a good bit of empirical evidence to suggest that using carb dip is acceptable and won’t appreciably damage the seals on the ends of the throttle shaft. My opinion is to go ahead but don’t leave them in the dip longer than over night. Rinse well with water once you pull them out and you should be fine.

            The needle has a spring underneath it which pushes it upward; the height of the washer stack ON TOP of the clip determines how high the needle sits relative to the slide. Replace the thick plastic washer with a shorter stack of thin washers, and you effectively raise the needle which will richen the mixture. This mod had a noticeable effect on my old 550 and I’m going to do my 850 soon.

            Hope this helps and good luck.
            Ed

            To measure is to know.

            Mikuni O-ring Kits For Sale...https://www.thegsresources.com/_foru...ts#post1703182

            Top Newbie Mistakes thread...http://www.thegsresources.com/_forum...d.php?t=171846

            Carb rebuild tutorial...https://gsarchive.bwringer.com/mtsac...d_Tutorial.pdf

            KZ750E Rebuild Thread...http://www.thegsresources.com/_forum...0-Resurrection

            Comment


              #7
              Back in the early 80s, when all the poorly-running bikes were trying to run with EPA-mandated lean jetting, one of the popular magazines (I don't remember which one) had an article on how to improve your GS400 and GS425. It involved no money and just a little time. What they suggested was to remove the needle, notice the location of the thin metal washer (under the clip) and the thick nylon spacer (over the clip) and reverse them. Like Nessism said, this will raise the needle. However, back when I was a newbie on this board, I suggested that to someone and quickly received a notice from Keith Krause who said that was not a good idea. I am still not sure why it's not a good idea, but he is the carb guro on this board. 8-[


              .
              sigpic
              mine: 2000 Honda GoldWing GL1500SE and 1980 GS850G'K' "Junior"
              hers: 1982 GS850GL - "Angel" and 1969 Suzuki T250 Scrambler
              #1 son: 1986 Yamaha Venture Royale 1300 and 1982 GS650GL "Rat Bagger"
              #2 son: 1980 GS1000G
              Family Portrait
              Siblings and Spouses
              Mom's first ride
              Want a copy of my valve adjust spreadsheet for your 2-valve per cylinder engine? Send me an e-mail request (not a PM)
              (Click on my username in the upper-left corner for e-mail info.)

              Comment


                #8
                I wasn't aware that you could adjust the needle height on the CV carbs.

                The needle I was originally speaking of was the needle and seat for the float.

                Comment


                  #9
                  Originally posted by Nessism View Post
                  There’s a good bit of empirical evidence to suggest that using carb dip is acceptable and won’t appreciably damage the seals on the ends of the throttle shaft. My opinion is to go ahead but don’t leave them in the dip longer than over night. Rinse well with water once you pull them out and you should be fine.

                  The needle has a spring underneath it which pushes it upward; the height of the washer stack ON TOP of the clip determines how high the needle sits relative to the slide. Replace the thick plastic washer with a shorter stack of thin washers, and you effectively raise the needle which will richen the mixture. This mod had a noticeable effect on my old 550 and I’m going to do my 850 soon.

                  Hope this helps and good luck.
                  If the carbs still want to be finiky, this will be the next mod I do!

                  Comment


                    #10
                    With respect to the rubber seals on the butterfly shaft...
                    I've had success with removing one seal and hanging the carb with steel wire from the handle of the ChemDip basket so only the other end of the shaft, the corresponding seal, and some of the engine side rim of the carb sit above the surface of the liquid. The rest of the carb is submerged and all of the important internal passages with it.
                    On my rack of GS850 carbs, three of them had the crank (?) held on one end of the shaft with a pressed in pin and the crank for the throttle cable had a 12mm nut. After removing the crank and return spring you can carefully pick the seal out with a small screwdriver before soaking the carb. Be careful not to tear it.
                    I've removed the butterfly plates on other CVs to remove the throttle shaft and seals. I'd say it is not worth it. Too many things to worry about with grinding the ends of the screws, peening the screws during reassembly, risk of damage to the shaft or carb throat during both operations, etc.
                    The reason I avoid submerging the shaft seals is because of a forgotten rubber part that I once fished out of my Chem dip container. I honestly don't know how long it sat in there, but when it went in it was smaller than a dime and when I fished it out it was about the size of a quarter. After about a week it shrunk back down to size. I can't imagine that it was good for the part. That experience leads me to believe that the shaft seals may swell up when soaked. Since the CV shaft seals are pretty well confined they probably don't expand too much if soaked but I would wager in the long run it is not good for the rubber.
                    One final note about cleaning...
                    Boiling the carb body in distilled water with lemon juice worked great! I can thank the GSResources for that suggestion. Boil for 20 minutes, 8oz of lemon juice to a gallon of distilled water. I never liked having to clean the ChemDip off the carbs after soaking. This time they went from the ChemDip to a quick dip in hot tap water and then right into the old tea kettle with the lemon solution (on a camp stove in the garage, it really smells bad!) Problem solved! I would recommend Real Lemon brand because it had no pulp. The store brand had pulp.

                    Comment


                      #11
                      Originally posted by Steve View Post
                      I have dipped several sets of carbs and never taken the butterflies out. Can't say that I have had a problem because of that, either.


                      .
                      Likewise. I've never heard of removing the butterfly shaft.

                      On one occasion, I had a carb in the sauce for perhaps 12 hours -- much longer than normal for me -- and the butterfly shaft seemed to be binding a little, as if the seals had swollen a bit from being in the Berryman's. That's why I suggest not dipping for longer than an hour, on my 'tips' sheet that I include with my kits.
                      and God said, "Let there be air compressors!"
                      __________________________________________________ ______________________
                      2009 Suzuki DL650 V-Strom, 2004 HondaPotamus sigpic Git'cha O-ring Kits Here!

                      Comment


                        #12
                        I put them in for the standard 30 mins each and then washed them in a mix of simple green/ hot soapy water.

                        After a soapy bath, I blew them dry with compressed air including every orifice I could cram air through. Everything seems smooth and clean. All four holes in the upper bore blew strong air on my finger so everything should be free and clear.

                        Road Rash ordered up stock float needles and seats along with the little rubber plugs. I want to be sure to get the float height dialed in as per other pictures depict on here.

                        Rob, I put your kit on the tubes, idle screws and am awaiting for the new seats to finish off the kit. I got a kick out of your little o-ring pictures on the envelope. Overall, a quality kit for sure!

                        I did note that the other o-rings on the tubes were a bit hard, so perhaps that was one of the problems as to why it was still a bit lean.

                        Comment


                          #13
                          i just posted in the off topic thread but anyone use the new chem-dip? i cant find the B9 here and only have the cali version (which most cali version anythings suck)

                          and i just ordered my Orings from Mr Barr and gaskets from Z1

                          i think you should carry the gaskets as well but./

                          anyways

                          Comment

                          Working...
                          X